Introduction
Ever want to take your projects to the next level by drawing many shapes with only a few lines of code? Imagine drawing a row of trees, a stack of books, the arches of a rainbow, or the inside of a honeycomb. To create visuals that are made with versions of the same shape, we go beyond coding individual shapes, and venture into the wonderful world of loops and arrays. Let’s learn how to create repeating patterns with only a few lines of code!
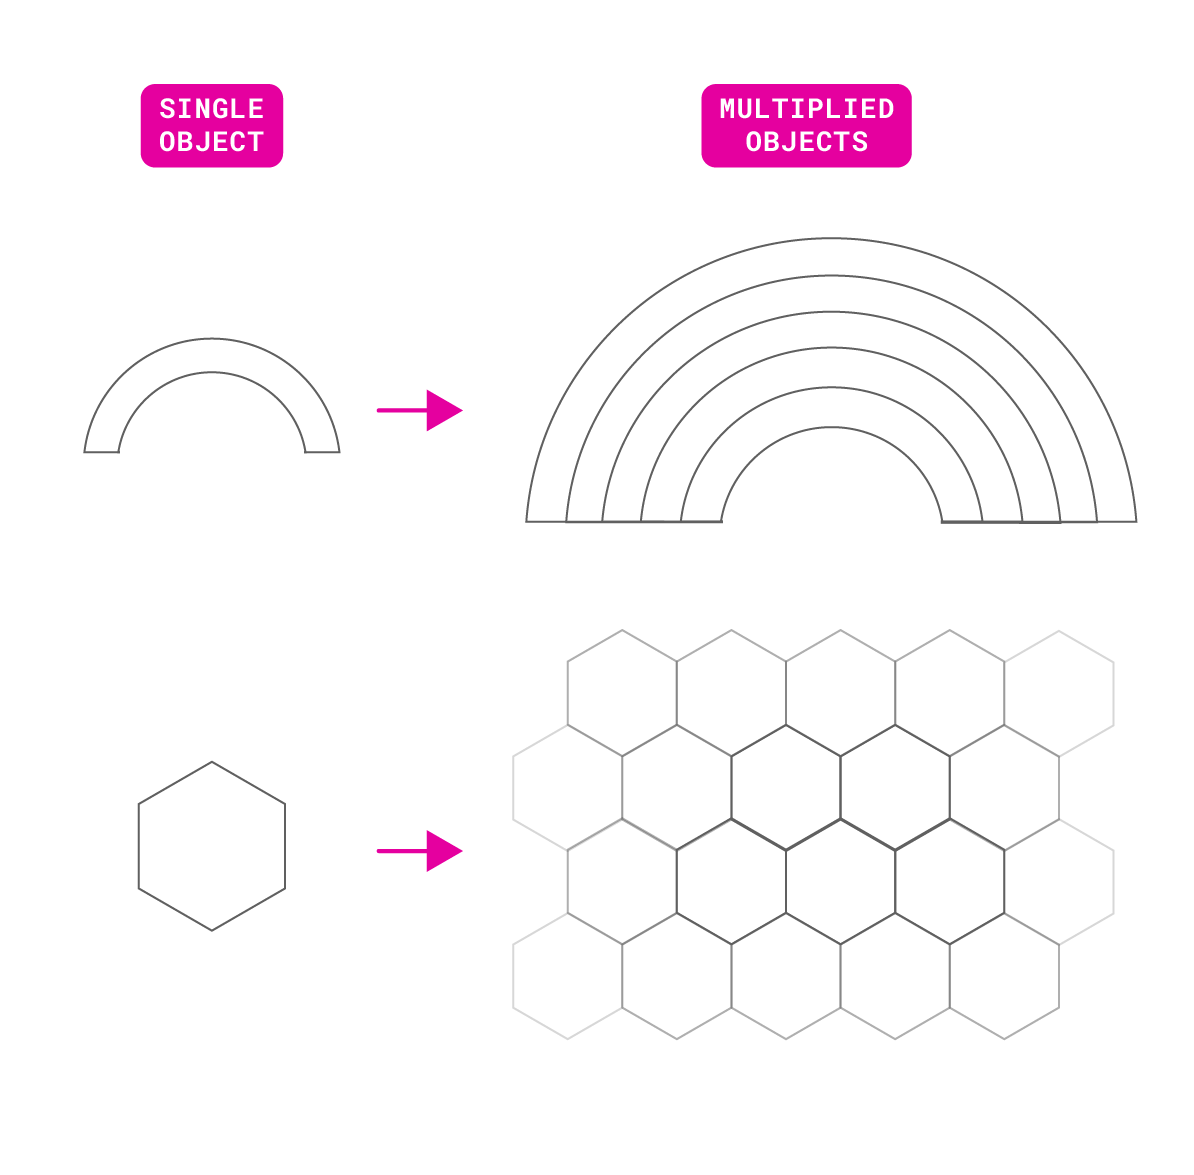
An arch and hexagon shape are vertically aligned with the label that reads “single object.” Arrows point from these shapes to corresponding patterns that are vertically aligned under a label that reads “multiplied objects.” The single arch points to five vertically stacked arches creating a rainbow shape. The hexagon points to many hexagon arranged in a honeycomb tessellation.
Drawing each shape with a new line of code would be a tedious process. Instead, we can use loops, which allow us to execute and repeat blocks of code as many times as we want. In this tutorial, we use loops and arrays to create a racing caterpillar sketch.
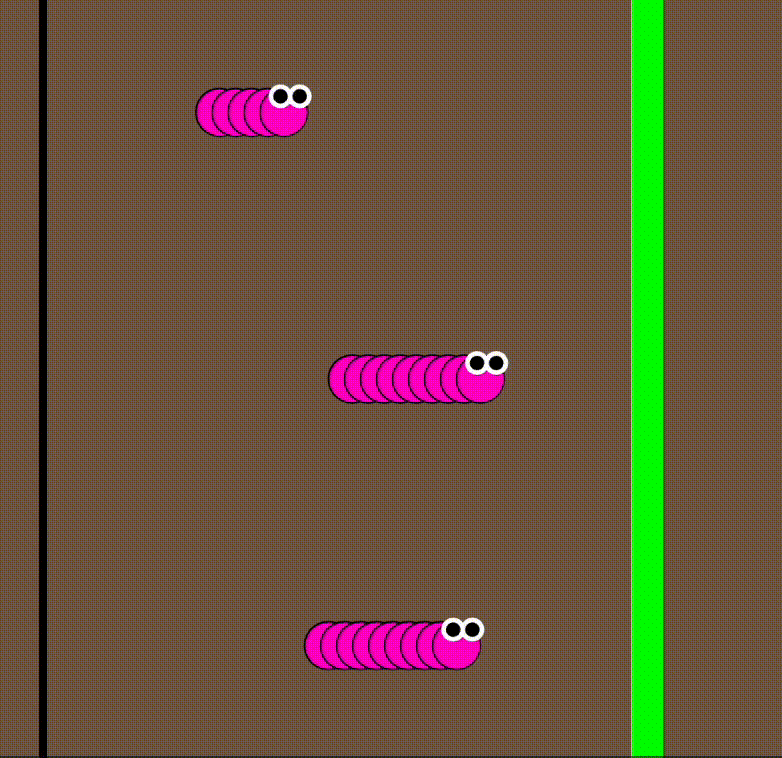
Three pink caterpillars crawling to reach a green finish line at the right of the canvas.
A group of caterpillars will begin at the starting line of the race, and the first caterpillar to pass the finish line wins. The winning caterpillar will vary each time we run the sketch!
In this tutorial, you will:
- Draw and update repetitive tasks and shapes using for loops
- Use custom functions to update variables and program states and make changes in the program as the sketch runs.
- Use conditional statements and
random()to generate different outcomes - Run and stop your sketch using mouse triggers and Boolean variables
- Store the positions of the caterpillars in an array
What you’ll need
- The p5.js Web Editor
- An understanding of p5.js drawing basic shapes and text using x- and y-coordinates
- You can refer to our previous tutorial, Get Started
- An understanding of variables and conditionals
- You can refer to our previous tutorials, Variables and Change and Conditionals and Interactivity
- An understanding of custom functions and parameters
- You can refer to our previous tutorial, Organizing Code with Functions
Step 1 – Draw the racetrack
- Open a new project in the p5.js Web Editor, give it a name like “Caterpillar Race”, and save it.
- In
setup(),create a 500x500 pixel canvas. - Declare two new global variables above
setup()to define the x-coordinates of your start line and finish line respectively. We will name the two variables startLine and finishLine.- Assign them values on the x-axis, depending on where you’d like to place your start and finish lines. In this example, we’ll set the startLine to 30, and finishLine to 360.
- In the
draw()function:- Set a background color. For example, we’ll set it to brown with
background(121, 96, 76); - Draw a rectangle and set its x-coordinate as
startLine. Set its height toheightso that it stretches vertically across the canvas. - Draw another rectangle at
finishLineand repeat the same step. - Fill the two rectangles with different colors.
- Set a background color. For example, we’ll set it to brown with
- Don’t forget to name and save your sketch.
Your code could look like this:
Step 2 – Draw one caterpillar segment and make it move.
Next, we will draw one segment of a caterpillar on the canvas and make it travel from the start line to the finish line. It will stop at the end of the race.
Declare a new global variable named
circXand assign it the value ofstartLine.- This will be the x-coordinate of the caterpillar’s segment.
Declare a new global variable named
circYand assign it the value of 250 (or half of the height).- This will be the y-coordinate of the caterpillar’s segment.
In
draw():- Draw the caterpillar segment using the
circle()function. IncludecircX,circY, and 50 as arguments to specify the x coordinate, y coordinate, and diameter:circle(circX, circY, 50); - We will also give the circle a white fill color and a thin black stroke.
- Under the circle command, increment
circXby 20 usingcircX += 20;- This means that every time the
draw()function runs, the variablecircXwill increase by 20 pixels. The sketch will draw a new circle at an x-coordinate 20 pixels to the right of the previous circle creating the shape of a caterpillar..
- This means that every time the
- Draw the caterpillar segment using the
Add the following conditional statement at the end of
draw():if (circX > finishLine) { noLoop(); }
The noLoop() function stops the draw() function from running again. The if statement stops draw() using noLoop() when the x-coordinate of the circle passes the value of finishLine. Visit the p5.js reference for more information about noLoop().
In setup(), add: frameRate(3);
- A frame rate is the number of times
draw()runs in one second. Setting it to a low number will make the movements more noticeable and dramatic for this animation.
Your code should look like this:
If-statements
If-statements, like the one applied above, refer to blocks of code that are executed only when a given condition is true. It is normally written:
if (<condition>) {
<code>
}
The condition is specified inside the parentheses of the if-statement. The curly brackets { } mark the start and end of the block of code. In Step 2, the condition circX > finishLine stops draw() from running again when the x-coordinate of the circle is greater than the value of finishLine by calling noLoop().
Visit the p5.js reference for if to learn more.
Step 3 – Draw one caterpillar
We will repeat the caterpillar segment from Step 2 to make a row of circles that make up the caterpillar’s body. We will use a for loop, to draw multiple circles in a row.
3.1 – Declare the properties of the caterpillar’s body
Above setup():
- Declare a new variable named
segmentsand assign it a value of 6.- This variable defines how many circles that makeup the caterpillar’s body.
- Declare a new variable named
spacingand assign it a value of 20.- This variable defines the pixel spacing between the caterpillars body segments.
- Declare a new variable named
segmentSizeand assign it a value of 50.- This variable defines the diameter of the circle body segments.
3.2 – Construct the caterpillar’s body with a for loop
In draw():
- After the code that draws the finish line, declare a new local variable
xto position all the body segments:let x = circX; - Add a for loop using:
for (let i = 0; i < segments; i += 1) { }- A for loop will repeat the code we write inside the curly brackets multiple times.
- Move the lines of code that draw the
circle()into the curly brackets of the for loop.
- After the for loop, add:
circX += spacing- This moves the caterpillar body to the right each time
draw()runs.
- This moves the caterpillar body to the right each time
Your code should look like this:
For loops
A for loop can execute a section (or block) of code multiple times. For loops can be written like this:
for (let i = 0; i < number; i += 1) {
// code that you want to execute number times
}
Inside the curly brackets {} of a for loop, we write the code that we want to execute repeatedly. We can specify the number of times we want the code to repeat by setting the loop’s condition.
A for loop is defined by three statements inside its parentheses, each separated by semicolons. They are:
| | | | | | |
| Initialization | Condition | Instruction |
Initialization: initialize the iteration variable
iwith a number to start counting with.let i = 0;Condition: the condition that keeps the loop running. As long as this condition is true, the for loop will continue to run. When this condition is
false, the for loop will stop.i < number;Instruction: this tells the program how to change the counting number each time the loop runs.
i += 1;
The first expression, let i = 0, initializes or starts the for loop.
- i is a variable that defines the initial state of the for loop. It’s also known as the index variable. Commonly, the index starts at a value of 0, and increases each loop. The name of this variable can be anything you like. Generally, single-letter variables such as
i,jandkare used, but feel free to use something more descriptive.
The second expression, i < number, is the condition for the loop to keep running. It is known as a Boolean expression, as this expression can return true or false. As long as this expression is true, the for loop will continue to run, and in this case the index variable (i) will continue to increase.
numbercan be any numerical value or variable that stores a numerical value. For counting, integers are often used.- Example:
i < 5;ori < segments;
- Example:
- In this case,
numberdetermines the number of times the for loop will run because the initial valueibegins at 0. - In the caterpillar example above, we set this value to the
segmentsvariable, which specifies the number of circles that make up the caterpillar’s body. As long as the index has not reached the number stored insegments, the loop will continue to draw circles.- Once the number of circles drawn is no longer less than segments, the program exits the for loop, and continues to the next line of code.
The third expression, i += 1, is how the index will change at the end of each loop iteration.
- A loop iteration refers to a single time a loop runs. For example, if a for loop runs 3 times, it has 3 iterations.
- In this example, the
ivariable will increase by 1 each time the for loop runs. That means the first time this for loop runs,iis 0. The second time the loop runs,iis 1. The third time it runs,iis 2, and so forth (until it reaches the valuenumber). This expressioni += 1can also be writteni++.
In summary:
- When a program executes a for loop, it first declares the loop’s index variable in the first expression.
- It checks the second expression, which is a Boolean expression. If it is
true,it runs the code written inside the curly brackets. - At the end of a loop, the value of the iteration variable,
i, changes as defined by the third expression. - The loop repeats this process until the condition in the second expression is
false. When the condition isfalse, the program exits the for loop and continues to the next lines of code in the sketch.
Visit the for loops reference to learn more.
3.3 – Add more details to the caterpillar
- Adjust the
fill()color for your caterpillar’s body if you wish to. In this example, we’ll give it a pink color:fill(255, 0, 200); - Draw the caterpillar’s eyes. The position of the eyes is the same as the x- and y-coordinates of the last circle that is drawn for the body. This means that it comes AFTER the for loop has already drawn all circles, so we will add the eyes after the for loop, but before
noLoop(). This ensures the eyes are drawn on top of the last circle in the caterpillars body.- Declare
eyeSizeas a new global variable abovesetup(),and assign it the value of 15. - Draw two circles.
- Give them a black fill and a thick white stroke.
- Add the first eye and set its coordinates and size:
circle(x, circY-eyeSize, eyeSize);- This places the eye at the top of the last drawn circle.
- Add the second eye and set its coordinates and size:
circle(x - eyeSize, circY-eyeSize, eyeSize);- We subtract the second eye’s x-coordinate by
eyeSizeso both eyes are side by side with no overlap.
- We subtract the second eye’s x-coordinate by
- Declare
- When your caterpillar is complete, organize your code into a custom function named
drawCaterpillar(). Feel free to modify the caterpillar as you like!- Define the
drawCaterpillar()function outside ofdraw(). - The function should include your for loop of circles for the caterpillar’s body and the two circles for the caterpillar’s eyes.
- Remember to call it in the
draw()function! TypedrawCaterpillar();indraw()before the if-statement that ends the loop.
- Define the
Here is how your sketch could look to far:
Play around with different sizes for the caterpillar’s body and eyes by adjusting the bodySize and eyeSize variables.
Step 4 – Generalize the drawCaterpillar() function
When the sketch first runs, we want each caterpillar to be at the starting line. This means we’ll need to add parameters to our function so that we can modify them to specify where the caterpillars are drawn.
- Go to the
drawCaterpillar()function.- Add
xas a parameter in the parentheses of the function:function drawCaterpillar(x) { ...}- Note that we had already declared
xas a local variable in thedrawCaterpillar()function. We can remove that declaration and use thexparameter instead.
- Note that we had already declared
- Add
yas the second parameter in the parentheses of the functionfunction drawCaterpillar(x,y) { ... }- Substitute
yforcircYin the function body.
- Substitute
- Add
You can learn more about custom functions, arguments, and parameters in our previous tutorial, Organizing Code with Functions, and the p5.js reference for functions.
Your custom functions should now look similar to this:
function drawCaterpillar(x,y) {
// Create a loop of circles
// to form the body.
for (let i = 0; i < segments; i += 1) {
fill(255, 0, 200);
stroke(0);
strokeWeight(1);
circle(x, y, 50);
x += spacing;
}
// Draw the caterpillar's eyes.
fill(0);
stroke(255);
strokeWeight(3);
circle(x, y - eyeSize, eyeSize);
circle(x - eyeSize, y - eyeSize, eyeSize);
}
- In
draw(), calldrawCaterpillar()three times to get three caterpillars
Your draw function should look like this:
function draw() {
// Draw the background.
background(121, 96, 76);
// Draw the start and finish lines.
noStroke();
fill(0);
rect(startLine, 0, 5, height);
fill(0, 255, 0);
rect(finishLine, 0, 20, height);
// Draw 3 caterpillars.
drawCaterpillar(circX,circY-150);
drawCaterpillar(circX,circY);
drawCaterpillar(circX,circY+150);
circX += spacing;
// End the loop when x
// reaches the finish line.
    if (circX > finishLine) {
  noLoop();
}
}
Step 5 – Create a drawCaterpillars() function
Now we have 3 caterpillars traveling across the screen at the same time. We can use a loop to draw the three caterpillars instead of three individual function calls to drawCaterpillar().
- Declare a new global variable above
setup()in your sketch for the number of caterpillars you want in the race:let numCaterpillars = 3; - Create a new custom function outside of
draw()and name itdrawCaterpillars()- Make a new for loop inside the
drawCaterpillars()function.- Initialize and start the loop’s variable at 0 in the loop’s first expression.
- Set the condition to
i < numCaterpillarsin the loop’s second expression. - Increment the loop’s variable in the third expression.
- Call
drawCaterpillar(circX, circY);inside the curly brackets of the for loop.
- Make a new for loop inside the
- In
draw(), calldrawCaterpillars();
Your draw() and drawCaterpillars() functions should look like this:
    let numCaterpillars = 3;

// ...variable declarations and setup

function draw() {
  // Draw the background.
  background(121, 96, 76);
  // Draw the start and finish lines.
  noStroke();
  fill(0);
  rect(startLine, 0, 5, height);
  fill(0, 255, 0);
  rect(finishLine, 0, 20, height);

  circX += spacing;

  // Draw the caterpillars on the canvas
  drawCaterpillars();

  // End the loop when x
  // reaches the finish line.
  if (circX > finishLine) {
    noLoop();
  }
}

function drawCaterpillars() {
  for (let i = 0; i < numCaterpillars; i += 1) {
    drawCaterpillar(circX,circY);
  }
}
The sketch should run but you will only see one caterpillar this time. This is because the three caterpillars are all drawn on top of each other. To fix this in the next step we will adjust the y coordinate of each caterpillar:
Step 6 – Position the caterpillars for the race
Recap! From Steps 3 and 4, we have two custom functions in our sketch.
drawCaterpillar(x,y)draws one caterpillar using the parameters x and y.drawCaterpillars()calls thedrawCaterpillar()function and places it inside a for loop so that we can draw multiple caterpillars.
Now, each caterpillar is at the same x- and y-coordinates. We will adjust the code in the for loop to space the caterpillars apart with the y-coordinate.
- Go to the
drawCaterpillars()function declaration.- Inside the for loop, add a new line of code:
let padding = height / numCaterpillars;- This declares a new variable called
paddingwhich determines the vertical space between each caterpillar. - We assign it the value of the canvas’s
height, divided by the number of caterpillars there are in the sketch. This divides the canvas vertically into rows (one for each caterpillar). The height of each row is the value ofpadding.
- This declares a new variable called
- Initialize the variable
yby assigning it this value:let y = (i + 0.5) * padding, whereydetermines the y-coordinate of each caterpillar.- Using the
ivariable, each iteration of the for loop positions a caterpillar in its own row - Adding 0.5 to
icenters the caterpillar in that row.
- Using the
- Inside the for loop, add a new line of code:
- Similar to Step 5, add
yas an argument in the parentheses of thedrawCaterpillar()function call.- The line of code should now be:
drawCaterpillar(circX, y);
- The line of code should now be:
In summary, we have assigned x and y as parameters to be used inside the drawCaterpillar() function. We use circX and y as arguments when calling this function in drawCaterpillars().
You can learn more about custom functions, arguments, and parameters in our previous tutorial, Organizing Code with Functions.
Your drawCaterpillars() function should look like this so far:
    function drawCaterpillars() {
  for (let i = 0; i < numCaterpillars; i += 1) {
    let padding = height/numCaterpillars;
    let y = (i + 0.5) * padding;

    drawCaterpillar(circX, y, 6);
  }
}
Drawing with for loop index variables
The index variable of a for loop (i) can incrementally increase or decrease with every loop iteration. In this tutorial, the i variable starts at 0 and increases by 1 each time the for loop runs.
- The first time this for loop runs,
iis 0. - The second time the loop runs,
iis 1. - The third time it runs,
iis 2, and so forth.
We can use index variables in our drawings to add, subtract, multiply and divide numbers so their result is different for every iteration of the for loop.
In this example, we use i to calculate consistent spacing between each caterpillar (see table below):
- During the first iteration
iis 0 andyis0.5 * padding. The first caterpillar is drawn with that y value. - During the second iteration,
iis 1 andybecomes1.5 * padding. The second caterpillar is drawn at the new y value. - During the third iteration,
iis 2 andybecomes2.5 * padding. The third caterpillar is drawn at the new y value.
Caterpillars (Loop iterations) |
|
|
|---|---|---|
First | 0 |
|
Second | 1 |
|
Third | 2 |
|
drawCaterpillar() and drawCaterpillars() should now look like this:
    // ... variable declarations, setup(), and draw()

function drawCaterpillars() {
  for (let i = 0; i < numCaterpillars; i += 1) {
    // Space between each caterpillar.
    let padding = height / numCaterpillars;
    let y = (i + 0.5) * padding;

    // Draw the caterpillar
    drawCaterpillar(circX, y);
  }
}

function drawCaterpillar(x, y) {
  // Create a loop of circles
  // to form the body.
  for (let i = 0; i < segments; i += 1) {
    fill(255, 0, 200);
    stroke(0);
    strokeWeight(1);
    circle(x, y, 50);

    x+=spacing;
  }

  // Draw the caterpillar's eyes.
  fill(0);
  stroke(255);
  strokeWeight(3);
  circle(x, y - eyeSize, eyeSize);
  circle(x - eyeSize, y - eyeSize, eyeSize);
}
Here is how it should look all together:
Change the value of the numCaterpillars global variable and see how the for loop in drawCaterpillars() spaces them out vertically on the canvas.
Step 7 – Create an array to save the position of each caterpillar
Now that we’ve positioned the caterpillars vertically on the canvas, we want to give each one a unique x-coordinate. We can do this using an array. The array will contain the x coordinates for each caterpillar. Then we can move the caterpillars randomly across the screen, making a race possible.
7.1 – Create an array
- Declare the
caterpillarEndsarray right afternumCaterpillars:let caterpillarEnds = [];- This array will hold the x position for the leftmost segment for each caterpillar.
You will learn more about arrays in the next tutorial, Data Structure Garden. Visit the MDN reference for arrays to learn more.
- In
setup(), add the x coordinate for each caterpillar, placing them all on the start line.- Make a for loop that will repeat once for each caterpillar:
for (let i=0; i < numCaterpillars; i++) { } - Inside the curly braces, add the line
caterpillarEnds.push(startLine);- This will add the value
startLineto thecaterpillarEndsarray once for each caterpillar that needs to be drawn in the sketch. - The
.push()method is used to add a new value to the end of an array.
- This will add the value
- Make a for loop that will repeat once for each caterpillar:
Now setup() should look like this:
    function setup() {
  createCanvas(500, 500);

  // Set a slow frame rate.
  frameRate(6);

  for (let i=0; i < numCaterpillars; i++) {
    //add the position of last segment into an array
    caterpillarEnds.push(startLine);
  }
}
- In the
drawCaterpillars()function, change the linedrawCaterpillar(circX,y):- Instead of using
circX, we will now use the values in thecaterpillarEndsarray. - Since the index
iin the for loop represents the correct index position in thecaterpillarEndsarray, we can changecircXtocaterpillarEnds[i]:drawCaterpillar(caterpillarEnds[i], y);
- Instead of using
- Remove
circXfrom the function.- Note:
circXis still used at the end ofdraw(). Go ahead and remove that and we will add it back later.
- Note:
Your drawCaterpillars() function should look like this:
    function drawCaterpillars() {
  for (let i = 0; i < numCaterpillars; i += 1) {
    // Space between each caterpillar.
    let padding = height / numCaterpillars;
    let y = (i + 0.5) * padding;

    // Draw caterpillars using an array.
    drawCaterpillar(caterpillarEnds[i], y);
  }
}
7.2 – Move the caterpillars randomly
Create a new custom function outside of
draw()and name itmoveCaterpillars()Define a new for loop that iterates the same number of times as there are caterpillars:
for (let i = 0; i < numCaterpillars; i += 1) { }- This is the same for loop syntax used in the
drawCaterpillars()function as it allows you to individually refer to each caterpillar.
- This is the same for loop syntax used in the
Within the loop, assign a local random value to
move:let move = random(5,30);Once the race begins, this will randomly move each caterpillar between 5 and 30 pixels to the right each time
draw()runs.You can modify the values in
random()depending on the range of motion you want for your caterpillars. Visit the p5.js reference forrandom()to learn more.
Your function could look like this:
    function moveCaterpillars() {
  for (let i = 0; i < numCaterpillars; i += 1) {
    //Give each caterpillar a
    //random speed.
    let move = random(5, 30);
    caterpillarEnds[i] += move;
  }
}
In summary, the order of events in the function above is:
- For every loop iteration, we assign
moveto a random number between 5 and 30.- This means every caterpillar is assigned a different random
move.
- This means every caterpillar is assigned a different random
- Then we update the value in the
ith position in thecaterpillarEndsarray, which is what thedrawCaterpillar()function uses to display the caterpillar.
7.3 – Move the caterpillars
- Finally, call the
moveCaterpillars()function indraw()before thedrawCaterpillars()function call.
Your code should look like this!
Step 8 – Give the caterpillars a crawling motion
To replicate a ‘crawling’ movement, we will randomize the number of segments of each caterpillar using the random() function. As a refresher, the global segments variable determines the number of segments displayed for the caterpillars. We will now change that to be a parameter in the drawCaterpillar() function.
- Go to the
drawCaterpillar()function definition.- Add a new parameter called
segments. It should now look like this:function drawCaterpillar(x, y, segments) { ... } - You can remove the
segmentsglobal variable at the top of the sketch.
- Add a new parameter called
- Go to the
drawCaterpillars()function definition.- Add
crawlas the third argument in the parentheses where thedrawCaterpillar()function is called:drawCaterpillar(x, y, crawl); - Above this line, assign a new random value to the
crawlvariable by typing:let crawl = round(random(3, 6));- This means that while the sketch is running, the program will continuously draw the caterpillars at random lengths (between 3 to 6 circles) while moving them from the start to the finish line.
- You can modify the values in
random()depending on how long and short you want the caterpillars to crawl. - The random value of the
crawlvariable will populate thesegmentsparameter in thedrawCaterpillar()function definition, which determines how many circles are drawn.
- Add
Your functions should look like this:
    // ... variable declarations, setup(), draw(), moveCaterpillars() functions
function drawCaterpillars() {
  for (let i = 0; i < numCaterpillars; i += 1) {
    // Update each caterpillar x-coordinate
    let padding = height / numCaterpillars;
    let y = (i + 0.5) * padding;

    // Update length of caterpillar.
    let crawl = round(random(3, 6));

    // Draw caterpillars.
    drawCaterpillar(x, y, crawl);
  }
}

function drawCaterpillar(x, y, segments) {
  // Create a loop of circles
  // to form the body.
  for (let i = 0; i < segments; i += 1) {
    fill(255, 0, 200);
    stroke(0);
    strokeWeight(1);
    circle(x, y, 50);
    x += spacing;
  }

  // Draw the caterpillar's eyes.
  fill(0);
  stroke(255);
  strokeWeight(3);
  circle(x, y - eyeSize, eyeSize);
  circle(x - eyeSize, y - eyeSize, eyeSize);
}
Step 9 – Start the race with a mouse trigger
Declare a new boolean global variable called
isRacingand set it tofalse:let isRacing = false;- This variable will behave as a state variable, storing information on whether or not the caterpillars are racing, as a Boolean value (
trueorfalse).
- This variable will behave as a state variable, storing information on whether or not the caterpillars are racing, as a Boolean value (
Define a
mousePressed()function.- In the function, set the
isRacingboolean totrue.
- In the function, set the
The function should look like this:
    // Start the race when the
// user presses the mouse.
function mousePressed() {
  isRacing = true;
}
In the
draw()function, create a new if-statement before thedrawCaterpillars()function call:if (isRacing === true) { }Move the
moveCaterpillars()function call into the if-statement.- This means the caterpillars will only start moving once the race begins (after the mouse is pressed).
Your code should look like this:
    // ... define global variables

let isRacing = false;

function setup() {
  createCanvas(500, 500);
  // Set a slow frame rate.
  frameRate(3);

  for (let i=0;i<numCaterpillars;i++) {
    caterpillarEnds.push(startLine)
  }
}

function draw() {
  // Draw the background.
  background(121, 96, 76);

  // Draw the start and finish lines.
  noStroke();
  fill(0);
  rect(startLine, 0, 5, height);
  fill(0, 255, 0);
  rect(finishLine, 0, 20, height);

  // Move caterpillars if
  // race has started.
  if (isRacing === true) {
    moveCaterpillars();
  }

  drawCaterpillars();
}

// Start the race when the
// user presses the mouse.
function mousePressed() {
  isRacing = true;
}

// ... moveCaterpillars, drawCaterpillars, and drawCaterpillar functions.
Step 10 – Add messages for the start and end of the race
Well done! At this stage of your sketch, you have a caterpillar race that starts at the click of a mouse.
Now, all we have to do is add instructions on the canvas on how to use the program. We will also add a message at the end of the race to announce the winning caterpillar, which will be random. We will add back in the noLoop() function so the race ends when a winner is declared.
10.1 – Write a start message
Create a new custom function after
draw()and name itwriteStart().Inside the function, add:
text(“ 🏁 Click to start!”, width / 2, height / 2);- This writes the instructions text and places it at the center of the canvas.
- Align the text to the center by adding
textAlign(CENTER);above thetext()command. - Add styles to the text. In this example, we will give it a white color with no stroke and a text size of 24.
Your
writeStart()function should look like this:function writeStart() { // Style the text. textSize(24); textAlign(CENTER); fill(255); noStroke(); // Display the message. text("🏁 Click to start!", width / 2, height / 2); }Go back to the
draw()function and add an else-statement:else {}- This else-statement will execute if the race has not yet started
Call the
writeStart()function inside this else-statement code block.
The draw() function should look like this:
    function draw() {
  // Draw the background.
  background(121, 96, 76);

  // Draw the start and finish lines.
  noStroke();
  fill(0);
  rect(startLine, 0, 5, height);
  fill(0, 255, 0);
  rect(finishLine, 0, 20, height);

  // Move caterpillars if
  // race has started.
  if (isRacing === true) {
    moveCaterpillars();
  } else {
    // If the race hasn't started,
    // write instructions to start.
    writeStart();
  }

  //draw caterpillars at new position
  drawCaterpillars();
}
10.2 – Check for a winner and write who won.
We need to check if one of the caterpillars has won. If so we need to display that information and end the race.
Create a new function below
draw()to check the winner:function checkWinner() {}Inside the curly braces for the function, write a for loop to check each of the caterpillars’ x values to see if they have won:
for (let i = 0; i < caterpillarEnds.length; i += 1) {}Inside of the for loop curly braces, include an if statement to see if each caterpillar crossed the finish line:
if (caterpillarEnds[i] >= finishLine) {}Inside this if statement, write the winner into the text dynamically using a text literal:
text(`Caterpillar ${i + 1} wins!`, width / 2, height / 2);- This dynamically writes text displaying the index of the caterpillar who won. Since indices start at 0 and typically we count caterpillars starting at 1, we added 1 to the value of
i - Similar to Step 9.1, align the text to the center by adding:
textAlign(CENTER);and add styles to the text.
- This dynamically writes text displaying the index of the caterpillar who won. Since indices start at 0 and typically we count caterpillars starting at 1, we added 1 to the value of
Inside the if statement also include the
noLoop()function to causedraw()to stop running.
Your checkWinner() function can look like this:
    function checkWinner() {
  for (let i = 0; i < caterpillarEnds.length; i += 1) {
    if (caterpillarEnds[i] >= finishLine) {
      // Style the text.
      textSize(24);
      textAlign(CENTER);
      fill(255);
      noStroke();

      // Display the message.
      text(`Caterpillar ${i + 1} wins!`, width / 2, height / 2);

      noLoop();
    }
  }
}
Your final sketch should look like this:
Conclusion
Congratulations on completing this tutorial! You have now learned to use loops to generate multiple moving shapes in p5.js. Visit the p5.js Reference or the previous tutorials to learn more about conditional statements, interactivity, variables, and functions.
Next Steps
- Next tutorial: Data Structure Garden