Logos for p5.js and Visual Code Studio.
Introduction
To begin writing code using p5.js, you need to set up the coding environment you will use to write and save your programs. In this guide, you will:
- Set up your coding environment on the web using the p5.js Web Editor, or on your computer using Visual Studio Code (VS Code).
- Use the p5.js reference to help you write your first simple program using shapes and color.
- Save and share your code.
What you will need
- Access to the internet and a desktop browser such as:
- A desktop computer, laptop, or chromebook
Step 0: Choose the type of coding environment
You can begin your coding journey with p5.js using the p5.js Web Editor or VS Code.
The p5.js Web Editor is a website where programmers can write, test, share, or remix p5.js programs without needing to download or configure a code editor on a computer. A code editor makes writing and reading code easier by organizing and coloring text in a way that helps programmers see different parts of the code.
VS Code is a popular code editor you install on your computer that provides a more advanced coding experience. Depending on your needs, choose the coding environment that is best for you.
If you are new to p5.js, start with the p5.js Web Editor!
Using the p5.js Web Editor
Step 1: Open the p5.js Web Editor sign-up page
- Open a desktop browser on your computer and go to https://editor.p5js.org/.
- Click the “Sign up” link on the top-right of the web page.
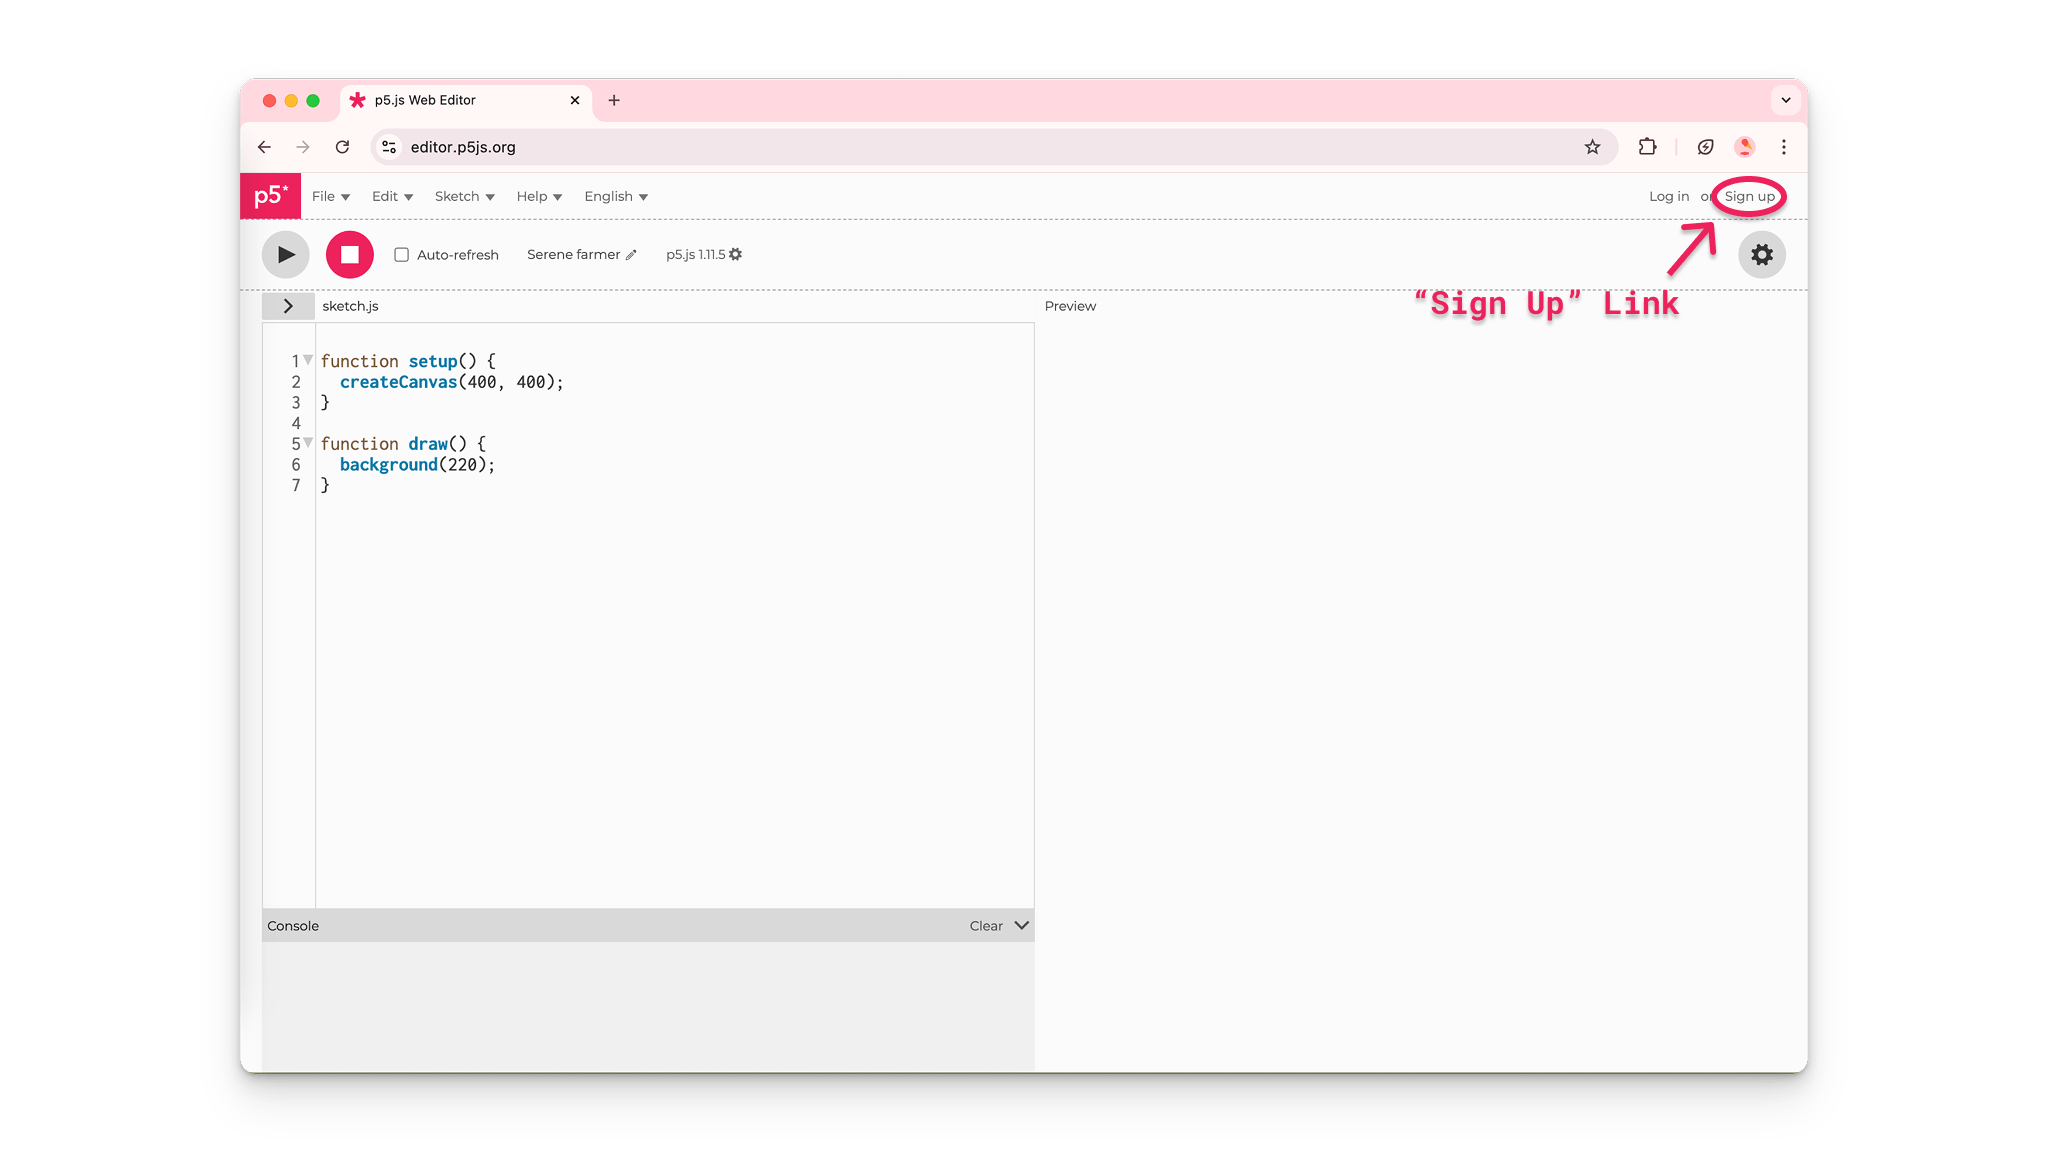
An arrow to the “Sign Up” link.
Step 2: Create an account with p5.js Web Editor
- Once on the sign-up page, create an account on the p5.js Web Editor using one of the following options:
- Manual sign-up
- Create a username.
- Enter your email address.
- Create and confirm a password.
- Click the “Sign Up” button.
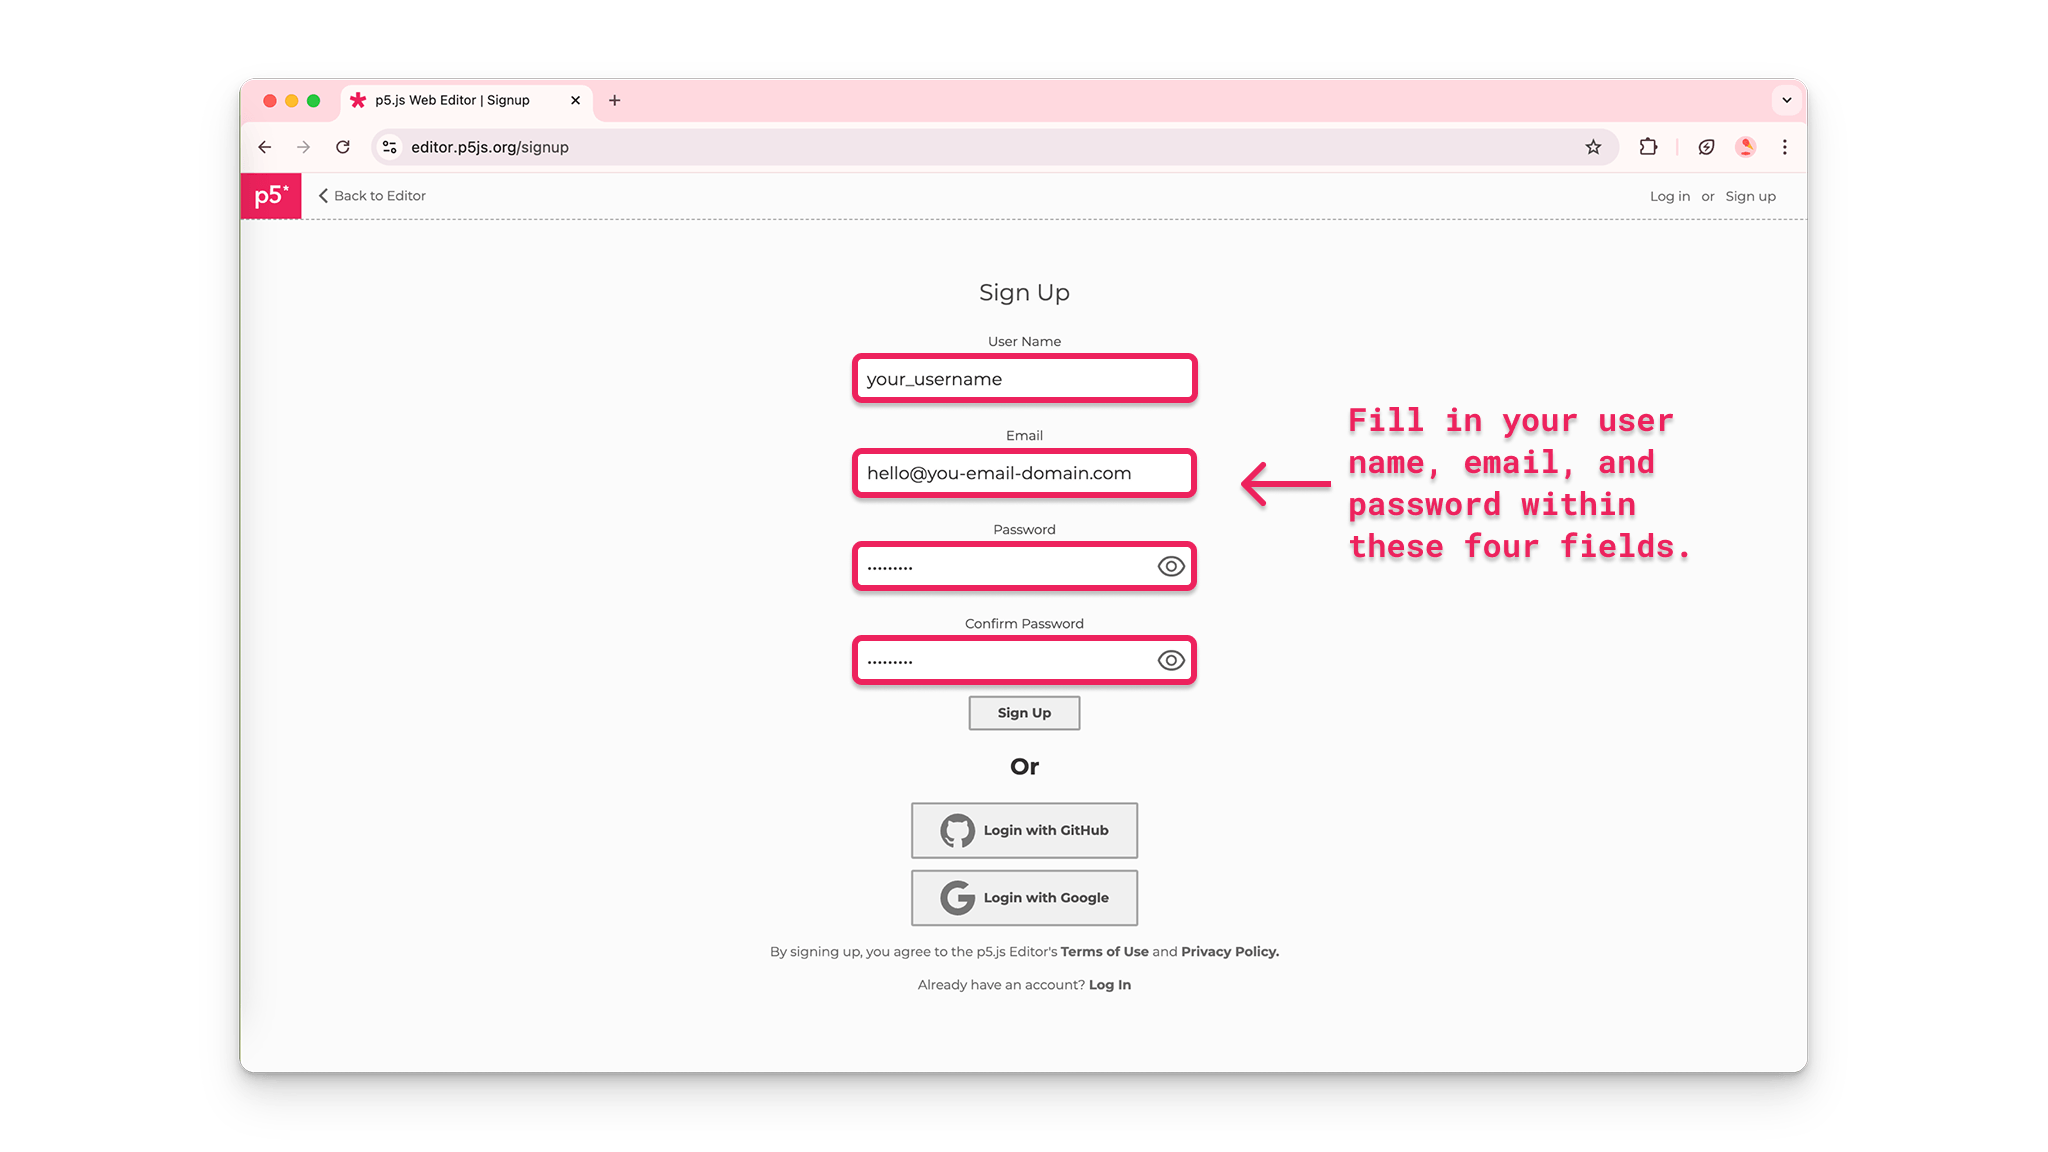
An arrow pointing to the highlighted fields on the Sign Up page, as described above.
- Using a Google account
- Click on the button on the bottom of the page that says “Login with Google.”

A Google login button displaying “Login with Google”
- Follow the prompts to enter your email and password for your Google account (if necessary).
- Using a Github account
- Click on the button on the bottom of the page that says “Login with GitHub.”

A Github login button displaying “Login with Github”
- Follow the prompts to enter your username and password for GitHub.
- Authorize the p5.js Web Editor to access your GitHub details by clicking the “Authorize processing” button.
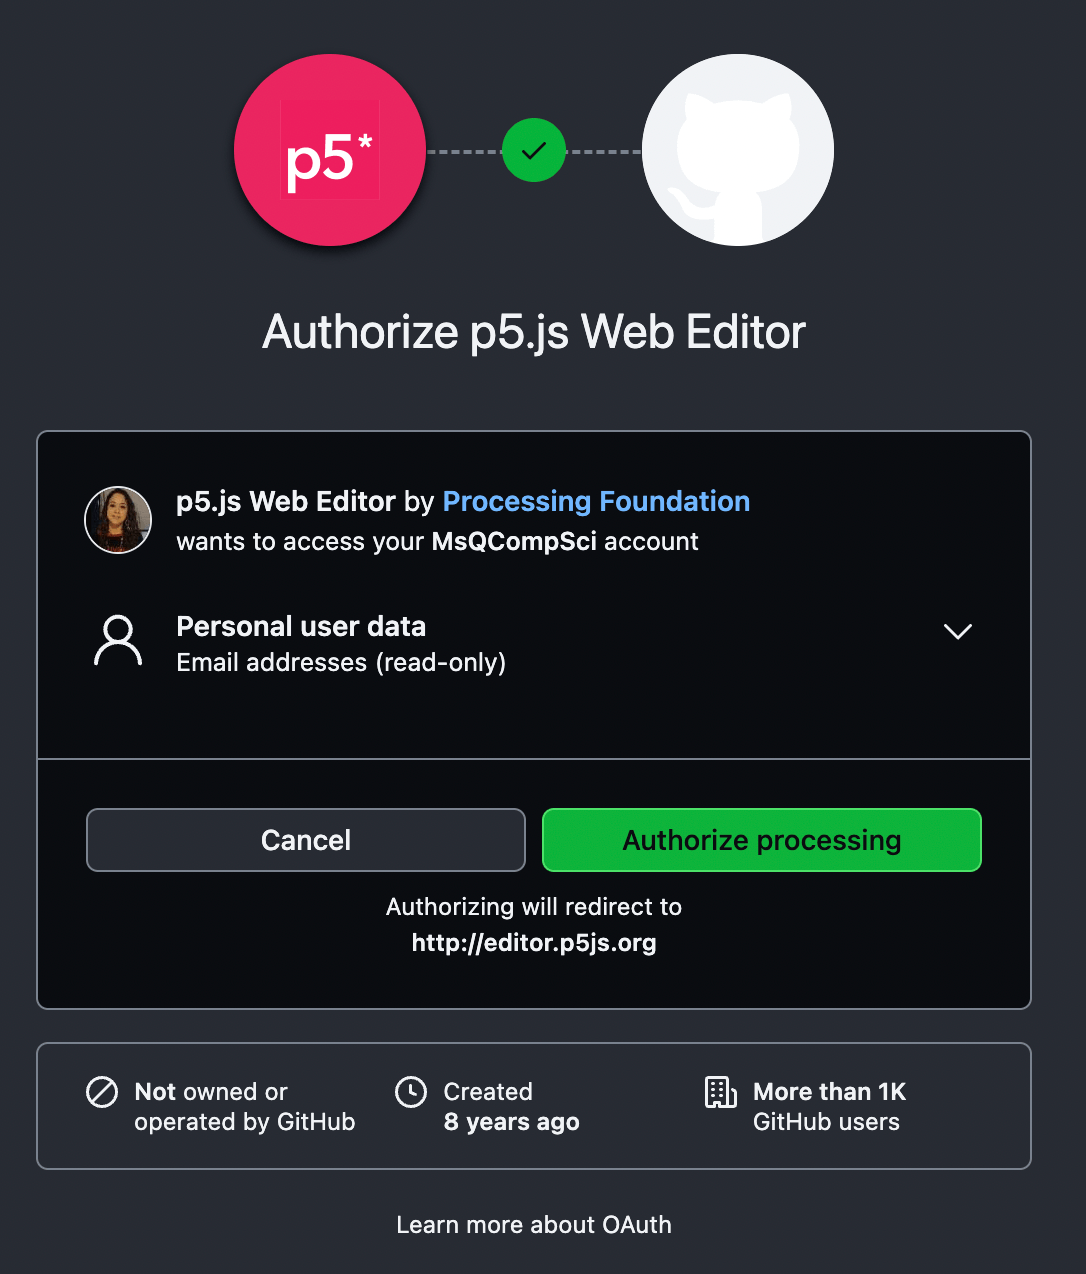
A GitHub third party authorization window informing users that p5.js Web Editor wants to access their GitHub account and read email addresses from their personal user data. Users can cancel the request by clicking the “Cancel” button, or approve the request by clicking the “Authorize processing” button.
Step 3: Explore the p5.js Web Editor
The p5.js Web Editor is an online environment where programmers can write and test their p5.js code. Explore the different elements of the p5.js Web Editor and their functions.
The following diagram labels and describes each element of the editor’s interface:
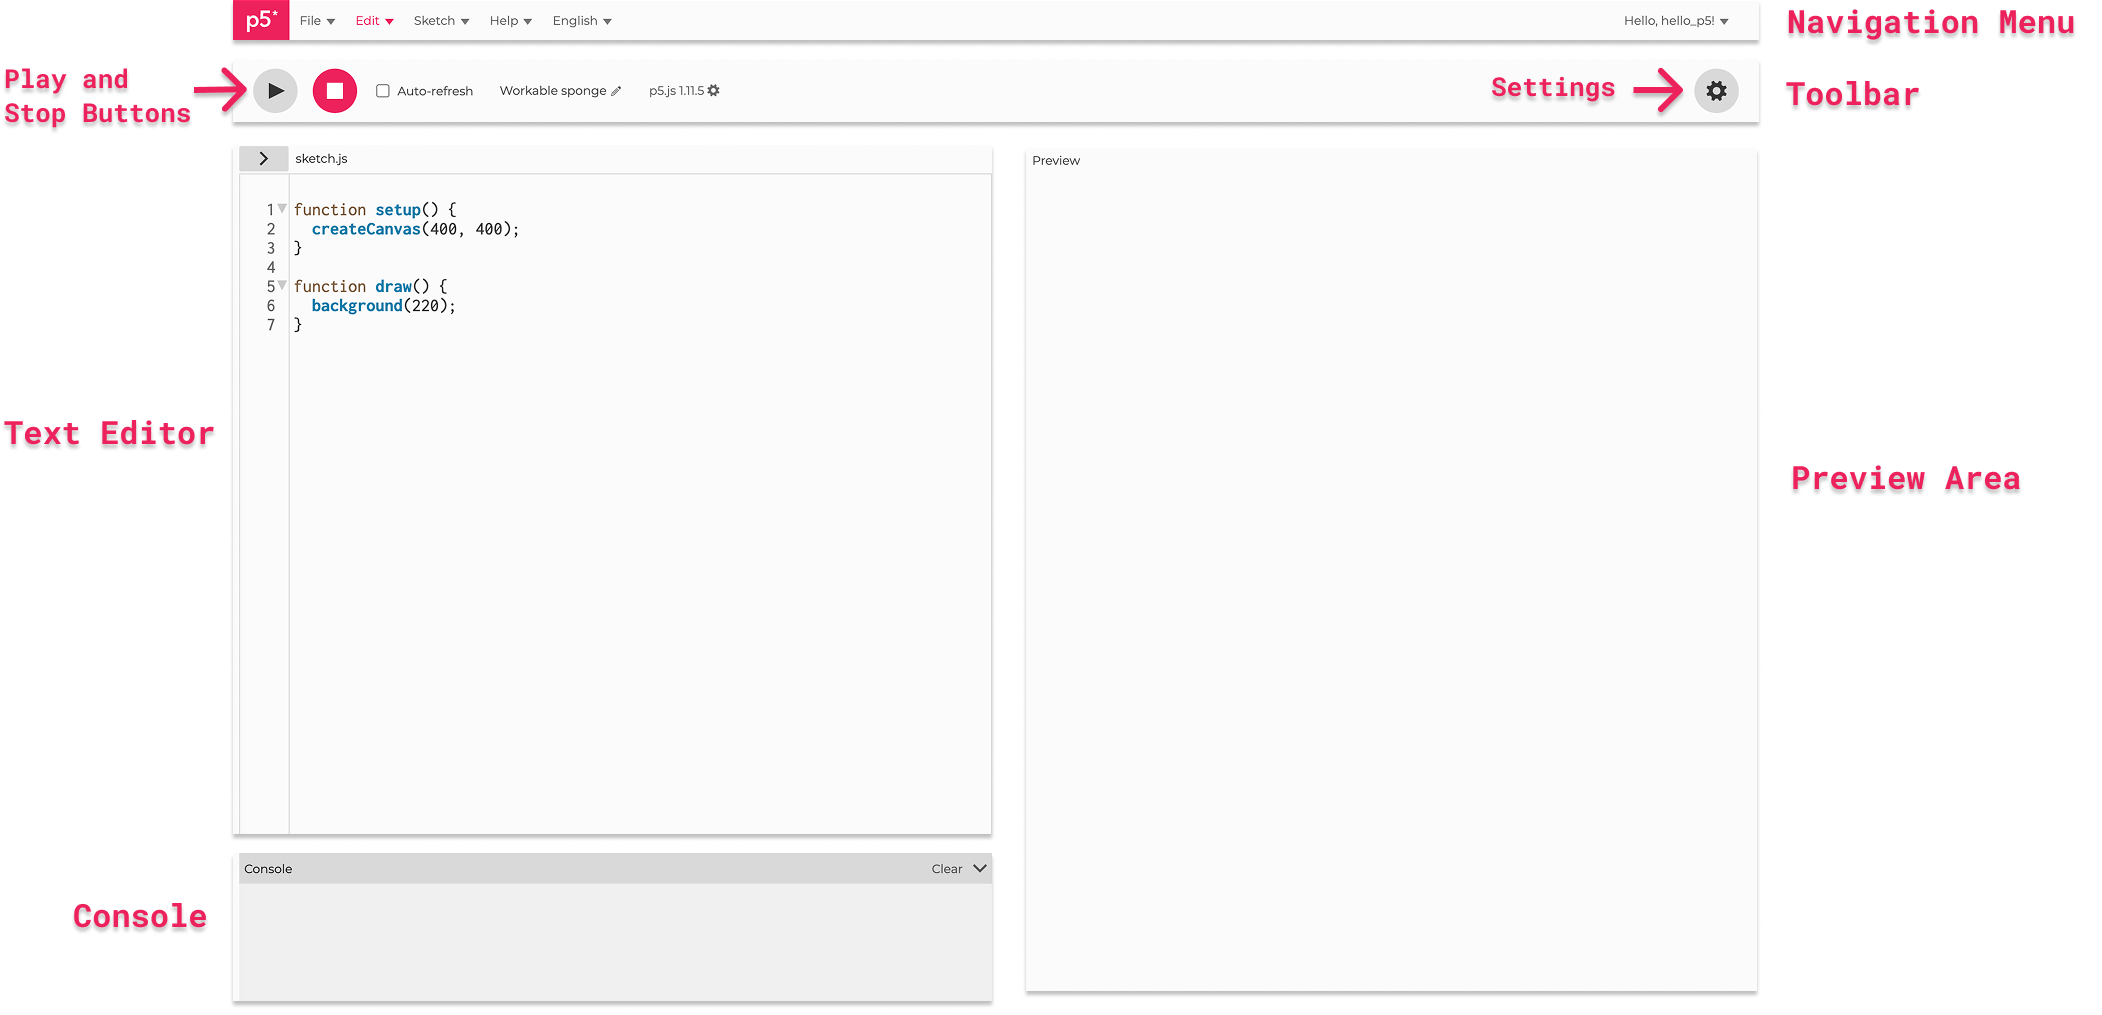
A labeled diagram of the p5.js Web Editor’s user interface.
Step 4: Name, save, and run your first sketch
- Name your projects by clicking on the pencil icon above the text editor and typing in a name for your project.
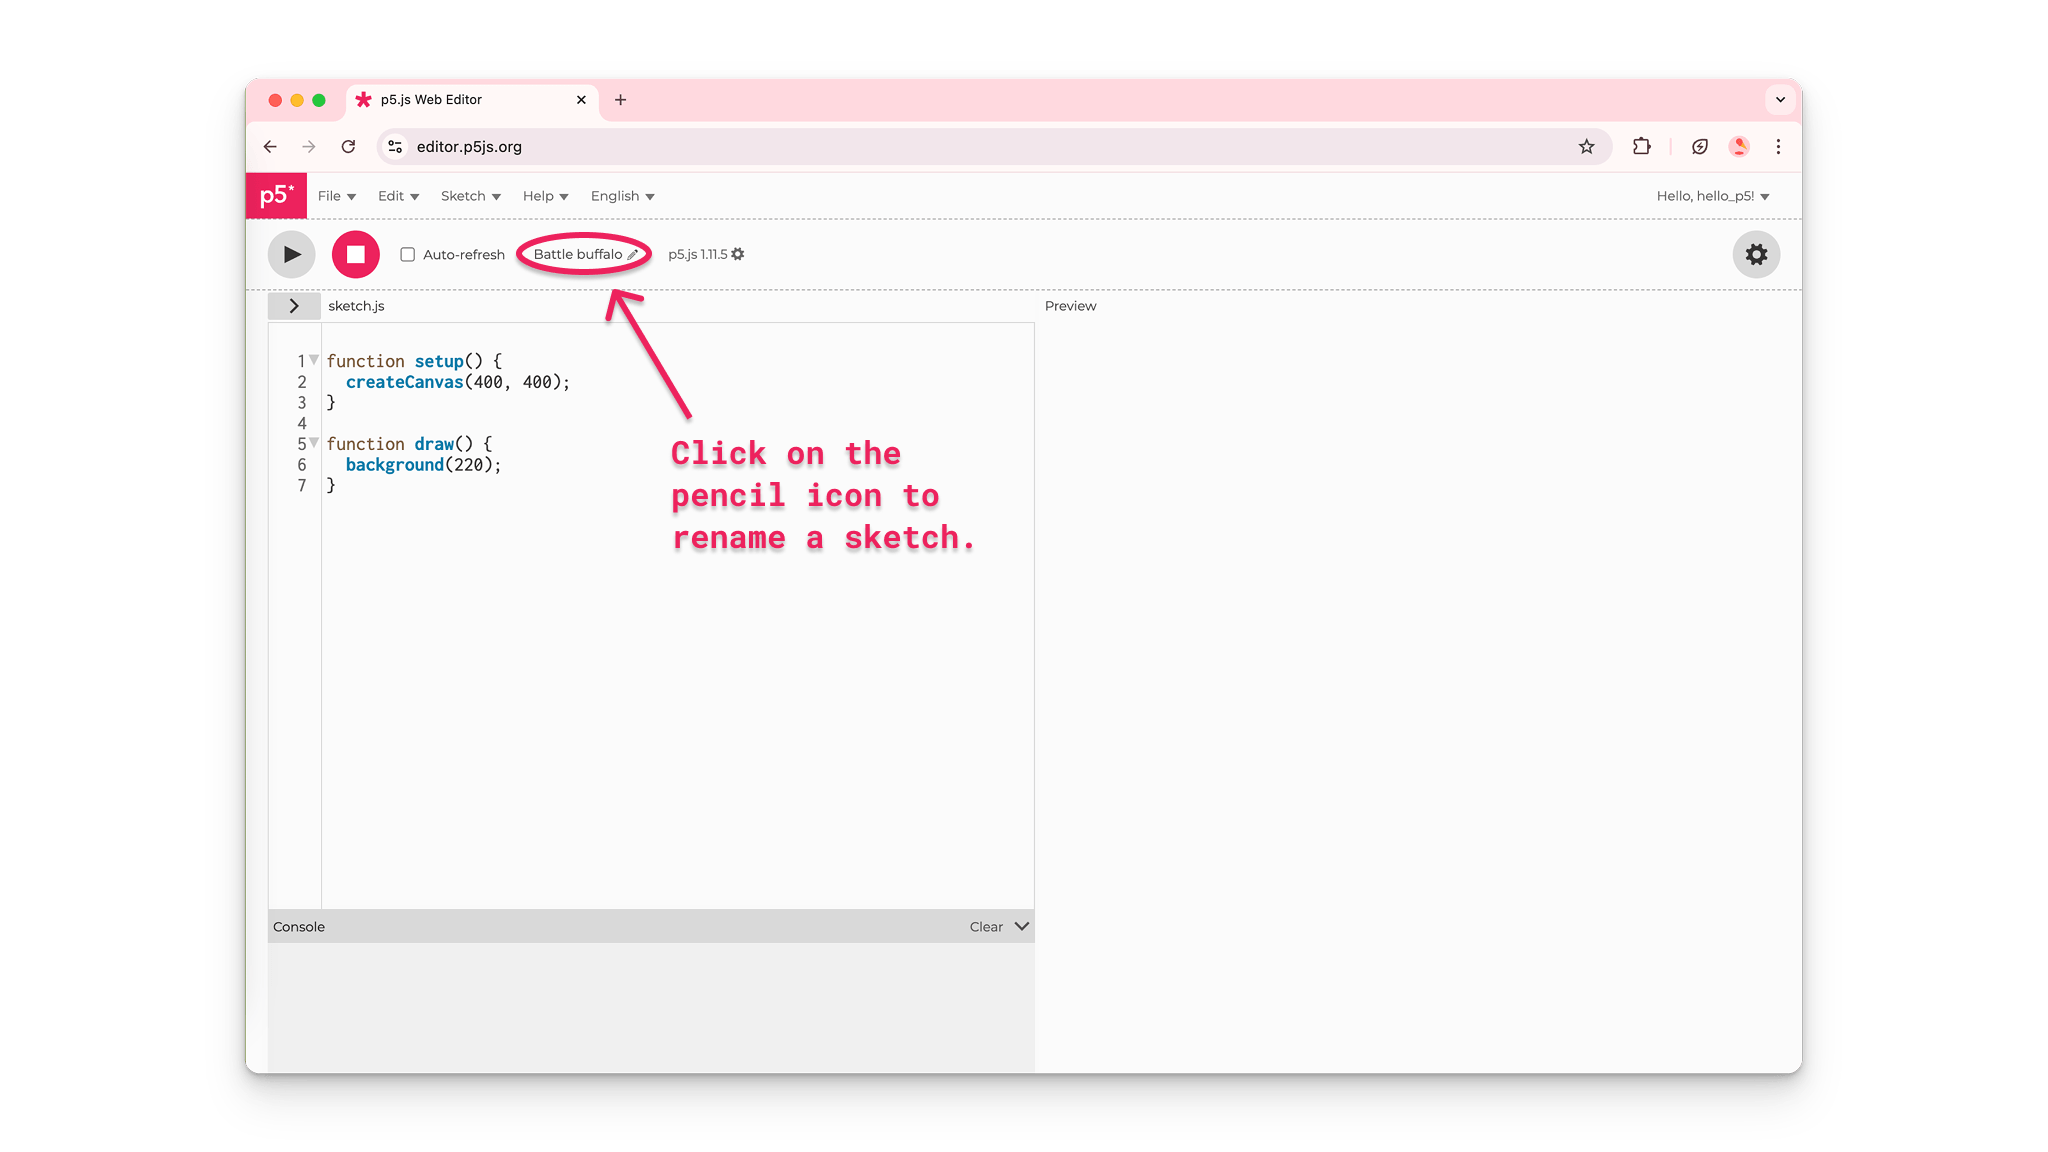
An arrow points to a pencil icon to rename a sketch.
- Save projects by clicking on File in the top toolbar, and selecting Save.
- Make sure you are logged in to your account or you will not be able to save the sketch.
- Saving projects frequently helps to ensure that code isn’t lost if something happens to your computer, browser, or internet connection while you are coding.
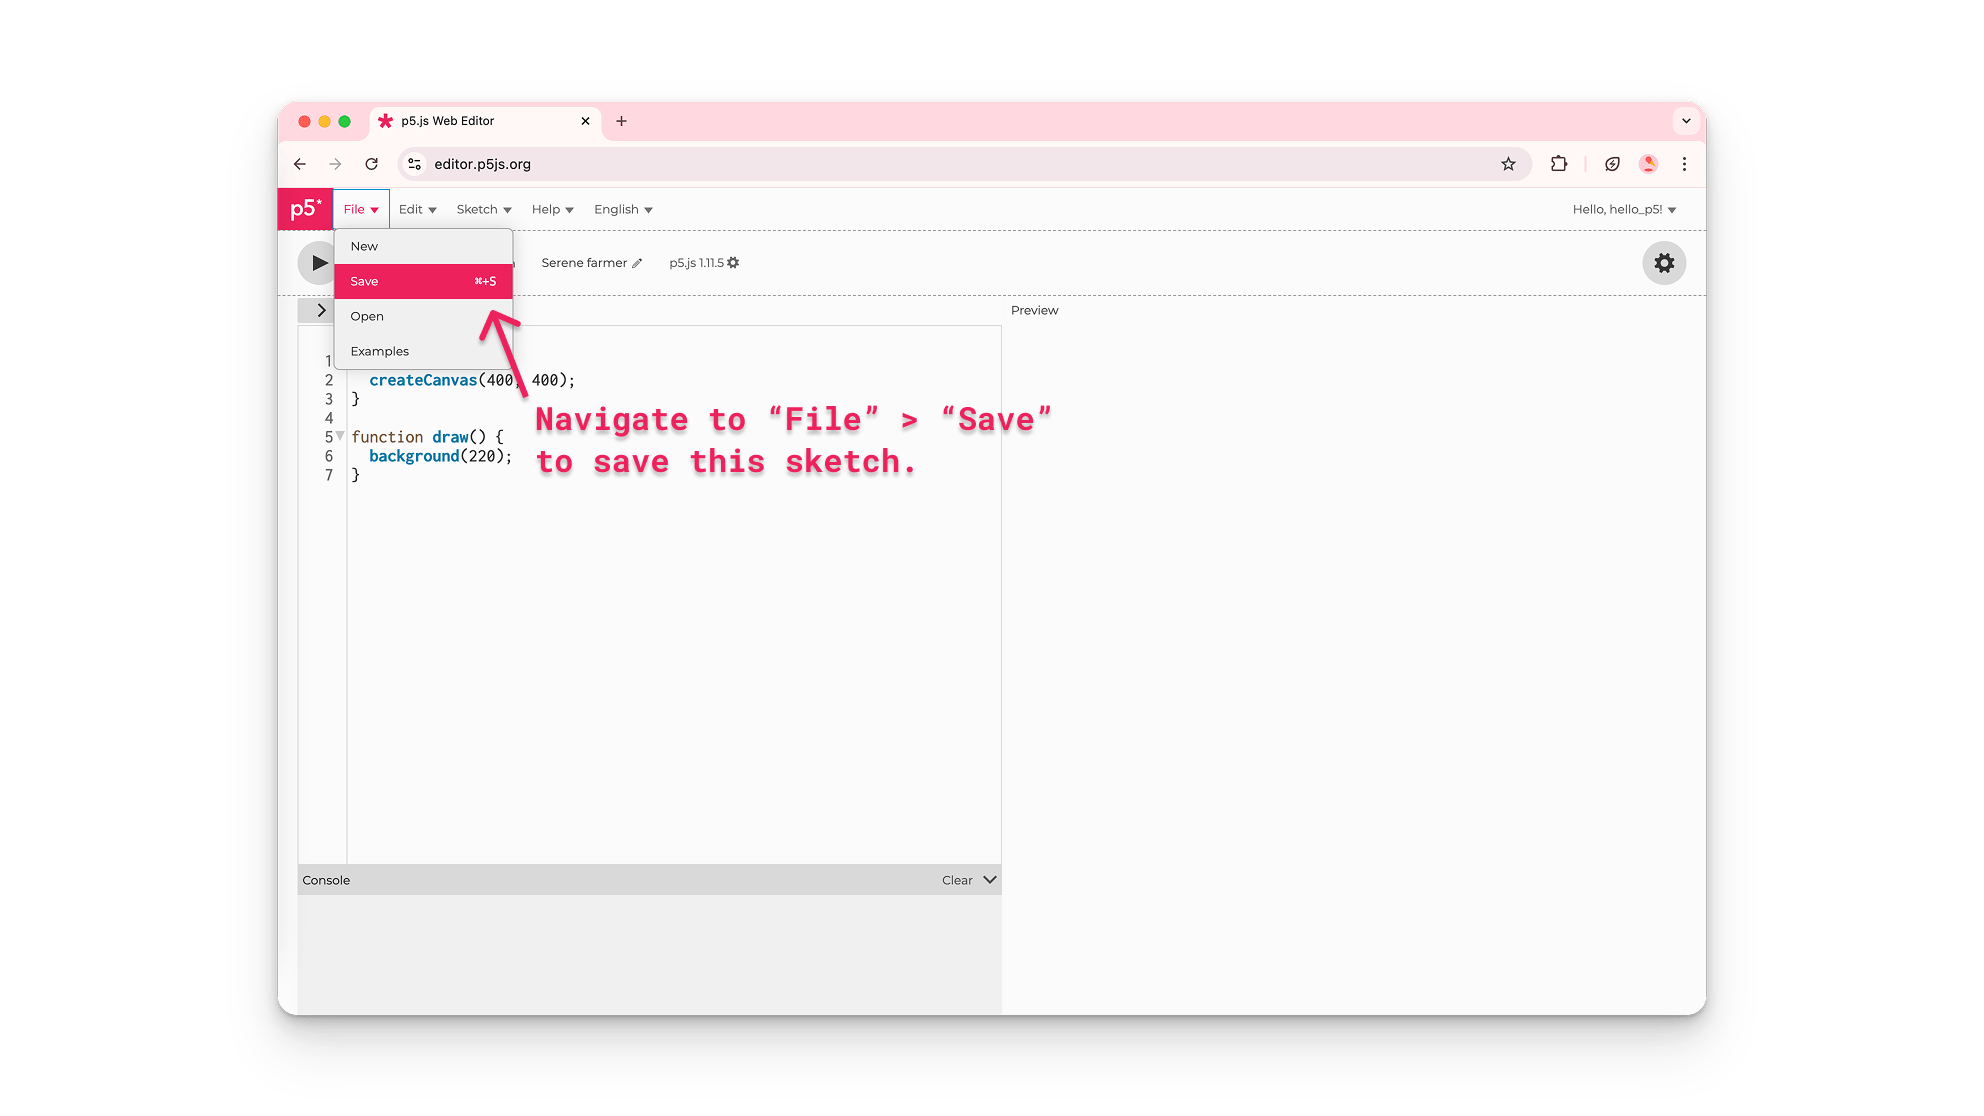
A user on the p5.js Web Editor names a new project and saves it.”
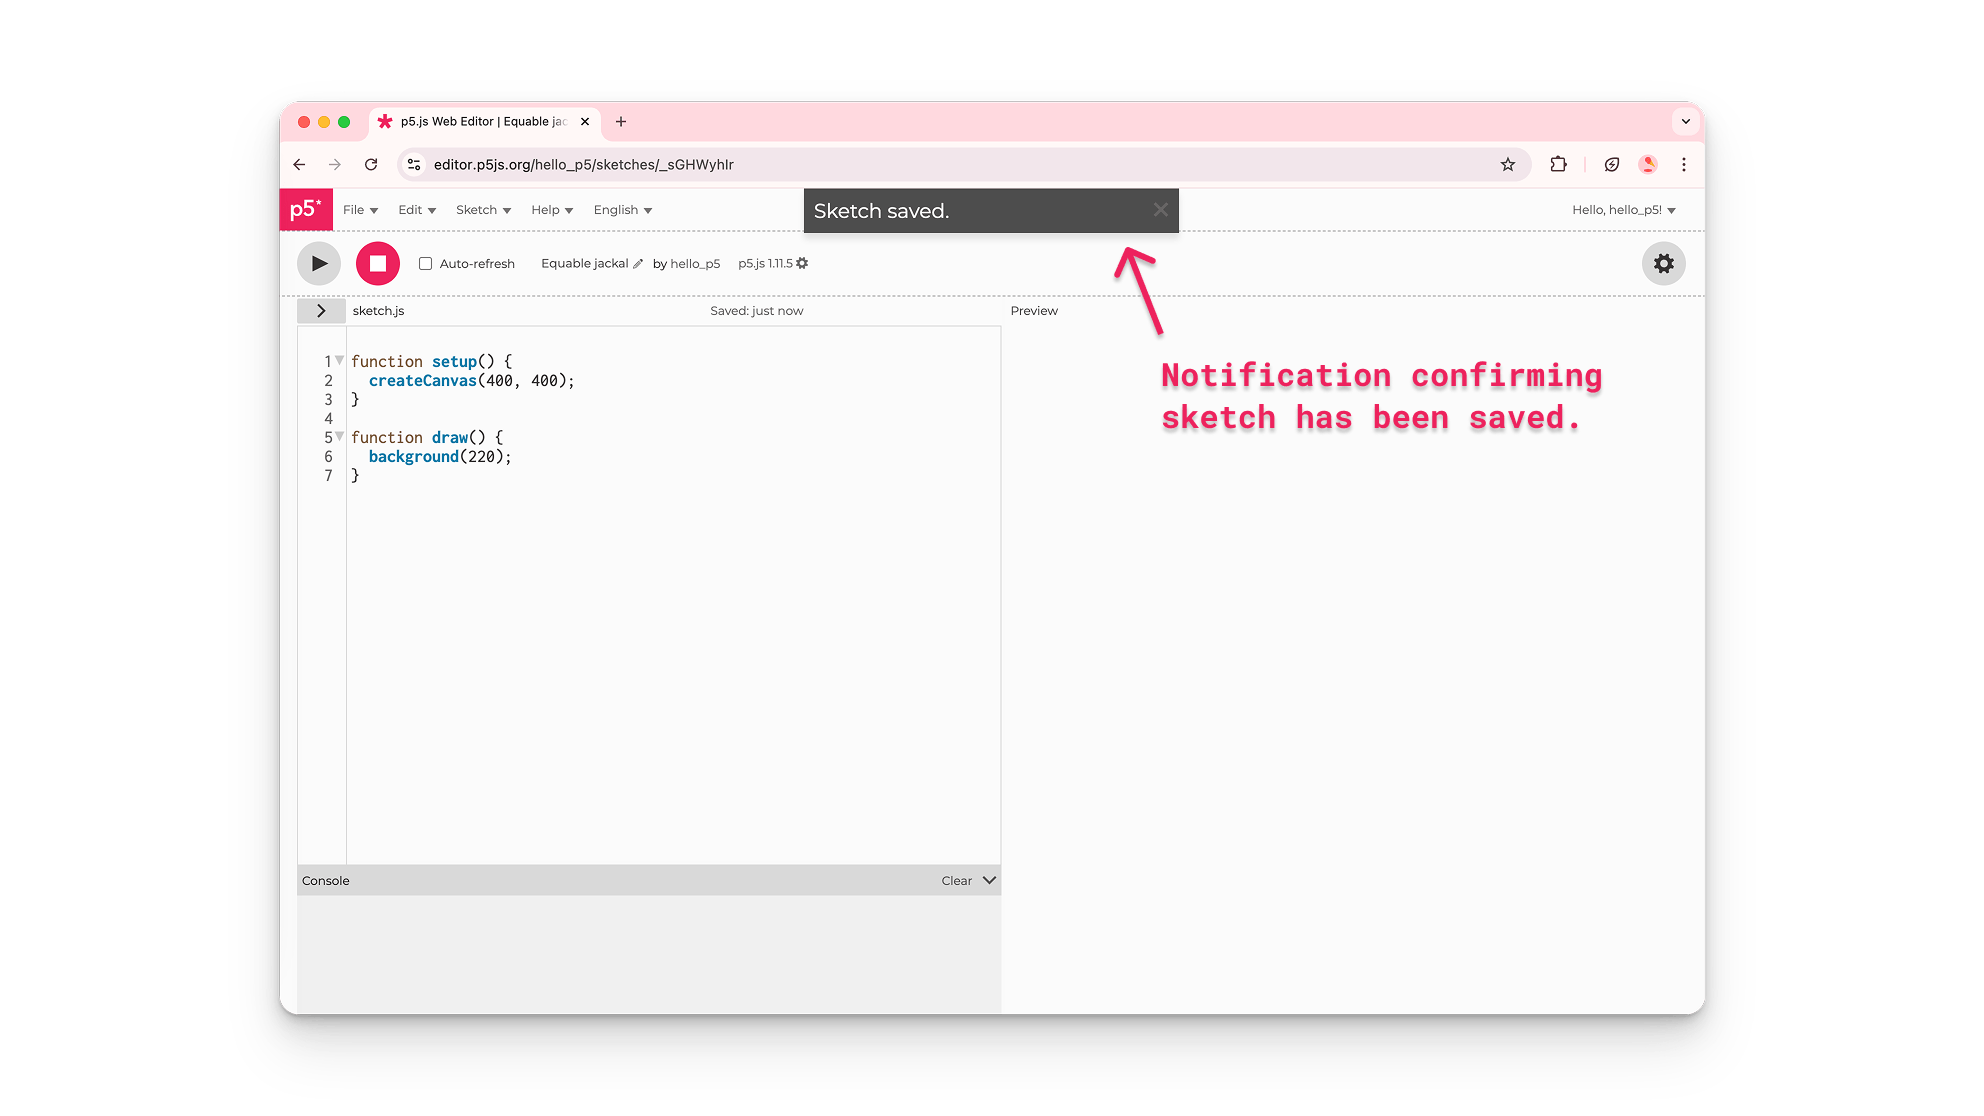
An arrow pointing to a notification box with the text “Sketch saved.”
To view the output of your code, click the Play button in the top left corner:
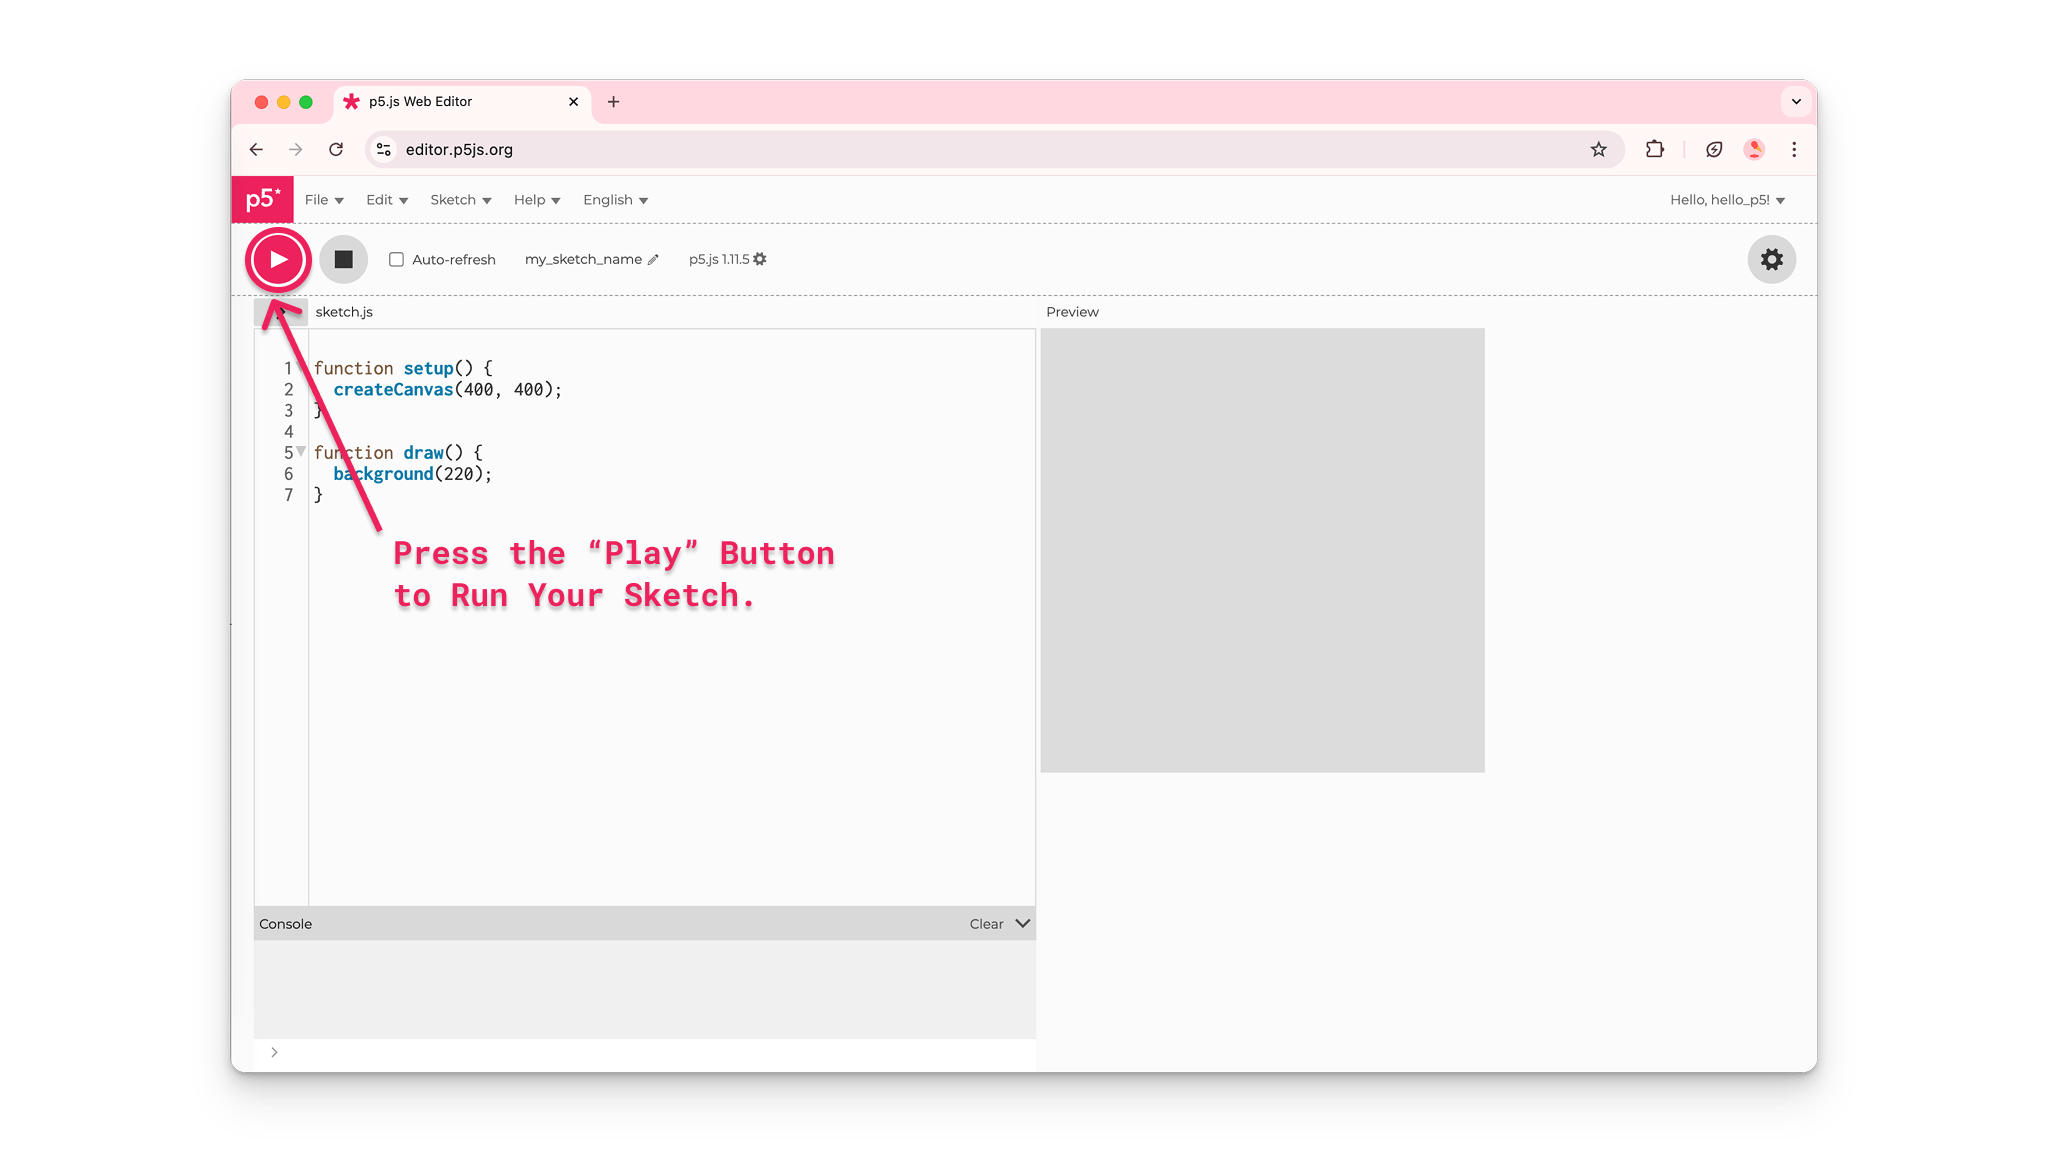
A blank canvas appears in the preview window of the p5.js Web Editor when a user clicks on the “Play” button in the top right corner.
A p5.js sketch is a text file with code written in the JavaScript programming language. JavaScript is a programming language used to make web pages interactive. p5.js is a library written in JavaScript – which is why it ends in “.js” for JavaScript. With p5.js, you can create programs that are colorful and animated, with features that users can interact with! To learn more about some of the things you can do with p5.js, watch the p5.js Welcome Video! To learn more about JavaScript, you can visit this resource.
The editor begins with the following code in the sketch.js file:
    function setup() {
  createCanvas(400, 400);
}
function draw() {
  background(220);
}
The code above creates a canvas element in the preview that is 400 pixels wide and 400 pixels high. It also sets the background to a shade of gray.
createCanvas()
Computer screens are made up of tiny lights called pixels, which are the smallest elements that make up any image. The line of code that creates a canvas in the preview window is createCanvas(400, 400). Without this line of code, there will be no canvas to draw on! The numbers 400, 400 correspond to the width and the height of the canvas in pixels. These numbers are also known as arguments for the createCanvas() function.
Any values that you place within parentheses of a function are called arguments: any value used to customize functions. createCanvas() appears within the setup() function to create an HTML canvas element that you can draw on.
To learn more, visit the p5.js reference pages for setup() and createCanvas().
Step 5: Change the color of the canvas
- You can type commands for any sketch in the text editor, and view the output of your code in the preview window by clicking Play.
- Change the background color of your canvas by changing the argument for the
background()function.- Change
background(220);tobackground("aqua");and press Play.
- Change
    function setup() {
  createCanvas(400, 400);
}
function draw() {
  background("aqua");
}
background()
The background() function colors the background a specific color. You can use words inside quotations or numbers to color the background of the canvas. To learn more, visit the p5.js reference pages for background() & color.
Step 6: Draw shapes on the canvas
Draw a circle on the canvas.
Add the following text under the
background()function://circle in the center with a width of 100 circle(200,200,100);
Click the Play button.
Your code should look like this:
    function setup() {
  createCanvas(400, 400);
}
function draw() {
  background(220);

  // Draw a circle in the center with
  // a width of 100.
  circle(200, 200, 100);
}
draw()
You can draw shapes on the canvas by typing specific commands for shapes within the curly brackets {} after function draw().
The sketch above draws a circle on the canvas by calling the circle() function within draw(). The first two arguments – 200, 200 – place the circle in the center of the canvas, and the last argument – 100 – indicates that the circle is 100 pixels wide. The comments embedded in the sketch in the lines above the circle() function describe what the code does. To learn more, visit the p5.js reference pages for draw() and circle().
Step 7: Create!
p5.js has many functions you can use to incorporate both static and interactive elements in your canvas.
Replace the background and circle commands with the following text:
    //when mouse button is pressed, circles turn black
if (mouseIsPressed === true) {
  fill(0);
} else {
  fill(255);
}

//white circles drawn at mouse position
circle(mouseX, mouseY, 100);
Your code should look like this:
Press and hold the mouse button as you drag the mouse pointer over the canvas.
The code above draws white circles in the same position as the mouse pointer. When a mouse button is pressed, the circle’s color changes to black.
Visit the p5.js reference for more p5.js functions like 2D Primitive shapes.
Errors
It is easy to spell function names wrong or forget a comma. Syntax rules help the computer interpret code. When a “rule” is broken, an error message will appear in the console (for example, if circle() is spelled wrong). These errors are commonly referred to as “bugs.” The console displays messages from the editor with details about any mistakes you might have made. When your code does not execute correctly, there might be a bug in your code!
Visit the Field Guide to Debugging for more information on how to fix errors in your code.
Accessibility Note:
If you are using a screen reader, you must turn on the accessible outputs in the p5.js Web Editor and add the accessibility library in your html. To learn more, visit our guide to using the p5.js Web Editor with a screen reader.
Step 8: Share Your Project
Once your project is saved, you can share it!
- Share projects by clicking File in the upper toolbar, selecting Share, and copying one of the links provided. You can share your projects in three different ways:
- Embed: Add your p5.js sketch to a website or blog that uses html (does not show code).
- Fullscreen: Share your project with a link (does not show code).
- Edit: Share your project code in the p5.js editor with a link.
Next steps:
- Next Tutorial: Get Started
- Explore some p5.js examples
Resources:
- p5.js Welcome Video
- The Coding Train: 1.2: p5.js Web Editor - p5.js Tutorial
- p5.js reference page
- Javascript - MDN reference
- Field Guide to Debugging
- How to Use the p5.js Web Editor with a Screen Reader
Using VS Code
VS Code offers a more advanced code editing experience compared to the Web Editor. We recommend this option if you’re already familiar with VS Code.
Step 1: Download VS Code
- Download VS Code onto your device using this link.
- Explore the features of VS Code and various setup options using these resources.
Step 2: Install the p5.js library extension
- Open VS Code and navigate to the extensions manager on the left toolbar.
- Type p5.js 2.x Project Generator in the search bar, select the extension, and click the install button.
- Familiarize yourself with details for this extension here.
Step 3: Create a p5.js project
- Click on View on the top toolbar and select Command Palette.
- Type Create a new p5.js 2.x Project in the search bar and select the command.
- Follow the prompts to configure your project.
- Select the folder on your machine where you would like to save your project.
Step 4: View your first sketch
To view the preview for your code:
- Right click on the index.html file in the VSCODE tab on the left Explorer panel.
- Select Open Live Server.
- A window will open in your default browser with the output of your project.
A p5.js sketch is a text file with code written in the JavaScript programming language. JavaScript is a programming language used to make web pages interactive. p5.js is a library written in JavaScript – which is why it ends in “.js” for JavaScript. With p5.js, you can create programs that are colorful and animated, with features that users can interact with! To learn more about some of the things you can do with p5.js, watch the p5.js Welcome Video! To learn more about JavaScript, you can visit this resource.
The editor begins with the following code in the sketch.js file and preview:
The code above creates a canvas element in the preview that is 400 pixels wide and 400 pixels high. It also sets the background to a shade of gray.
createCanvas()
Computer screens are made up of tiny lights called pixels, which are the smallest elements that make up any image. The line of code that creates a canvas in the preview window is createCanvas(400, 400). Without this line of code, there will be no canvas to draw on! The numbers 400, 400 correspond to the width and the height of the canvas in pixels. These numbers are also known as arguments for the createCanvas() function.
Any values that you place within parentheses of a function are called arguments: any value used to customize functions. createCanvas() appears within the setup() function to create an HTML canvas element that you can draw on.
To learn more, visit the p5.js reference pages for setup() & createCanvas().
Step 5: Change the color of the canvas
- Change the background color of your canvas by changing the argument for the
background()function.- Change
background(220);tobackground("aqua");and press Play.
- Change
Your code should look like this:
background()
The background() function colors the background a specific color. You can use words inside quotations or numbers to color the background of the canvas. To learn more, visit the p5.js reference pages for background() & color.
Step 6: Draw shapes on the canvas
Draw a circle on the canvas.
Add the following text under the
background()function://circle in the center with a width of 100 circle(200,200,100);
Don’t forget to save your changes to update the preview window.
Your code should look like this:
draw()
You can draw shapes on the canvas by typing specific commands for shapes within the curly brackets {} after function draw().
The sketch above draws a circle on the canvas by calling the circle() function within draw(). The first two arguments – 200, 200 – place the circle in the center of the canvas, and the last argument – 100 – indicates that the circle is 100 pixels wide. The comments embedded in the sketch in the lines above the circle() function describe what the code does. To learn more, visit the p5.js reference pages for draw() and circle().
Step 7: Create!
p5.js has many functions you can use to incorporate both static and interactive elements in your canvas.
Replace the circle command with the following text:
    //when mouse button is pressed, circles turn black
if (mouseIsPressed === true) {
  fill(0);
} else {
  fill(255);
}

//white circles drawn at mouse position
circle(mouseX, mouseY, 100);
Your code should look like this:
Press and hold the mouse button as you drag the mouse pointer over the canvas.
The code above draws white circles in the same position as the mouse pointer. When a mouse button is pressed, the circle’s color changes to black.
Visit the p5.js reference for more p5.js functions, such as other shapes you can draw.
Errors
It is easy to spell function names wrong or forget a comma. Syntax rules help the computer interpret code. When a “rule” is broken (for example, if circle() is spelled wrong), a message will appear in the browser’s console. These errors are commonly referred to as bugs; when your code does not execute correctly, there might be a bug in your code!
- Visit these resources for instructions on how to view the console in specific browsers: Chrome | Firefox | Safari | Edge
- Visit the Field Guide to Debugging for more information on how to fix errors in your code.
Accessibility note
If you are using a screen reader, use the p5.js Web Editor instead! To learn more, visit the “How to Use the p5.js Web Editor with a Screen Reader” resource.
Next steps:
- Next Tutorial: Get Started
- Explore some p5.js examples
Resources:
- p5.js Welcome Video
- The Coding Train: 1.2: p5.js Web Editor - p5.js Tutorial
- p5.js reference page
- Javascript - MDN reference
- Field Guide to Debugging
- p5.js with VSCode (video tutorial)
- VSCode Overview
- p5.vscode reference
- Reference for p5.nvim - Editor support for Neovim
- Browser consoles in Chrome | Firefox | Safari | Edge