Welcome to the contributor guidelines! This document is for new contributors looking to contribute code to p5.js, contributors looking to refresh their memories on some technical steps, or just about anything else to do with code contributions to p5.js.
If you are looking to contribute outside of the p5.js repositories (writing tutorials, planning classes, organizing events), please have a look at the other relevant pages instead. Stewards or maintainers may find the steward guidelines more helpful regarding reviewing issues and pull requests.
This is a relatively long and comprehensive document but we will try to signpost all steps and points as clearly as possible. Do utilize the table of contents to find sections relevant to you. Feel free to skip sections if they are not relevant to your planned contributions.
If you are a new contributor, you may want to start with the first section, “All about issues.” If you just want a step-by-step setup of the development process, you can look at the “Quick Get Started For Developers” section.
Table of Contents
All about issues
The majority of the activity on p5.js’ GitHub repositories (repo for short) happens in issues, which is a great place to start your contribution journey.
What are issues?

“Issue” is the generic name for a post on GitHub that aims to describe, well, an issue. This issue can be a bug report, a request to add a new feature, a discussion, or anything that works as a post related to p5.js library development. Comments can be added below each issue by anyone with a GitHub account, including bots! It is the place where contributors discuss topics related to the development of the project in the repo.
While an issue can be opened for a wide variety of reasons, we usually only use issues to discuss the development of p5.js source code. Topics such as debugging your own code, inviting collaborators to your project, or other unrelated topics should be discussed
either on the forum or on other platforms such as Discord.
We have created easy-to-use issue templates to aid you in deciding whether a topic should be a GitHub issue or posted elsewhere!
Issue templates
p5.js’s issue templates make it easier for stewards and maintainers to understand and review issues. They also make it easier for you to file the relevant issue and receive a reply faster.
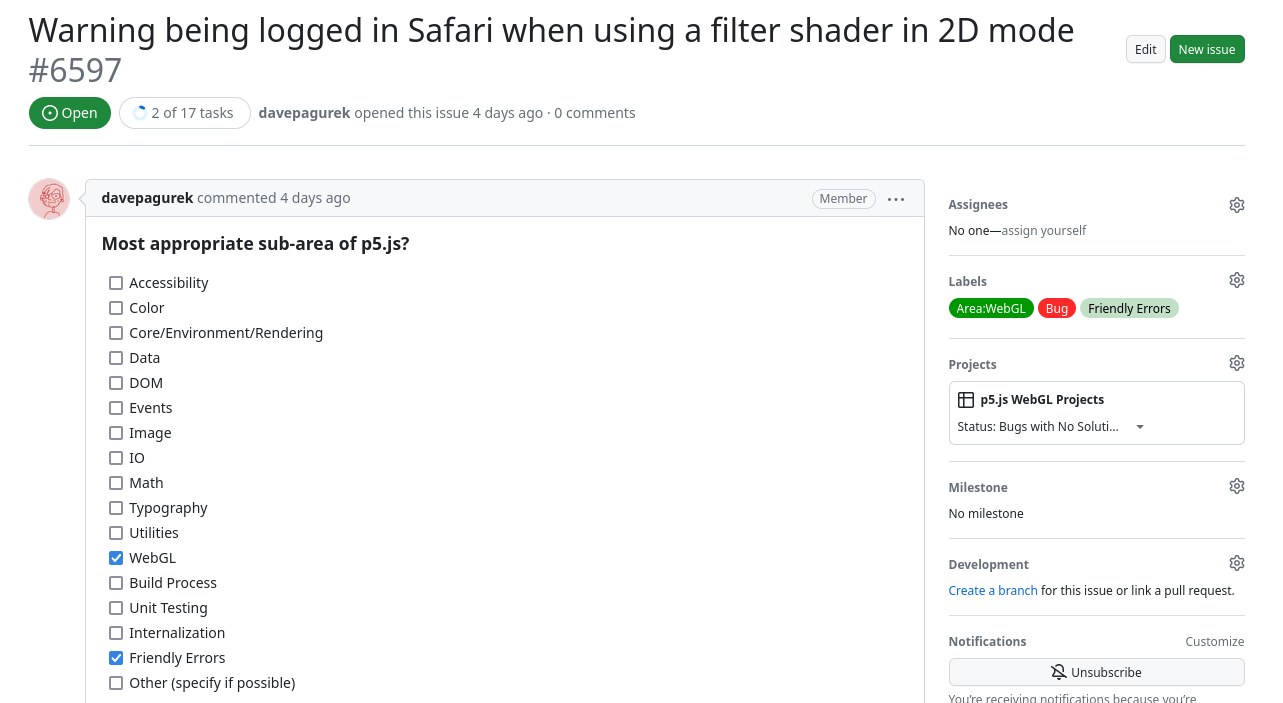
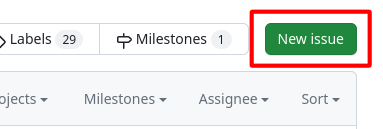
To file a new issue, simply go to the “Issues” tab on the p5.js repo and click on the “New issue” button on the right side. You will be presented with several different options, each of which either corresponds to a relevant issue template or redirects you to the relevant place to file your question. We recommend choosing the most relevant option out of those presented to ensure your issue receives the right attention promptly.
“Found a bug”
When you encounter possible incorrect behavior in p5.js or something not behaving as described in the documentation, use this template. Please note that if you are trying to debug your sketch and you think it may be a problem with your code, you should first ask on the Discourse forum instead.
There are a few fields for you to fill in for this template:
- Most appropriate sub-area of p5.js? - This helps us identify and respond to your issue by automatically tagging the issue with the relevant labels.
- p5.js version - You can find the p5.js version number in either the
<script>tag link or on the very first line of the p5.js/p5.min.js file. It will look something similar to1.4.2(three numbers separated by periods). - Web browser and version - This helps us isolate different behaviors between browsers. To find the browser version number, follow the instructions in the table below for the browser you are using.
Chrome | Firefox | Safari |
In the address bar, navigate to | In the address bar, navigate to | Under the top bar “Safari” menu item, choose “About Safari” |
- Operating System - You should include the OS version number if possible, e.g.,
macOS 12.5. Some bugs can stem from OS behaviors. - Steps to reproduce this - This is arguably the most important information to share. You should list out detailed steps for replicating the bug you are seeing. Sharing a basic sample code that demonstrates the issue can go a long way for anyone looking to replicate the bug you are facing and start formulating a solution.
Replication is key! Many of the fields in this template are aimed at replicating the bug. The more information you can provide us about your sketch’s environment and how others can replicate what you are seeing, the easier it is for anyone to understand your issue and start looking into solutions.
Be as detailed as you can and avoid generic statements, e.g., do not say “image() function does not work” but rather be more specific, such as “image() function does not display the loaded GIF image at the right size.” A helpful way to describe the bug you are facing is to describe two things:
- What you expect the sample code you share to do (expected behavior).
- What the sample code is actually doing (actual behavior).
If you wish to contribute a fix to the bug you just reported, you can indicate so in the description. You may provide a simple suggestion as to how you would fix the bug you just described, this will let us know how much support you may need to contribute to the fix.
You should not file a pull request (or start working on code changes) without a corresponding issue or before an issue has been approved for implementation; that is because the proposed fix may not be accepted, need a different approach entirely, or the actual problem is somewhere else. Any pull requests filed before the issue has been approved for fixing will be closed until approval is given to the issue.
For bug reports to be accepted for fixing, they must be approved by at least one area steward or maintainer before work can begin on a pull request.
”Existing Feature Enhancement”
This template should be used if you wish to propose changes or add functionality to existing features of p5.js (functions, constants, rendering, etc). For example, if you want to add a new way to define a color to the color() function and other functions that accept colors, this is the template to use.
There are a few fields for this template that you should fill in.
- Increasing Access - This required field is where you insert a statement about how adding the proposed feature enhancement will help p5.js increase access for people historically marginalized in the field of creative arts or technology. No proposals will be accepted without this, although you can fill in “Not sure” and offer other members of the community to provide this argument if they can think of how it addresses the accessibility of p5.js.
- Most appropriate sub-area of p5.js? - This helps us identify and respond to your issue. This will automatically tag the issue with the relevant labels.
- Feature enhancement details - This is where you describe your proposal for the feature enhancement. A good feature enhancement proposal often includes a clear use case: what, when, how, and why this feature enhancement is needed.
For feature enhancement proposals to be accepted they must be approved by at least 1 area steward or maintainer before work can begin on a pull request.
You should not file a pull request (or start working on code changes) without a corresponding issue or before an issue has been approved for implementation, because there is no guarantee that the proposal will be accepted. Any pull requests filed before a proposal has been approved will be closed until approval is given to the issue.
”New Feature Request”
This template should be used if you wish to propose a new feature to be added to p5.js. For example to add support for drawing native HTML <table> elements with a new createTable function. Some proposals may overlap with existing feature enhancement proposals, in these cases you should just choose whichever template you feel is most appropriate.
Accordingly, the template form fields are nearly identical to the field of the “Existing Feature Enhancement.” As such please see the previous section for details about how to fill in each field.
For new feature request proposals to be accepted, they must be approved by at least 2 area stewards or maintainers before work can begin on a pull request.
You should not file a pull request (or start working on code changes) without a corresponding issue or before an issue has been approved for implementation, that is because there is no guarantee that the proposal will be accepted. Any pull requests filed before a proposal has been approved will be closed until approval is given to the issue.
”Discussion”
This template is used when the issue you are filing does not fit into any of the above in any way. An issue not fitting into any of the above templates should be relatively rare in practice. For example, a discussion about whether to adopt a specific Web API feature in p5.js should be filed as a new feature request; a discussion about adding an additional color mode to the various color functions should be filed as a feature enchancement; an announcement about a local creative coding event that you are organizing should be posted on the forum and contacting the Processing Foundation if you are looking for support or publicity; etc.
When opening a discussion issue, you can use the “Labels” panel on the side panels to add additional relevant labels so you can signpost your issue to the relevant area. The template itself is just the bare minimum text field. You can see this link for an example discussion issue.
Working on the p5.js codebase
Prerequisites
To proceed you should be minimally familiar with working with the command line, git, node.js (at least v18 and up), and have a local development environment setup.
Introduction
Now that your issue has been discussed, an implementation approved, and you are willing to make the code changes, you are ready to start working on the codebase.
Similarly, if you have come across an issue or joined in discussions of an issue and an implementation has been approved by stewards, but neither the original issue author nor other members of the community have indicated they are willing to work on the issue, you may volunteer for submit a contribution here and have the stewards or maintainers assign the issue to you.
You should not “jump the queue” by filing a PR for an issue that either someone else has indicated willingness to submit a contribution or has already been assigned to someone else. We will always prioritize the “first assigned, first serve” order for accepting code contributions for an issue. If you file a PR for an issue while someone else is still working on the same issue, your PR will likely be closed.
If you see that it has been a few weeks since the last activity on an issue with an assigned individual, you can leave a polite comment on the issue asking for progress and if they need help with the implementation. We generally allow for people to work on their contributions at their own pace, as we understand that most people will often be working on a volunteer basis, or it simply takes more time for them to work on the feature.
In some cases, issues may be time sensitive - so either maintainers will work on these directly, or explain any important deadlines. If the issue has a deadline, and a contributor isn’t able to finish on time, it may be reassigned. This is an exception, though, and not the rule. Generally, you should work at your own pace and be confident that there is no hard time limit on how long you can spend working on something. If you are having trouble with any aspect of your code contribution, do not hesitate to ask for help in the issue, the stewards and maintainers, as well as members of our community, will do our best to guide you!
If you’ve been assigned to an issue and are working on it, the p5.js stewards or maintainers (you can check who this is in the README!) might comment and tag you in that comment to check in. Please reply within 1 week with any questions or updates; if you don’t respond in a week, stewards or maintainers may reassign the issue. This doesn’t mean you need to finish the work in 1 week: only to confirm you’re still on it.
Quick Get Started For Developers
If you want to work/contribute to p5.js’🌸 codebase as a developer, either directly for improving p5.js or for improving its sub-projects like Friendly Error Systems, you can follow the following steps:
- Create a fork of p5.js.
- Clone your created fork to your computer.
- Add upstream using the following command:
git remote add upstream https://github.com/processing/p5.js- Make sure your machine has NodeJs installed; check it with the following command:
node -v- Install dependencies with:
npm ci- Create a git branch of the
mainbranch having a descriptive branch name using:
git checkout -b [branch_name]- As you start making changes to the codebase, frequently run the tests (it takes time, but it ensures that existing behaviors are not being broken).
npm test- Add any unit tests if you are working on adding new features or feature enhancement.
- Once done, you can commit the changes and create a Pull Request.
Using the GitHub edit functionality
When viewing a file on the GitHub web interface, near the top of the content of the file you are viewing will be a pencil icon button. This button is a convenient edit feature provided by GitHub that simplifies many of the processes we will be covering below and can be used to make quick and simple edits to the file you are viewing.

However, it is not recommended to use this feature other than for very simple changes. One of the main reasons for this is that for more complex changes to the source code, it should be built and tested locally before being filed as a PR. Using a local development environment is also often much more fluent for most as compared to the basic editing environment provided by this edit functionality.
Forking p5.js and working from your fork
The first step to work on the p5.js source code is to fork the p5.js repository. Forking has a specific meaning in open source, but for our purpose, it means creating a copy of the repository and storing it in your own GitHub account. To fork a repo, simply click on the “Fork” button near the top of the page, and GitHub will make a copy of the repo in your account.
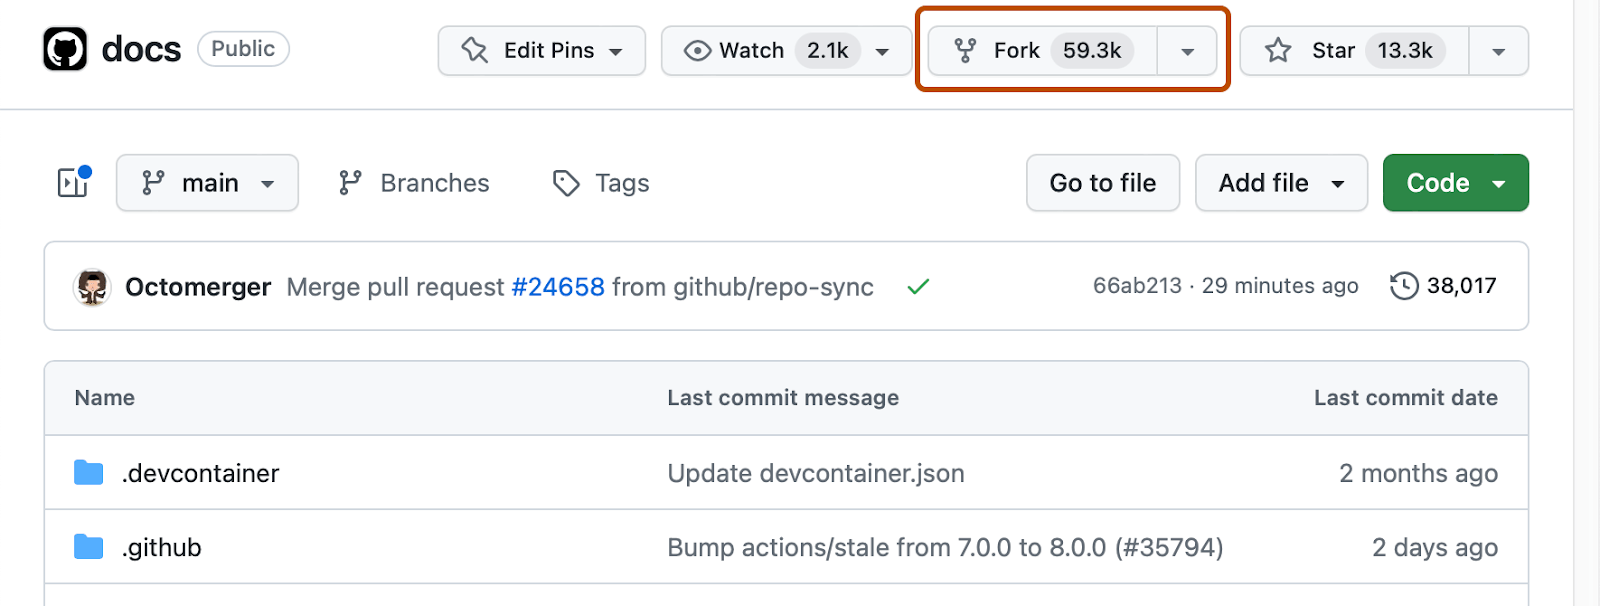
Working from your fork of the p5.js repository is necessary because you will likely not have direct write access to the official p5.js repository, and working on a fork allows you to make changes and later submit them back to the official repository.
Using GitHub Desktop
GitHub Desktop is a program that lets you work with git via a graphical user interface rather than typing commands into a terminal. It is a good option if you are new to git, and you can always switch back and forth between Github Desktop and a terminal whenever you feel like it.
First, download and install GitHub Desktop. Once installed, open the application. It will ask you to sign in to your GitHub account. After you have signed in, it will list your projects, including your fork of p5.js. Select your fork, which will be named yourUsername/p5.js, and click the blue “Clone” button. It will ask for some details about where to place your project; you can either change them or leave the default settings and continue.
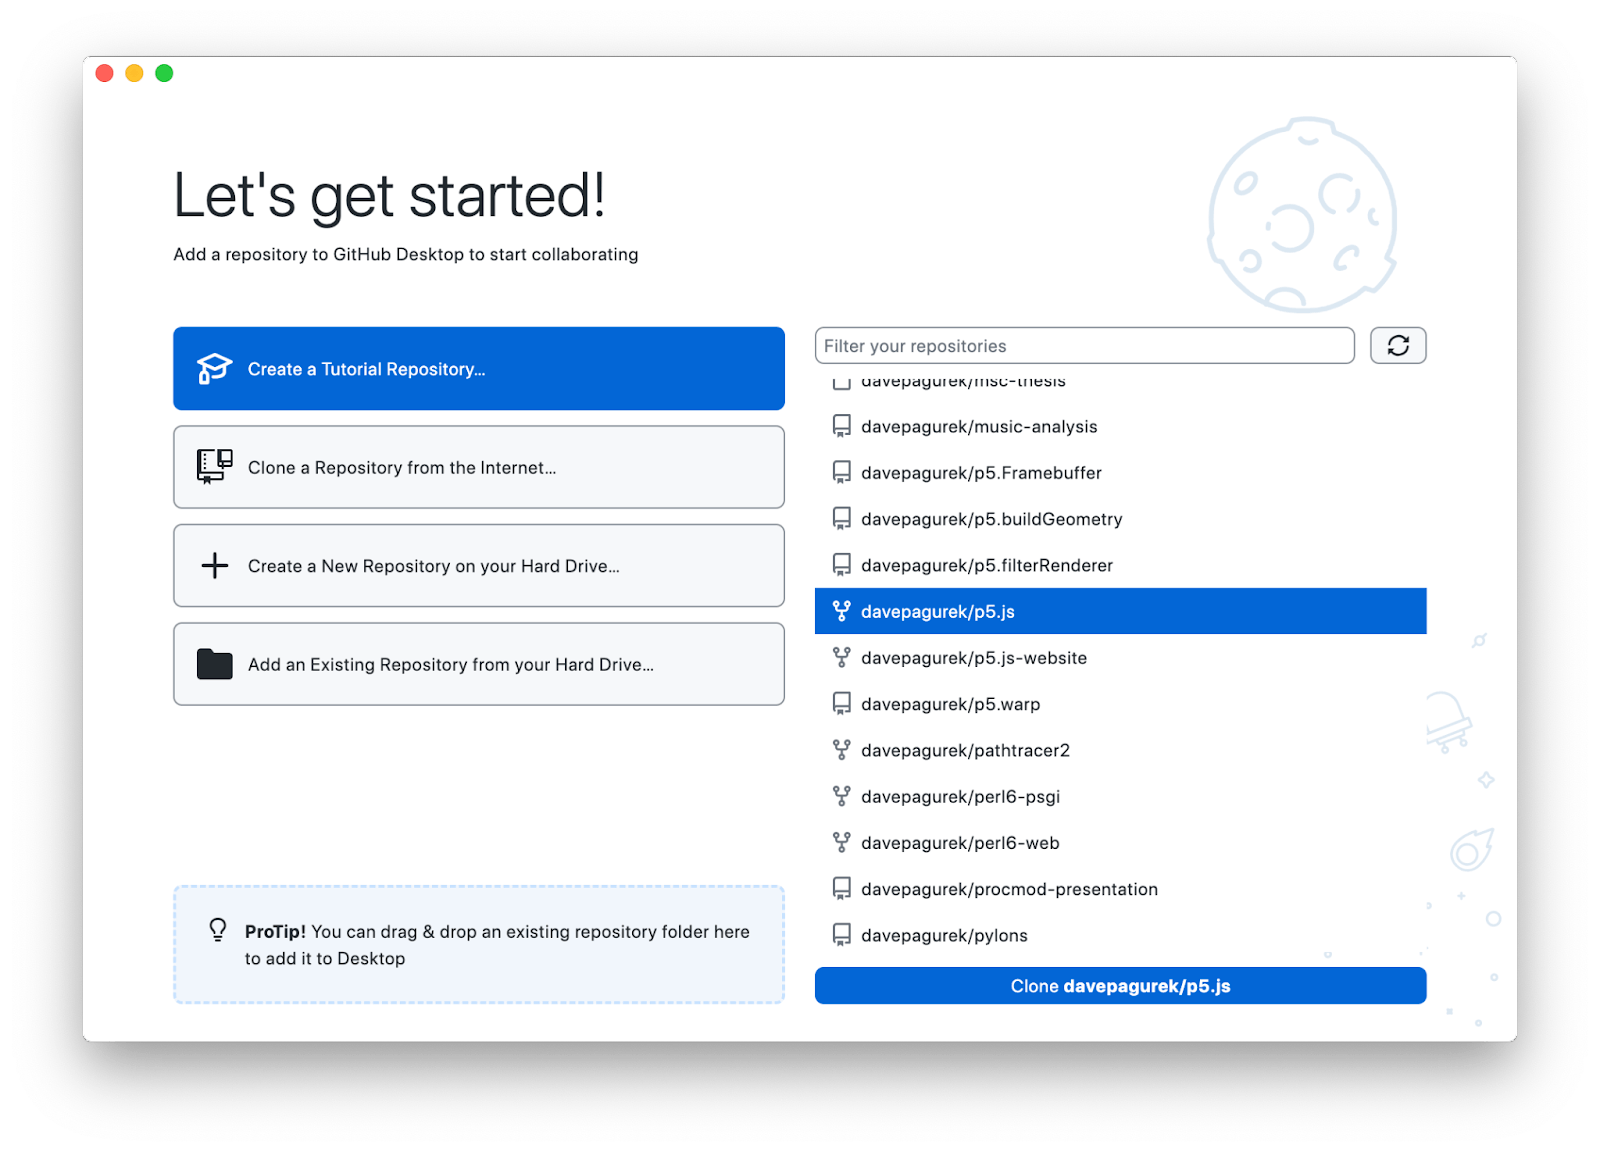
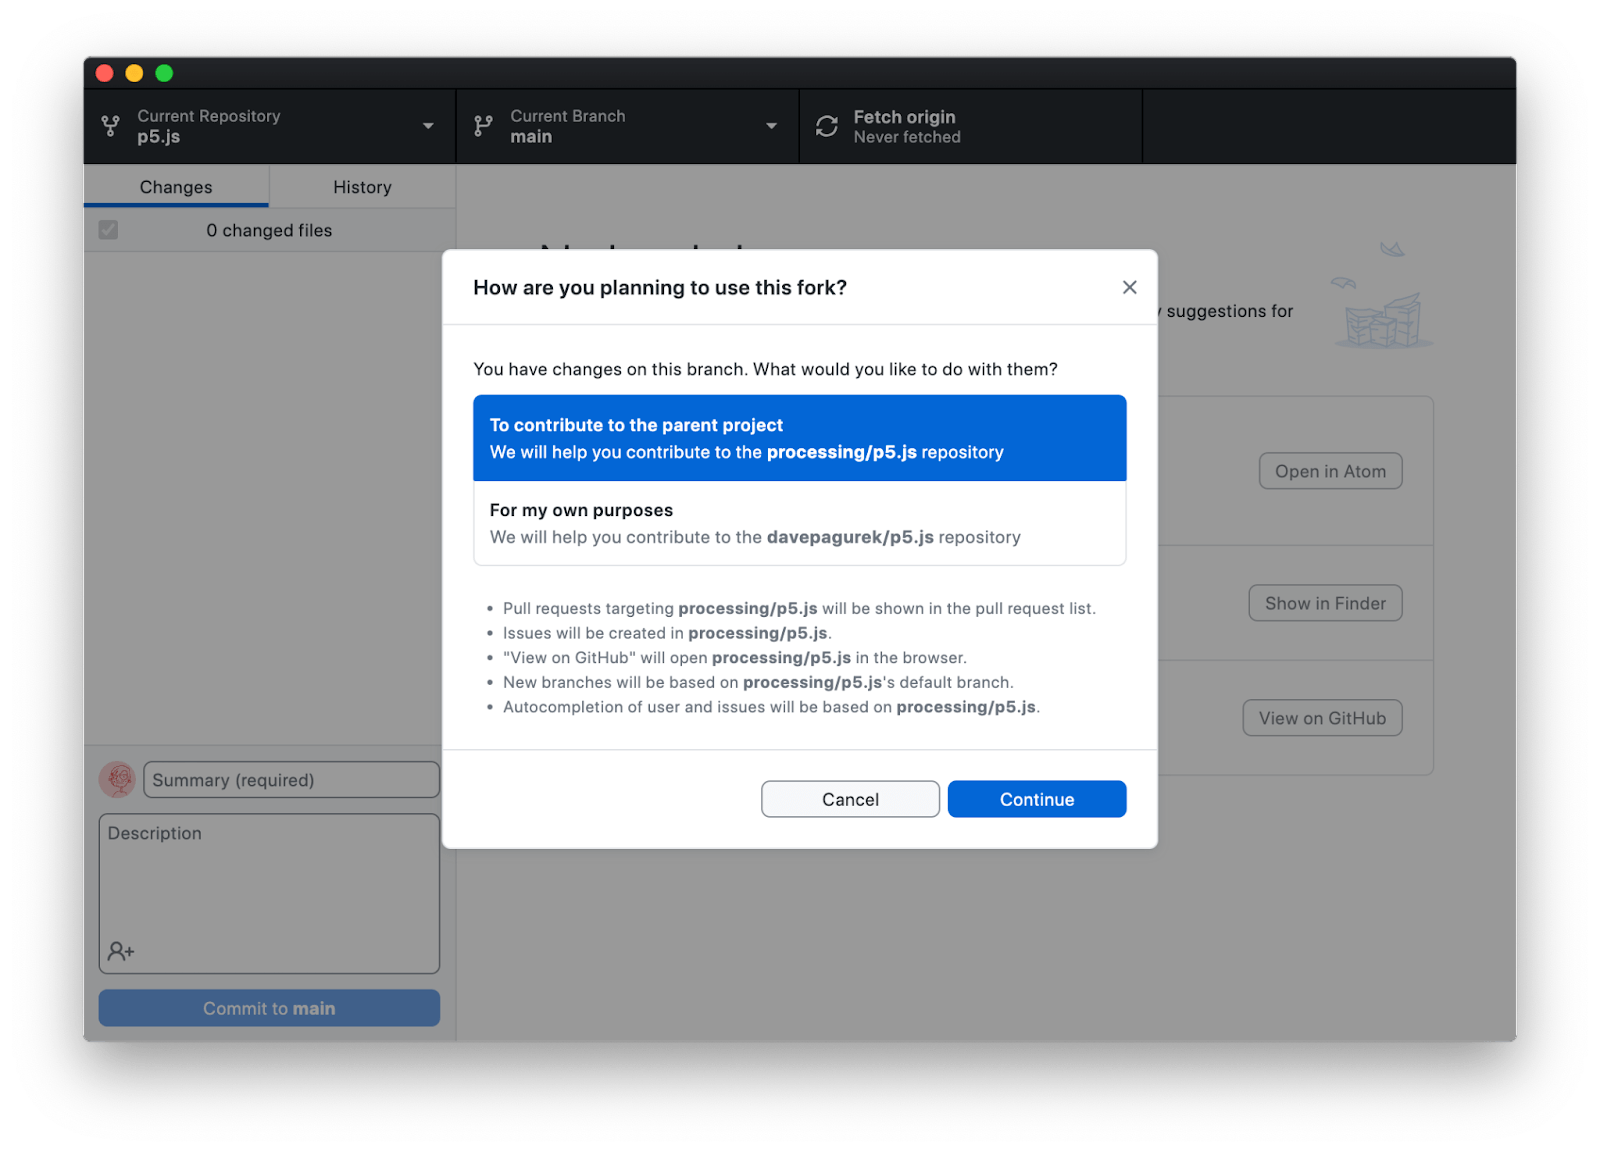
Once cloned, it will ask how you plan to use your fork. Select the option to contribute to the parent project and click “Continue.”
Using the git command line interface
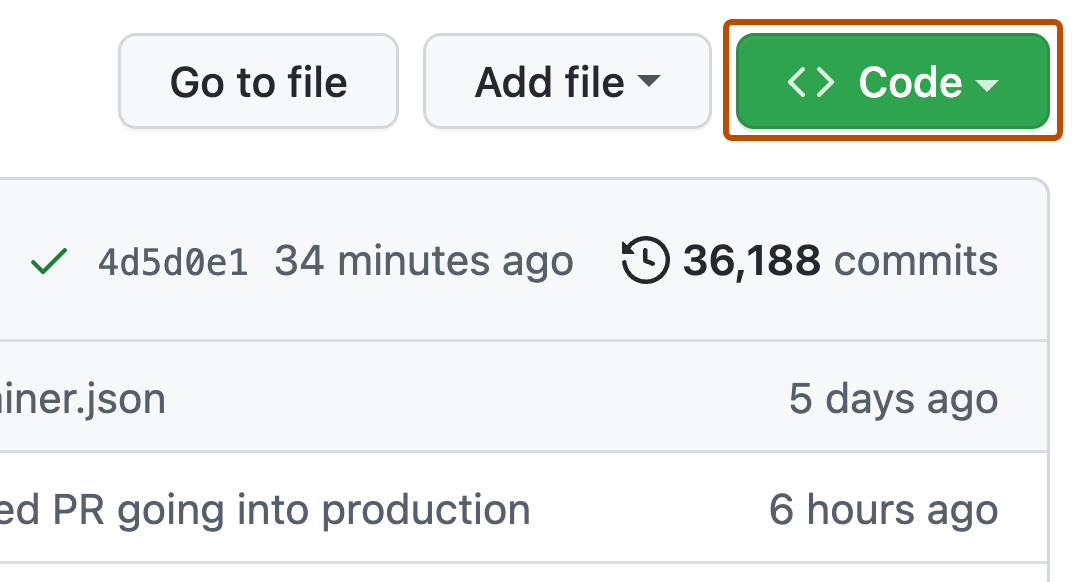
Once the fork is created, navigate to your fork’s page and copy the git URL by clicking the green “Code” button. It should look something like https://github.com/limzykenneth/p5.js.git.
Next go to the command line in your local environment and clone this git repository. “Clone” simply means download a copy of the repo to your local machine. Run the following command in a folder where you want to store the p5.js source code folder.
git clone [git_url]Replace [git_url] with the URL you just copied above. This can take several minutes, depending on the speed of your internet connection, a good time to make some coffee! Once the process is finished, you can open up the downloaded folder named p5.js in your preferred text editor and start looking around.
Codebase breakdown
Some of the key files and folders you will be in the p5.js folder are as follows:
src- Where all the code that eventually gets combined into the final p5.js and p5.min.js files livestest- Where unit tests and code for testing all documentation examples livestasks- Where detailed and custom build code livesGruntfile.js- This is the main build configuration filecontributor_docs- Where the documentation and all other contributor documentation lives
The other files and folders are either configurations or other kinds of support files; in most cases, you shouldn’t need to make any modifications.
Build setup
Before you do anything, you’ll need to set up the local project folder so that you can build and run tests for p5.js. Assuming you have node.js installed, run:
npm ciThis will likely take a while, as npm downloads all dependencies required. However, once done, that’s it, you are all set up. Pretty simple, right?
Git workflow
Now, you are ready to make the changes you need to make; for more details about the different parts of the repository and how you can make relevant changes, see the subsections below. To start, run:
npm testTo try building p5.js from scratch and run all unit tests, this should complete with no errors. If you just want to build the library without running the tests, you can run:
npm run buildEither of the commands above will build the library into the lib/ folder as p5.js and p5.min.js. You can use these built files for your own tests if necessary.
Next, we recommend that you make a branch off the main branch before starting your work. A branch in git is as the name implies, a branched version of the repo that you can add commits to without affecting the main or other branches. Branches enable you to work on multiple features at once (by using multiple isolated branches) and have confidence that if you mess up a branch it won’t affect the main branch.
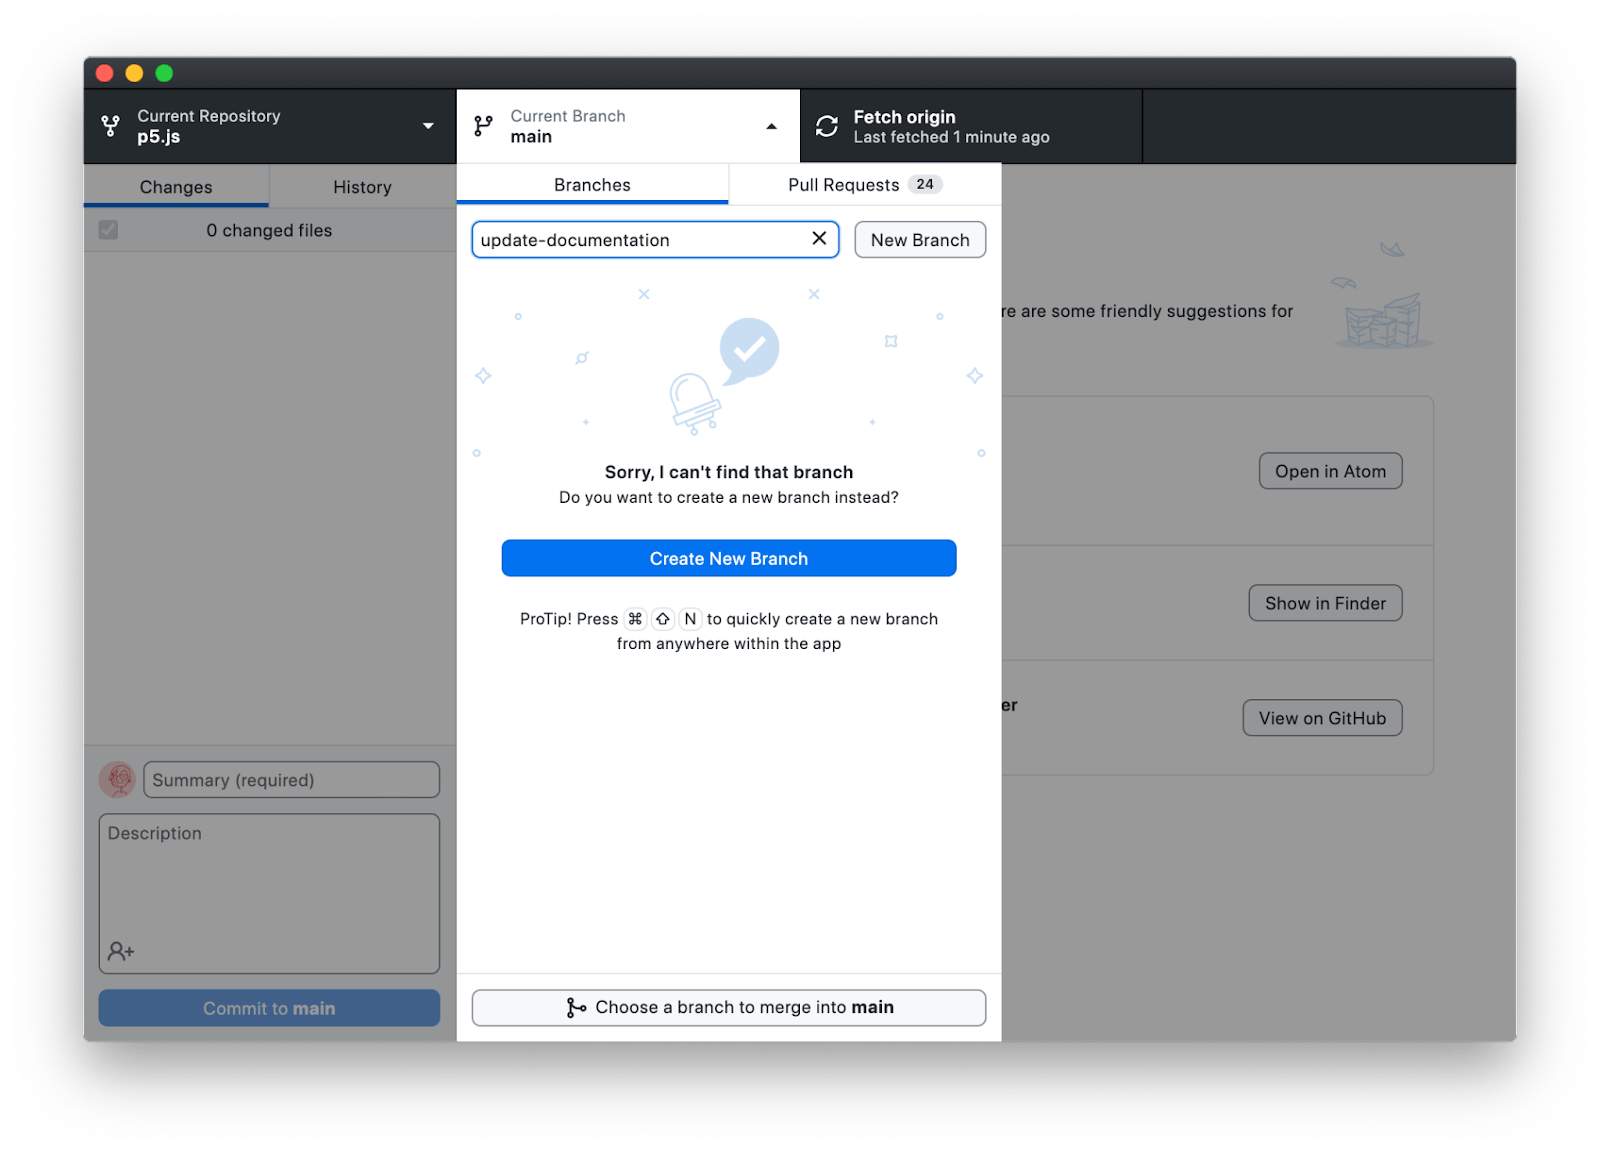
In GitHub Desktop, this can be done by clicking the Current Branch button in the header of the window. From here, you can change branches, or enter a branch name to make a new one. For our purposes, enter a new branch name describing the change you will make, and click Create New Branch.
From the terminal, run git checkout -b branch_name while you are on the main branch, replacing branch_name with something descriptive, and you will be on a separate branch now.
As you make your changes, we recommend running npm test frequently, especially if you are working on the source code. Running this will take some time, but it ensures that the changes you make are not breaking existing behaviors. You should run npm test before moving on to committing the changes as described below.
Once you have made your changes to the codebase, you will need to commit it to git. A commit is a collection of changes saved in the git repository; it essentially records the current state of the files in the repo at the time of commit.
A question that may arise is how often should you commit to git? In general it is preferred that you aim to commit often rather than lump multiple big changes into one commit. A good guideline is to commit whenever you have completed a subtask that can be described in a sentence.
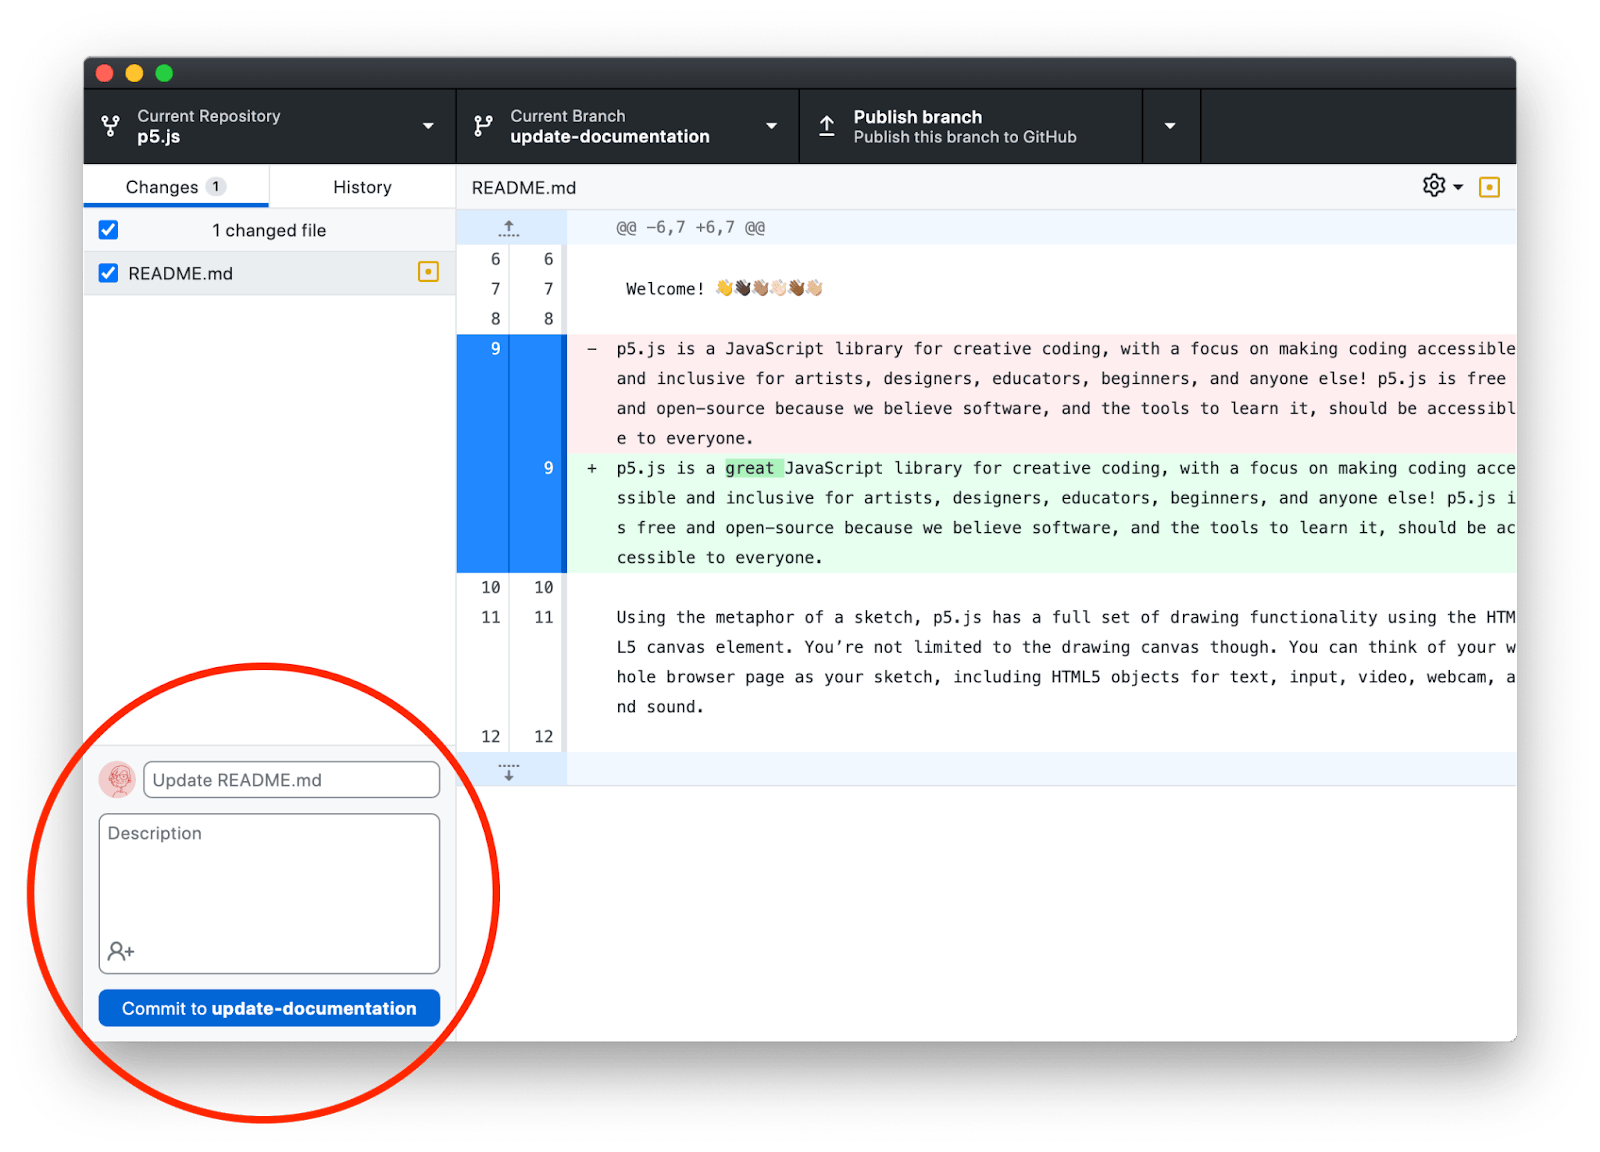
To commit all current changes from GitHub Desktop, open the app after making your changes. It will show a list of the files you have changed in the left sidebar, and the specific changes within each file on the right. Type a brief, high-level description in the field next to your user icon in the bottom left corner of the window. This will be the title of the commit. You may elaborate further in the description field below or just leave it blank. Click the blue “Commit” button to finalize the change.
To commit all current changes from the terminal, run the following:
- Check that it only lists files you have changed with the following command.
git statusIf there are files listed that you have not changed, you will need to either restore them to the original or make sure they are intended changes. To show more detailed changes for each file use the following command.
git diffYou should not commit any file changes that you don’t intend to change for your PR.
- Stage all changes for committing into git with the following command.
git add .- To commit the changes into git, run the following command.
git commit -m "[your_commit_message]"[your_commit_message] should be replaced with a relevant commit message that is descriptive of the changes, avoiding generic statements. For example, instead of saying Documentation fix 1, say Add documentation example to circle() function.
git commit -m "Add documentation example to circle() function"Repeat the above steps for all commits you will be making while making sure to run npm test periodically to make sure things are working.
Source code
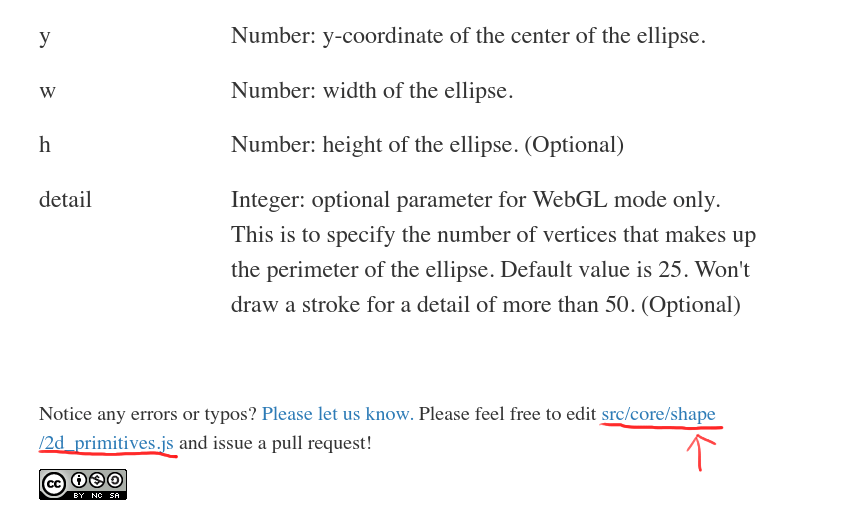
If you are going to work on the source code, a good place to start, if you know which of p5.js features you are going to work on, is to visit the documentation and at the bottom of each documented functionality of p5.js will be a link to its source code.
Unit tests
If you are going to work on unit tests, please see here. Note that for any feature enhancement, new features, and certain bug fix, unit tests covering the new implementations should be included in the PR.
Inline documentation
If you are going to work on the inline documentation, as known as p5.js reference, please see here.
Accessibility
If you are going to work on accessibility features, please see here. For a Friendly Error System, please see here.
Code standard
p5.js’ code standard or code style is enforced by ESLlint. Any git commit and pull request must pass linting before it will be accepted. The easiest way for you to follow the right coding standard is to use the ESLint plugin available for your text editor with linting error highlighting (available for most popular text editors).
Software Design principles
While working on any features of p5.js, it is important to keep in mind the design principles of p5.js. Our priorities may differ from the priorities of other projects, so if you are coming from a different project, we recommend that you familiarize yourself with p5.js’ design principles.
- Access We prioritize accessibility first and foremost, and decisions we make must take into account how they increase access to historically marginalized groups. Read more about this in our access statement.
- Beginner Friendly The p5.js API aims to be friendly to beginner coders, offering a low barrier to creating interactive and visual web content with cutting-edge HTML5/Canvas/DOM APIs.
- Educational p5.js is focused on an API and curriculum that supports educational use, including a complete reference to the API with supporting examples, as well as tutorials and sample class curricula that introduce core creative coding principles in a clear and engaging order.
- JavaScript and its community p5.js aims to make web development practices more accessible to beginners by modeling proper JavaScript design patterns and usage while abstracting them where necessary. As an open-source library, p5.js also includes the wider JavaScript community in its creation, documentation, and dissemination.
- Processing and its community p5.js is inspired by the Processing language and its community and aims to make the transition from Processing Java to JavaScript easy and clear.
Pull requests
Now that you have made the changes you need to make, including unit tests if applicable, npm test does not error, and you have committed the changes, you can start preparing pull requests to get your new commits merged into the official p5.js repository. A pull request, more formally, is a request to a repo (in this case, the official p5.js repo) to pull or merge changes from another repo (in this case, your forked p5.js repo) into its commit history.
Creating a pull request
The first step here is to push your new commits to your fork of p5.js; think of it as uploading the changes to your fork.
From GitHub Desktop, just to the right of the button to change branches in the header is a button to push your changes to GitHub. Click this to push your changes. 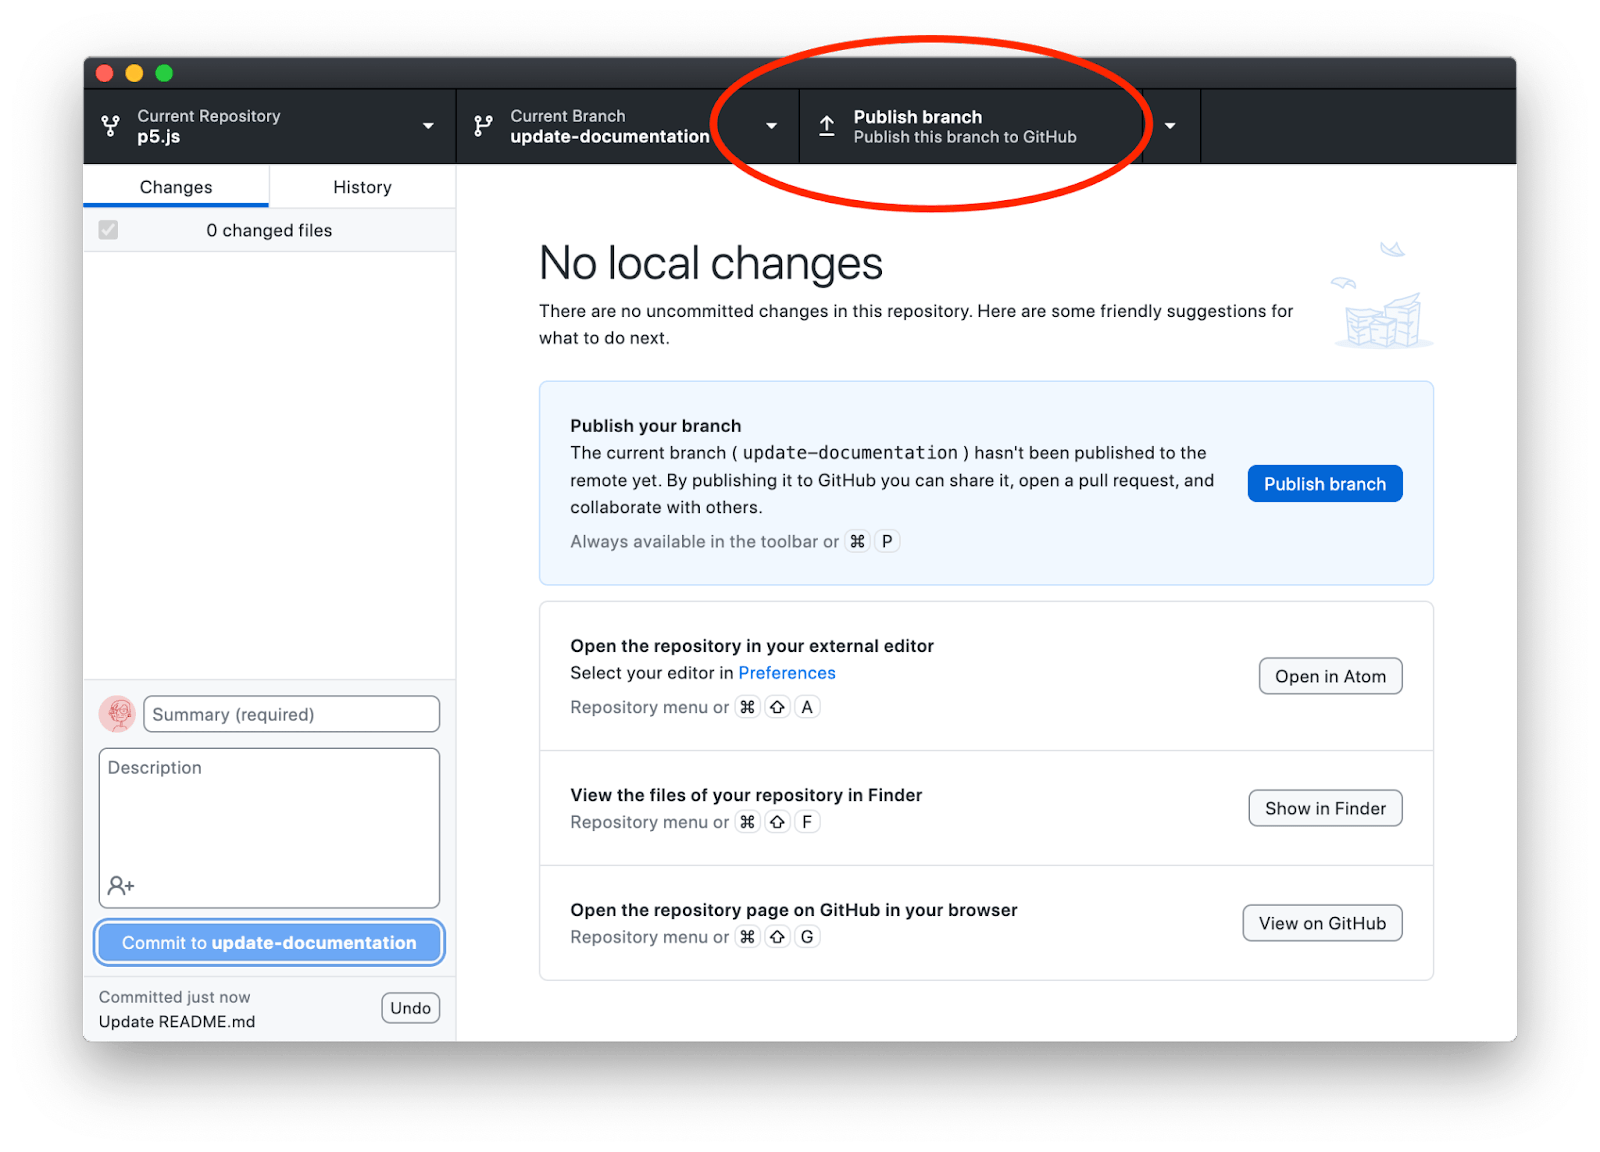
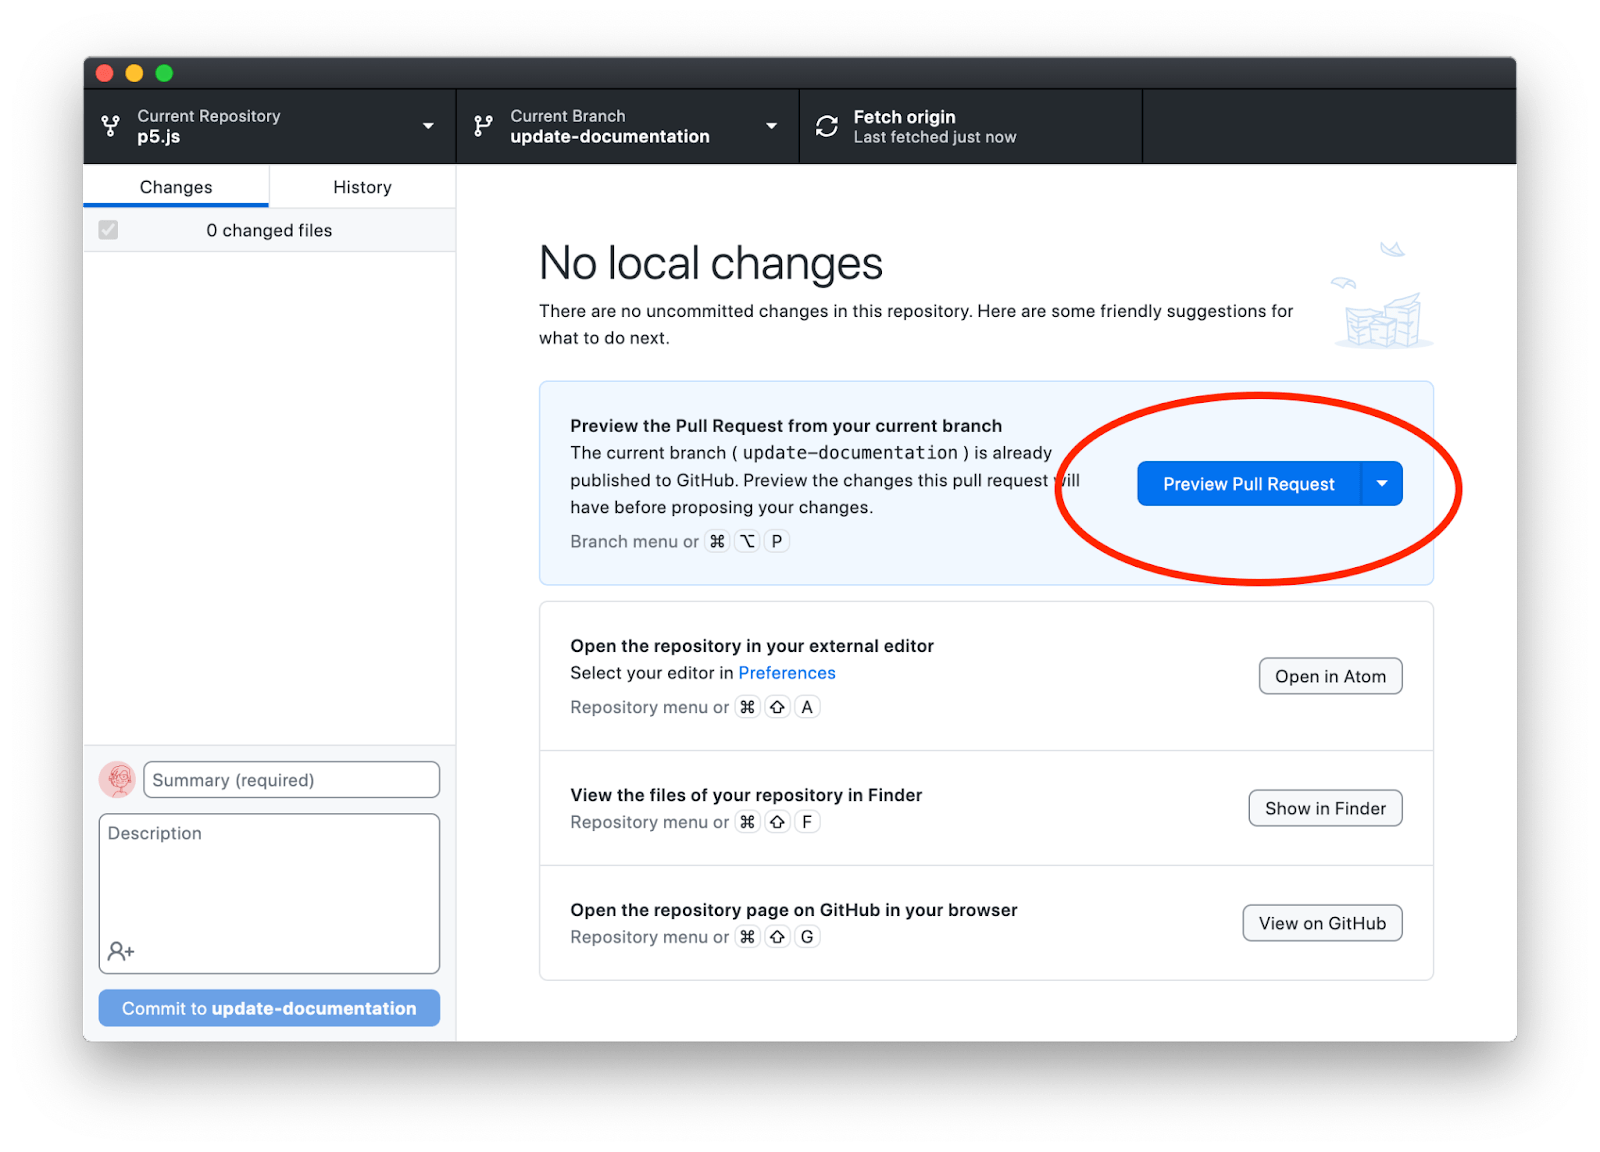
Once your code is uploaded, it will show a button prompting you to create a pull request. Clicking the button once will show a preview with another button to actually create the request. Press the “Create Pull Request” button to begin the process.
From the terminal, run the following command:
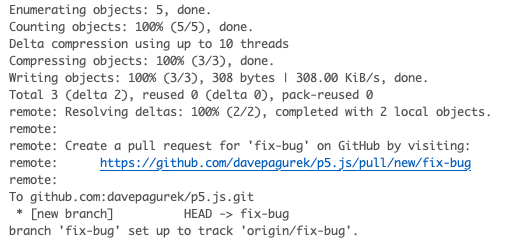
git push -u origin [branch_name]Once the push is complete, you may see a link in the terminal that lets you open a pull request, if not you can navigate to your fork in your web browser, switch to the branch you are working on with the dropdown button on top of the file list, click on “Contribute” then “Open pull request.”
You may also see a button to open a pull request when you visit the p5.js Github repo. Clicking it will also work to open a new pull request.
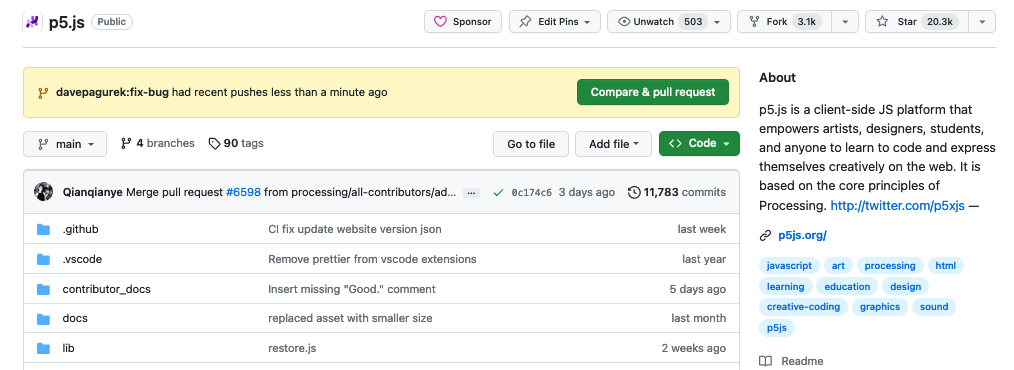
Pull request information
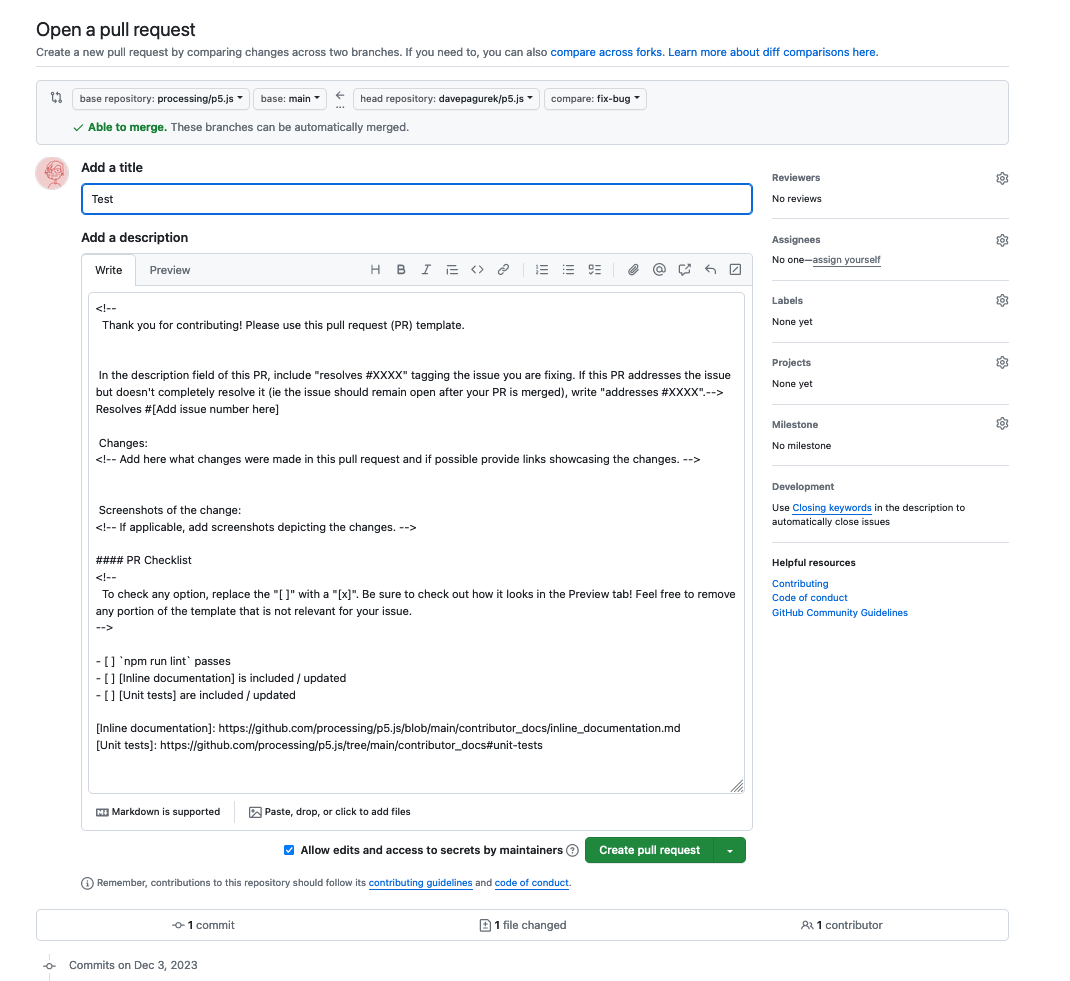
Before filing the pull request, you will need to fill out the pull request template.
Title
The pull request title should briefly describe what the changes are, again avoid generic statements here.
Resolves
In the template, there is this line Resolves #[Add issue number here], which you should replace [Add issue number here] with the issue number of the issue you are addressing/fixing above (e.g., Resolves #1234). This will make sure the issue is automatically closed after this PR is merged. If you do not wish to automatically close the issue after this PR is merged (maybe because there are more changes coming in a separate PR), change Resolves to Addresses.
Changes
You should clearly describe the changes you have made in this PR. Include any implementation details and decisions you made here that are relevant to whoever will review it.
Important: any PR that changes more than ~10 files or more than ~100 lines may be closed, unless this is specifically required by the issue and previously approved. Be sure to click the “Files Changed” tab in your PR to review changes. Unless required by the issue and approved, your PR should not make changes to package.json or package-lock.json; formatting changes; or changes not related to the issue.
Screenshots of the change
This is optional depending on circumstances and should be included when making changes related to how p5.js renders visuals on the canvas. Note that this is not a screenshot of the text editor but a screenshot of an example sketch’s behavior after your changes.
PR Checklist
This contains some relevant checklist items that you should tick by replacing [ ] with [x] wherever relevant to your changes.
Once done, click on “Create pull request.”
Rebase and resolve conflicts
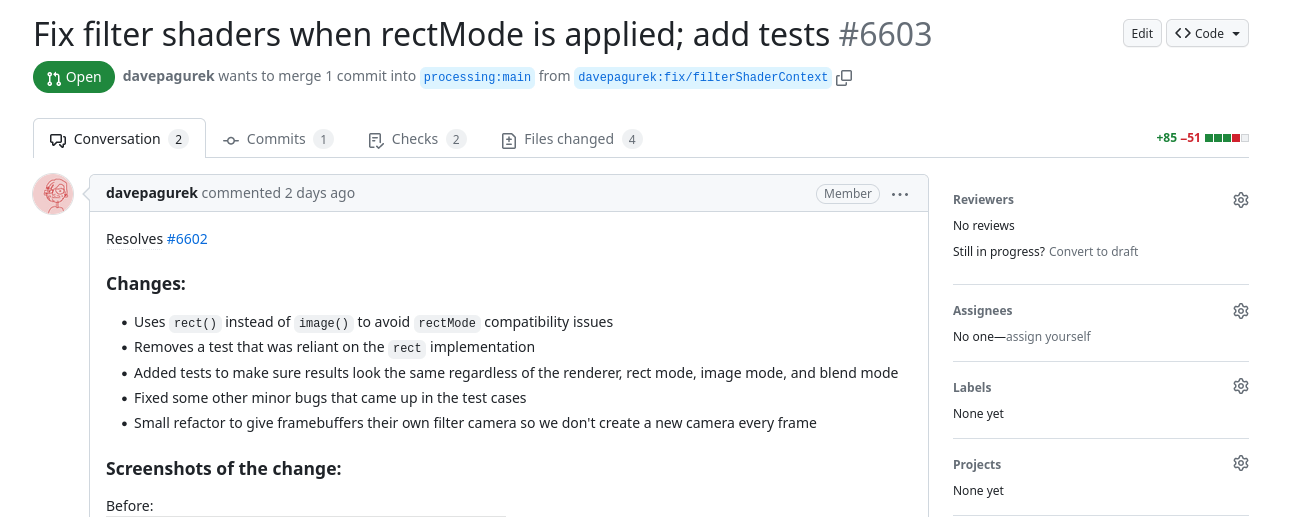
You should now inspect the opened pull request and pay attention to a few things:
- The number of commits should match the number of commits you have made, meaning if you have committed two times while working on this PR, it should only show two commits in the “Commits” tab.
- The “Files changed” tab should show the changes you have made as compared to the p5.js repo and nothing more.
- Near the bottom, it should say, “This branch has no conflicts with the base branch,” and not “This branch has conflicts that must be resolved.”
If any of the above is not true (there are more commits than you expected or there are conflicts), you may need to rebase or help resolve conflicts. Conflicts here mean that you have made changes to a file that also recently had changes applied to it, and git is not sure which set of changes to keep or leave out. If you are not confident in resolving these issues, let us know and we’ll guide you through the process. Basic instruction is as below.
Sometimes, Github lets you resolve conflicts directly in the browser by showing you a Resolve Conflicts button: 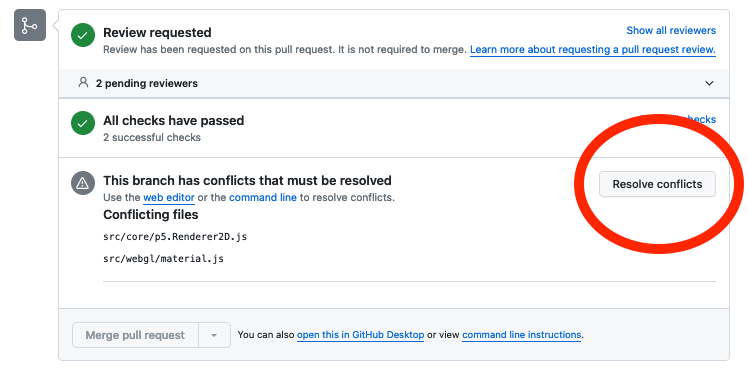
Conflicts are shown between <<<<<<< and >>>>>>>, separated by =======. One section shows your code, and the other section shows what has changed in the main branch.
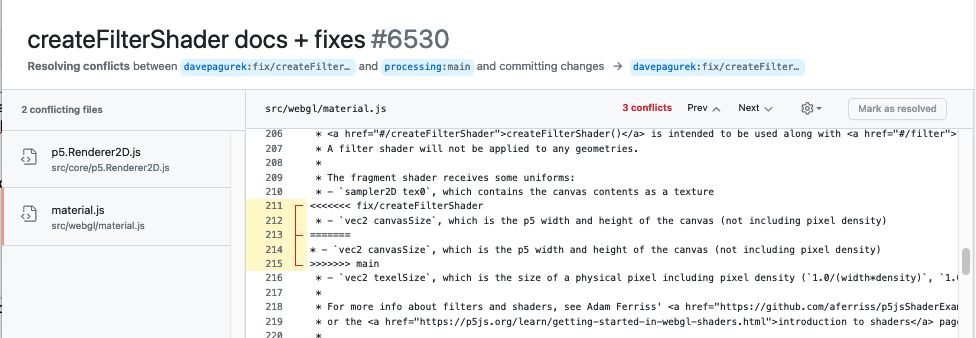
Remove the conflict markers and keep just the final code that you want in your PR. You can click “Mark as resolved” when all the conflicts have been addressed.
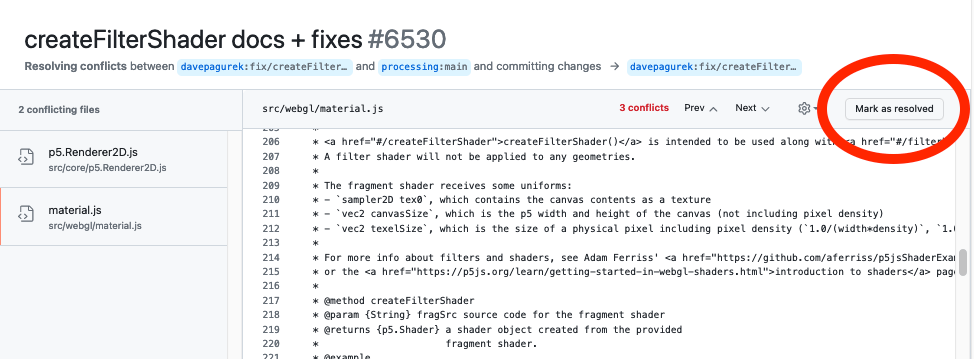
When all files with conflicts have been resolved, you can commit your changes.

Sometimes, the conflicts are too complicated for Github to show on the web. In this case, or if you just prefer the manual method, you can resolve your conflicts locally:
- Run
git remote add upstream https://github.com/processing/p5.js - Run
git fetch upstream - Run
git rebase upstream/main - You may have some conflicts! If it’s just lib/p5.js and lib/p5.min.js, it’s easy to fix; just build the project again. If you have conflicts in other files & you’re not sure how to resolve them, ask for help!
npm test
git add -u
git rebase --continue- Run
git push
The checklist above may clear out after these steps but if not, we’ll guide you through any fix necessary.
Discuss and amend
Now that your PR is opened, a steward or maintainer will review your PR. It may take several days before a steward is able to reply to your PR, so be patient. Why not use the time to check out some of the other open issues in the meantime?
Once a steward has reviewed your PR, one of two things may happen: 1. Your PR is approved and merged, hurray! 2. The steward may ask some questions regarding the PR or request some changes to the PR. If it’s the latter, don’t panic; it’s perfectly normal, and the stewards are always here to help you complete your contribution!
If changes are requested of your PR and you are able to make those changes, follow the same process as before but just continue from your local copy of the repo and relevant branch, make those changes, commit them into git, and push them to your forked remote repo. Once you have pushed additional commits to your forked remote repo, you will see that the new commits automatically show up in the PR. Leave a comment in the PR to let the reviewer know you have made the requested changes, and if no additional changes are needed, your PR will be merged!