This tutorial will introduce new concepts for creating 3D sketches with p5.js, including x, y, and z.
Let’s start by setting up the p5.js to use WebGL, by passing WEBGL as a third parameter into createCanvas().
    function setup() {
  createCanvas(windowWidth, windowHeight, WEBGL);
  describe('A red box on a white background.');
}
function draw() {
  background(255);
  fill(255, 0, 0);
  box();
}
3D coordinate space
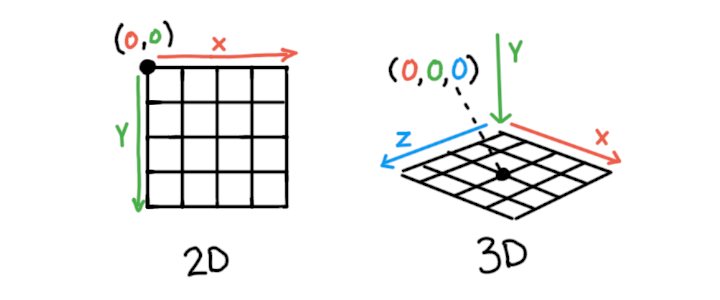
2D sketches use the x- and y-axes to define horizontal and vertical positions. 3D sketches extend this model with a z-axis which defines depth. When drawing in 2D, the point (0,0) is located at the top left corner of the screen. In WebGL mode, the origin of the sketch (0,0,0) is located in the middle of the screen. By default, the x-axis goes left to right, the y-axis goes up to down, and the z-axis goes from further to closer, “out of” the screen.

An illustration showing a 2D coordinate system on the left, showing an origin of (0,0) at its top left, and a 3D coordinate system on the right, showing an origin of (0,0,0) in its center
You can call debugMode() in your setup() function to add a grid on the x- and z-axes and the red-green-blue x, y, and z arrows to your sketch, similar to the illustration above.
Transformations: Position and Size of 3D Shapes
p5.js has a few functions that we can use to position and orient objects within 3D space: translate(), rotate(), and scale(). Collectively these are known as the transformation of an object. These methods are available for both 2D and 3D drawing.
translate(): Moving Objects in Space
translate() moves the origin to a given point. Anything drawn after we call translate() will be positioned relative to that point. translate() accepts arguments for x, y, and z values. Use the sliders in the sketch above to change the translation of the box and see how it moves along each axis. The code snippet below demonstrates simple translation on a box() shape.
    // draw a box 100 units to the right
translate(100,0,0);
box();
A random walk involves moving in a random direction each step. Try doing a random walk in 3D using translate(), drawing a cube after each step like a trail of breadcrumbs!
rotate(): Orienting Objects in Space
rotate() reorients whatever is drawn after it.
There are a few functions that can be used to rotate an object in 3D. Most of the time, it’s easiest to call functions like rotateX(), rotateY(), and rotateZ(), which each allow for rotation around a specific axis. Each function accepts a single argument specifying the angle of rotation. Try moving the sliders in the example above to see how rotation is performed on each axis. The code below shows each of these methods in use.
    // rotate X, Y, and Z axes by 45 degrees
rotateX(QUARTER_PI);
rotateY(QUARTER_PI);
rotateZ(QUARTER_PI);
box();
By default, p5.js expects angles to be in radians. Radians use numbers from 0 to TWO_PI to specify an angle. To use degrees, either convert degrees to radians using radians(numberInDegrees) or use angleMode(DEGREES):
    // rotate each axis by 45 degrees
rotateX(radians(45));
box();
// or
angleMode(DEGREES);
rotateY(45);
box();
You can also use rotate(angle, axis), which allows you to specify which axis you’d like to rotate around using a vector as the second argument. This lets you rotate a shape about any axis you choose. In the example below, we create an axis using the mouse coordinates, and rotate about it:
scale(): Size in Space
Try making a cube jump up and down, but use scale() changes the size of whatever is drawn after it. Like the other functions described, it accepts arguments for x, y, and z values.scale() to have it squash and stretch when it bounces to give it a cartoon feel!
Transforming Multiple Shapes
Transform functions are cumulative and affect everything drawn after them. For example, if you call translate(50, 0, 0) twice, they add together, making it equivalent to calling translate(100, 0, 0) once. However, sometimes you will want to draw different shapes with different transformations.
The push() function saves the current transformations and style settings. Then, after performing new transformations, the pop() function is used to restore us to the original transformations. The result is that whatever transformations or styling changes that are made between push() and pop() are isolated to that portion of the code. In the example below, we draw a number of boxes at their own distinct locations by placing their transforms between push() and pop():
Transformation Matrices
While this is a more advanced topic, each of these transformations affects what is called the model matrix. The model matrix is combined with the view matrix and the projection matrix, both of which help simulate the view of a camera, and this combination results in our 3D scene! You can learn more about Model View Projection on MDN.
Try making two spheres that can be moved around separately, with arrow keys controlling one, and WASD keys controlling the other.
The Order of Transformations Matters!
The way transformations affect each other can feel unpredictable at first because order matters. Each transformation always affects the next one. For example, if rotate() is called, followed by translate(), the direction of that translation will be affected by the rotation. The entire coordinate system is rotating and moving, not just the shape itself. Here are some recipes for different transformation orders that you can use.
The Default: Positioning Objects in a Scene
If you are drawing many objects, chances are that each one will have a unique position, orientation, and scale. For this, you should first translate() to the center of where the object should be, then rotate() to match its orientation, and finally scale() to fit its size. This is a good order to use by default.
Try making a solar system, where each planet has its own independent position as it moves around the sun, and each has its own rotation as they spin at different speeds!
Rotating Around a Pivot Point
Sometimes you want to rotate a shape about a point that isn’t its center. For this, you can translate() to the pivot point, rotate() or scale() as needed, and then translate() back to the center before drawing your shape. The sketch below uses this method to make a shape squash and stretch about its base rather than its center.
Try making a character waving its arm! You will want to rotate the arm about the point where the arm connects to its body so that it stays connected.
Drawing with Symmetry
Sometimes you want to draw the same thing multiple times with mirror or radial symmetry. In these cases, you will end up drawing in a loop. For each iteration, rotate() or scale() depending on the type of symmetry you want. Finally, apply any other transformations needed to draw your shape.
In the example below, scale(-1, 1) is used to add horizontal symmetry to draw the eyes and ears of a face:
In this example, rotateY() is used to create radial symmetry for a stonehenge scene.
Try giving a body with arms and legs to the head in the example!
Conclusion
By having control over 3D coordinates, you will be able to create more complex scenes in 3D. The tutorials that follow this one build on these skills by giving you more control over what you draw after you have transformed it.
Glossary
GPU
The GPU (Graphics Processing Unit) is a piece of hardware that is particularly well suited for performing many calculations in parallel, making it powerful for 3D graphics.
Model
A custom 3D geometry that can be saved and loaded from a file.
Matrix
A special array that can hold information about the transformation of a geometry.
Camera
The viewpoint of a 3D scene.
Transformation
The combined scale, rotation, and translation of a geometry. The verb transform is used when describing altering these properties.
Vertex
A point in 3D space with an x, y, and z position.
Face
A collection of three points that create a solid surface.
संबंधित संदर्भ
translate
निर्देशांक प्रणाली का अनुवाद करता है। डिफ़ॉल्ट रूप से, मूल (0, 0) स्केच के शीर्ष-बाएँ पर है 2डी मोड में कोना और वेबजीएल मोड में केंद्र। translate() फ़ंक्शन मूल को एक अलग स्थिति में स्थानांतरित कर देता है। translate() को कॉल करने के बाद खींची गई सभी चीज़ें स्थानांतरित होती दिखाई देंगी। translate() को कॉल करने के दो तरीके हैं उन मापदंडों के साथ जो मूल की स्थिति निर्धारित करते हैं। कॉल करने का पहला तरीका translate() अनुवाद की मात्रा निर्धारित करने के लिए संख्याओं का उपयोग करता है। पहले दो पैरामीटर, x और y, सकारात्मक x- और y-अक्ष के साथ अनुवाद करने के लिए मात्रा निर्धारित करते हैं। उदाहरण के लिए, translate(20, 30) को कॉल करने से मूल 20 पिक्सेल x-अक्ष पर और 30 पिक्सेल y-अक्ष पर अनुवादित हो जाता है। तीसरा पैरामीटर, z, वैकल्पिक है। यह सकारात्मक z-अक्ष के साथ अनुवाद करने के लिए मात्रा निर्धारित करता है। उदाहरण के लिए, translate(20, 30, 40) को कॉल करने से x-अक्ष पर मूल 20 पिक्सेल, y-अक्ष पर 30 पिक्सेल और z-अक्ष पर 40 पिक्सेल का अनुवाद होता है। कॉल करने का दूसरा तरीका translate() अनुवाद की मात्रा निर्धारित करने के लिए p5.Vector ऑब्जेक्ट का उपयोग करता है। उदाहरण के लिए, translate(myVector) को कॉल करने पर x-, y- के साथ अनुवाद करने की मात्रा निर्धारित करने के लिए myVector के x-, y- और z-घटकों का उपयोग किया जाता है। और z-अक्ष। ऐसा करना translate(myVector.x, myVector.y, myVector.z) को कॉल करने के समान है। डिफ़ॉल्ट रूप से, परिवर्तन जमा होते हैं। उदाहरण के लिए, translate(10, 0) को दो बार कॉल करने का प्रभाव translate(20, 0) को एक बार कॉल करने जैसा ही होता है। push() और pop() फ़ंक्शंस का उपयोग अलग-अलग ड्राइंग समूहों के भीतर परिवर्तनों को अलग करने के लिए किया जा सकता है। .
rotate
निर्देशांक प्रणाली को घुमाता है। डिफ़ॉल्ट रूप से, सकारात्मक x-अक्ष दाईं ओर इंगित करता है और सकारात्मक y-अक्ष नीचे की ओर इंगित करता है। rotate() फ़ंक्शन मूल के बारे में निर्देशांक प्रणाली को घुमाकर इस अभिविन्यास को बदलता है। rotate() कॉल करने के बाद खींची गई हर चीज़ घूमती हुई दिखाई देगी। पहला पैरामीटर, कोण, घूमने की मात्रा है। उदाहरण के लिए, rotate(1) को कॉल करने से निर्देशांक प्रणाली दक्षिणावर्त 1 रेडियन घूमती है जो लगभग 57˚ है। rotate() वर्तमान angleMode() का उपयोग करके कोण मानों की व्याख्या करता है। दूसरा पैरामीटर, अक्ष, वैकल्पिक है.
scale
निर्देशांक प्रणाली को मापता है। डिफ़ॉल्ट रूप से, आकृतियाँ उनके मूल पैमाने पर खींची जाती हैं। 50 पिक्सेल चौड़ा एक आयत 100 पिक्सेल चौड़े कैनवास की आधी चौड़ाई घेरता हुआ प्रतीत होता है। scale() फ़ंक्शन निर्देशांक प्रणाली को छोटा या फैला सकता है ताकि आकृतियाँ विभिन्न आकारों में दिखाई दें। scale() को पैरामीटर के साथ कॉल करने के दो तरीके हैं जो स्केल फैक्टर सेट करते हैं। कॉल करने का पहला तरीका scale() स्केलिंग की मात्रा निर्धारित करने के लिए संख्याओं का उपयोग करता है। पहला पैरामीटर, s, प्रत्येक अक्ष को स्केल करने के लिए मात्रा निर्धारित करता है। उदाहरण के लिए, scale(2) को कॉल करने से x-, y- और z-अक्ष 2 के कारक तक फैल जाते हैं। अगले दो पैरामीटर, y और z, वैकल्पिक हैं। वे y- और z-अक्ष को स्केल करने के लिए राशि निर्धारित करते हैं। उदाहरण के लिए, scale(2, 0.5, 1) को कॉल करने से x-अक्ष 2 के कारक से फैल जाता है, y-अक्ष 0.5 के कारक से सिकुड़ जाता है, और z-अक्ष अपरिवर्तित रह जाता है। scale() को कॉल करने का दूसरा तरीका p5.Vector ऑब्जेक्ट। उदाहरण के लिए, scale(myVector) को कॉल करने पर राशि निर्धारित करने के लिए myVector के x-, y- और z-घटकों का उपयोग किया जाता है। x-, y- और z-अक्ष के साथ स्केलिंग का। ऐसा करना कॉल करने जैसा ही है स्केल(myVector.x, myVector.y, myVector.z).
push
Begins a drawing group that contains its own styles and transformations.
pop
Ends a drawing group that contains its own styles and transformations.


