在本教程中,你将学习到为草图添加用户交互的新方法,同时掌握如何控制代码运行的顺序。
通过创作一个可交互太阳草图和一个日出动画,你将学习到以下基础编程概念:
- 条件语句 (if, if-else, 以及 else-if)
- 布尔变量, 比较运算符, 与表达式
- 加法/减法赋值运算符
- 递增与递减
- 基于鼠标点击和鼠标位置的交互
控制程序的流程是计算机强大功能的核心,也是在p5.js中创作激动人心的动画和游戏的关键。通常情况下,代码是按行的顺序来执行的。在之前的教程中,你已经了解了draw()函数是如何从上至下反复地运行代码的。这让重叠图形和“翻页”动画得以实现。
前置要求
在开始之前,你应该能够:
- 在画布上使用p5.js添加和自定义形状与文本
circle()|rect()|ellipse()|triangle()|line()fill(),stroke(),text(),textSize()
- 使用包括
mouseX和mouseY等在内的内置变量 - 使用
let和 赋值运算符 来声明、初始化、使用和更新自定义变量 - 通过使用
random()、frameRate()和frameCount,同时实现线性运动和随机运动 - 添加代码注释并处理错误信息 - 要了解更多关于错误信息和调试的信息,请阅读调试实战指南
第一部分:可交互太阳
创建一个可交互太阳草图是学习如何使用条件语句和用户交互的好方法。
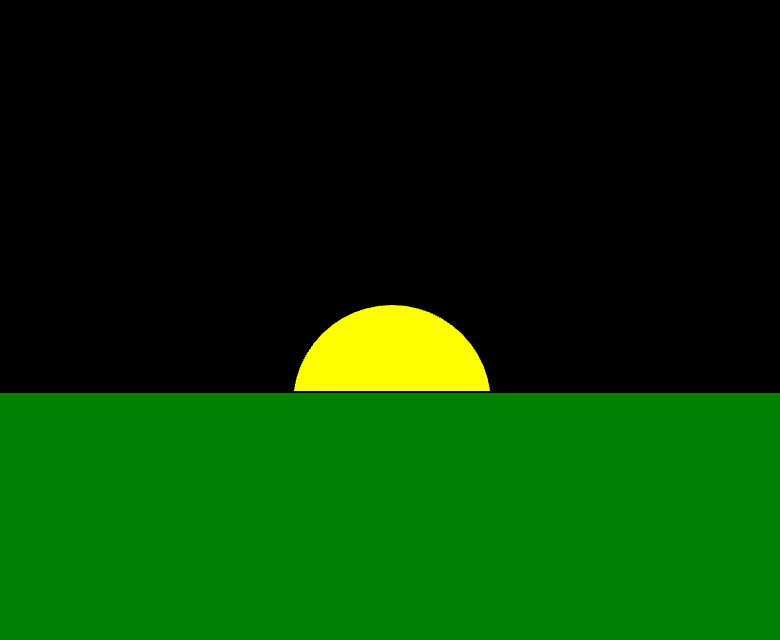
在黑色画布上,一个黄色圆圈的上半部分从绿色矩形后面露出。
在黑色画布上,一个黄色圆圈的上半部分从绿色矩形后面露出。
IF语句(条件语句)
条件语句 控制特定代码行执行的时机。例如,在太阳升起前天空是黑色的。一旦太阳升起,时间来到白天,天空颜色就会变浅。你可以编写一个条件语句(也称为if语句)来根据太阳的位置改变天空的颜色。如果太阳位置高,天空应该是浅色的;否则,天空应该是深色的。if 语句可以检查太阳的位置,并根据太阳在天空中的位置来控制执行的代码。
在我们使用检查太阳位置的条件语句之前,我们可以添加自定义变量来帮助我们在鼠标指针划过画布时更新太阳的位置。
第一步:定义并初始化自定义变量
打开一个新的p5.js项目,命名为 “Interactive Sun”,并保存该草图(sketch)。
声明一个名为
sunHeight的自定义变量用于表示太阳的 y 坐标,和一个名为horizon的自定义变量用于表示地平线的 y 坐标。将 horizon 变量初始化为 200。在
setup()函数之前,将以下代码添加到你的草图中://太阳和地平线 y 坐标的自定义变量 let sunHeight; let horizon = 200;
将
sunHeight更新为鼠标指针的 y 坐标(mouseY)。在
draw()函数内添加以下代码://太阳跟随鼠标的 y 坐标 sunHeight = mouseY;
你的代码应该如下所示:
    //太阳和地平线 y 坐标的自定义变量
let sunHeight;
let horizon = 200;
function setup() {
createCanvas(400, 400);
}
function draw() {
background(0);
//太阳跟随鼠标的 y 坐标
sunHeight = mouseY;
}
由于太阳的高度是变化的,我们将鼠标的 y 坐标 (mouseY)储存在变量 sunHeight 中。在函数 draw() 中执行此操作可以保证每次 draw() 运行时,sunHeight 都会持续更新。虽然地平线的位置保持不变,但为它设置一个自定义变量可以作为参考点,并提高代码的可读性。
访问 p5.js 参考手册以获取更多关于 mouseY 和 let的信息。
第二步:绘制形状并为画布着色
使用自定义变量
sunHeight作为太阳的y坐标来绘制太阳。在
draw()函数内添加以下代码://太阳 fill("yellow"); circle(200, sunHeight, 160);
绘制一条线段作为地平线。
在
draw()函数内添加以下代码://绘制一条线段作为地平线 stroke("green"); line(0,horizon,400,horizon);
你的代码应该如下所示:
    //太阳和地平线 y 坐标的自定义变量
let sunHeight;
let horizon = 200;
function setup() {
  createCanvas(400, 400);
}
function draw() {
  background(0);

  //太阳跟随鼠标的 y 坐标
  sunHeight = mouseY;

  //太阳
  fill("yellow");
  circle(200, sunHeight, 100);


  //绘制一条线段作为地平线
  stroke('green');
  line(0,horizon,400,horizon);
}
当鼠标在画布上垂直移动时,太阳会跟随鼠标指针。这是因为我们在 circle(200, sunHeight, 100) 中使用了 sunHeight 作为圆心 y 坐标的参数。画布上绘制的地平线则使用 horizon 作为两个端点 y 坐标 y1, y2 的参数。地平线在画布上的位置标记将用于后续改变背景颜色的逻辑。
访问 p5.js 参考手册的2D基础形状, 颜色, 基础和鼠标事件页面来了解更多关于形状和变量的信息。你也可以阅读调试实战指南(示例 1 & 2)来获取常见错误的帮助。
第三步:使用带有布尔表达式的条件语句来改变背景颜色
- 当太阳在地平线以上时,将背景颜色设置为浅蓝色。
在
draw()内部把以下代码添加在sunHeight = mouseY这行代码后://如果太阳在地平线以上,背景设为浅蓝色 if(sunHeight < horizon){ background("lightblue"); }
你的代码应该如下所示:
    //太阳和地平线 y 坐标的自定义变量
let sunHeight;
let horizon = 200;
function setup() {
  createCanvas(400, 400);
}
function draw() {
  background(0);

  //太阳跟随鼠标的 y 坐标
  sunHeight = mouseY;


   //如果太阳在地平线以上,背景设为浅蓝色
  if(sunHeight < horizon){ //check if it is daytime
     background("lightblue");
  }
  //太阳
  fill("yellow");
  circle(200, sunHeight, 100);


  //绘制一条线段作为地平线
  stroke('green');
  line(0,horizon,400,horizon);
}
运行代码,并尝试用鼠标移动太阳!
在以上代码中,背景默认是黑色,因为 draw() 函数中读取的第一条语句是 background(0) 。当太阳在地平线以下时,背景保持黑色,这是因为 if 语句跳过了花括号内的代码块:background("lightblue") 。当太阳移到地平线以上时,花括号内的代码块开始运行,这会将默认的黑色重置为浅蓝色。
在这里,你正在控制 background(0) 和 background("lightblue")运行的时机。条件语句(或if语句)是一种控制特定代码行何时运行的方式。它可以改变草图中发生的事。
IF 语句语法
一个if语句以单词 if 开头,后跟跟括号内的条件(conditions),以及花括号内被称为代码块的代码行。如果条件为 true (真),则运行该代码块。if语句的语法定义如下:
    if (condition) {
  // 如果条件为 true,则运行此处的代码
}
布尔表达式与布尔值
关键词 if 后括号内的内容可以是一个 布尔值 或一个 布尔表达式。在下面的示例中,我们使用布尔表达式来检查变量 sunHeight 的值是否小于变量 horizon 的值:
| | |
| Boolean expression |
| | |
| Code block |
|
布尔表达式是计算结果为布尔值的语句。布尔值只能是true(真)或false(假)。与数字(numbers)和字符串(strings)不同,布尔值只有这两个。布尔表达式可以帮助我们检查条件是否为true(真)或false(假)。因此,它们需要被称为 比较运算符(comparison operators) 的符号。 比较运算符(comparison operators) 是用于比较两个值的特殊符号(见下表)。
你可以用来创建布尔表达式的比较运算符包括:
符号 | 含义(p5.js参考链接) | 示例 |
|---|---|---|
|
| |
|
| |
|
| |
|
| |
| 严格相等 (意味着不同类型的值会被视为不相等) |
|
| 不等于 |
|
访问MDN参考资料来了解更多有关表达式与运算符的信息。
你可以将布尔表达式想象成是计算机在提问。在第三步添加的代码中,布尔表达式是 sunHeight < horizon 。它在询问:变量 sunHeight 的值是否小于变量 horizon 的值。如果问题的答案是 true (真),那么代码块就会运行。如果答案为否,那么代码块则会被跳过。
我们可以通过在 draw() 函数中的 sunHeight = mouseY 之后添加 console.log(sunHeight < horizon) 以在控制台(console)中查看该表达式的值。当你移动鼠标划过画布时,观察控制台打印的值是如何在 true 和 false 之间切换的:当太阳在地平线以下时,值为 false ;当太阳在地平线以上时,值为 true 。参考这个草图里的示例。
访问p5.js 参考手册的基础知识页面来了解更多关于 if 语句和布尔值的信息。
IF-ELSE 语句
另一个重要的条件语句是 if-else语句 。它可以控制两个不同的代码块。if-else 语句的语法定义如下:
    if (condition) {
  // 如果条件为 true,则运行此处的代码
} else {
  // 如果条件为 false,则运行此处的代码
}
如果条件为 true (真),则运行第一个代码块。如果条件为 false (假),则运行关键词 else 之后的代码块。如果你的代码需要根据同一个条件做出两种不同的改变,那么 if-else 语句是一种更好的代码组织方式。将 if 语句想象成如下所示的气泡图(bubble map)会很有帮助:它展示了当条件为真时运行第一个代码块,而当条件为假时运行第二个代码块。
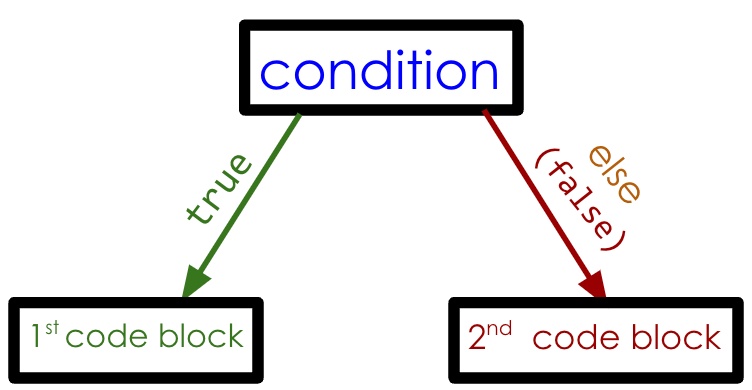
一张气泡图,有两个箭头从标有“条件(condition)”的气泡引出。标有 “true(真)“的箭头指向标有“第 1 个代码块”的气泡。第二个标有“else (false)(假)”的箭头指向标有“第 2 个代码块”的气泡。
例如,你可以修改日落动画中的 if 语句,先移除 background() 函数,然后添加以下 if-else 语句:
原始代码:
    //...function draw

background(0); // 夜晚的天空

//太阳跟随鼠标的 y 坐标
sunHeight = mouseY;

//如果太阳在地平线以上,背景设为浅蓝色

if (sunHeight < horizon) {
  background("lightblue"); // 蓝色的天空
}
修改后的代码:
    //...function draw

//太阳跟随鼠标的 y 坐标
sunHeight = mouseY;

//如果太阳在地平线以上,背景设为浅蓝色

//使用 if-else 语句

if (sunHeight < horizon) {
  background("lightblue"); // 如果太阳在地平线以上,背景设为浅蓝色
} else {
  background(0); // 否则把天空设置为夜空
}
在上面的代码中,我们可以看到太阳在地平线以上时 sunHeight < horizon 会返回 true,随后代码 background("lightblue") 运行。当 sunHeight 不小于地平线高度时,关键词 else 后的代码 background(0) 运行。虽然这两种代码编写方式在视觉效果上是相同的,但有时使用 if-else 会更清晰且高效,尤其是当你需要控制两个不同的代码块时。
访问 p5.js 参考手册的 if 和 Boolean 来了解更多信息。
第四步:添加草地来遮蔽太阳
为你的草图添加一片草地景观。这样当太阳移动到地平线以下时,你就看不见它了。
- 在绘制太阳之后,在景观中绘制一个绿色矩形以便在太阳低于地平线时将其遮挡。该矩形的 y 坐标参数即为地平线
horizon的位置。在
draw()函数中绘制地平线的代码行之后,添加以下代码://草地 fill("green"); rect(0, horizon, 400, 400);
你的代码应该如下所示:
    //太阳和地平线 y 坐标的自定义变量
let sunHeight;
let horizon = 200;
function setup() {
  createCanvas(400, 400);
}
function draw() {

  //太阳跟随鼠标的 y 坐标
  sunHeight = mouseY;

  //如果太阳在地平线以上,背景设为浅蓝色

  //使用if-else语句

  if (sunHeight < horizon) {
    background("lightblue"); // 如果太阳在地平线以上,背景为蓝色
  } else {
    background(0); // 否则为夜空
  }

  //太阳
  fill("yellow");
  circle(200, sunHeight, 100);


  //绘制一条线段作为地平线
  stroke('green');
  line(0,horizon,400,horizon);

  //草地

  fill("green");

  rect(0, horizon, 400, 200);

}
运行草图并将太阳移动到地平线以下。观察到天空是如何随着太阳的消失而改变的了吗?这是日出动画示例草图的链接。
第二部分:日出动画
接下来,你将制作一个日出动画。在这个动画中,太阳会自动移动,并使天空的颜色产生渐变效果。
第一步:声明并初始化用于太阳位置与背景颜色的变量
创建一个新的 p5.js 项目,命名为“Sunrise Animation”并保存。
声明一个用于表示太阳 y 坐标的自定义变量,并将其初始化为 600。
在
setup()函数之前,将以下代码添加到你的草图中://用于太阳初始位置的变量 //位置在地平线以下 let sunHeight = 600;
声明用于表示天空颜色中红色和绿色的值的自定义变量,并将它们初始化为 0。
在
setup()函数之前,将以下代码添加到你的草图中://用于颜色变化的变量 let redVal = 0; let greenVal = 0;
查阅p5.js关于 fill() 函数的参考手册或MDN上关于RGB的参考资料来回顾有关颜色的代码知识。
你的代码应该如下所示:
//用于太阳初始位置的变量
let sunHeight = 600; //位置在地平线以下
    //用于颜色变化的变量
let redVal = 0;
let greenVal = 0;
function setup() {
createCanvas(600, 400);
}
function draw() {
}
在这一步中,你创建了变量 redVal,greenVal, 和sunHeight来储存程序中将要使用的数值。sunHeight 的初始值是一个位于地平线以下的点,而 redVal 和 greenVal 的初始值则表示黑色。这些设置了动画开始时太阳的位置和天空的颜色。它们被称为动画的初始条件(initial conditions)。现在,这些变量已经可以用来改变画布上的效果了。
第二步:使用自定义变量绘制景观
根据红色和绿色的自定义变量绘制背景。
在
draw()函数内添加以下代码://根据自定义变量填充背景 //蓝色分量的值设为 0 且保持不变 background(redVal, greenVal, 0);
绘制一个使用自定义变量
sunHeight作为 y 坐标的太阳。在填充背景的代码之后添加以下代码:
    //太阳
fill(255, 135, 5, 60);
circle(300, sunHeight, 180);
fill(255, 100, 0, 100);
circle(300, sunHeight, 140);
在景观中添加一些三角形的山脉。
在绘制太阳的代码之后添加以下代码:
    //山脉
fill(110, 50, 18);
triangle(200, 400, 520, 253, 800, 400);
fill(110,95,20);
triangle(200,400,520,253,350,400);

fill(150, 75, 0);
triangle(-100, 400, 150, 200, 400, 400);
fill(100, 50, 12);
triangle(-100, 400, 150, 200, 0, 400);

fill(150, 100, 0);
triangle(200, 400, 450, 250, 800, 400);
fill(120, 80, 50);
triangle(200, 400, 450, 250, 300, 400);
你的代码应该如下所示:
    //用于太阳初始位置的变量

let sunHeight = 600; //位置在地平线以下

//用于颜色变化的变量

let redVal = 0;

let greenVal = 0;


function setup() {
  createCanvas(600, 400);
}
function draw() {

  //根据自定义变量填充背景
  background(redVal, greenVal, 0);

  //太阳
  fill(255, 135, 5, 60);
  circle(300, sunHeight, 180);
  fill(255, 100, 0, 100);
  circle(300, sunHeight, 140);

  //山脉
  fill(110, 50, 18);
  triangle(200, 400, 520, 253, 800, 400);
  fill(110,95,20);
  triangle(200,400,520,253,350,400);

  fill(150, 75, 0);
  triangle(-100, 400, 150, 200, 400, 400);
  fill(100, 50, 12);
  triangle(-100, 400, 150, 200, 0, 400);

  fill(150, 100, 0);
  triangle(200, 400, 450, 250, 800, 400);
  fill(120, 80, 50);
  triangle(200, 400, 450, 250, 300, 400);
}
在这一步中,你通过在 你可以添加任意数量的形状,让你的景观变得独特而有趣!background() 和 circle() 函数中使用自定义变量,为你的动画定制了景观。请记住,太阳之所以在山脉后面,是因为它是在山脉之前被绘制出来的!
第三步:使用条件语句更新自定义变量
通过不断改变变量
sunHeight的值来使太阳移动,直到它的值小于 130。在函数
draw()内添加以下代码://递减sunHeight,每次减2,直到130 if (sunHeight > 130) { sunHeight -=2; }
当
sunHeight小于480时,通过改变变量redVal和greenVal的值来逐渐改变天空的颜色。在函数
draw()内添加以下代码://在日出期间,将颜色变量分别增加4和1 if (sunHeight < 480) { redVal += 4; greenVal += 1; }
你的代码应该如下所示:
//用于太阳初始位置的变量
let sunHeight = 600; //位置在地平线以下
//用于颜色变化的变量
let redVal = 0;
let greenVal = 0;
function setup() {
createCanvas(600, 400);
}
function draw() {
//根据自定义变量填充背景
background(redVal, greenVal, 0);
//太阳
fill(255, 135, 5, 60);
circle(300, sunHeight, 180);
fill(255, 100, 0, 100);
circle(300, sunHeight, 140);
//山脉
fill(110, 50, 18);
triangle(200, 400, 520, 253, 800, 400);
fill(110,95,20);
triangle(200,400,520,253,350,400);
fill(150, 75, 0);
triangle(-100, 400, 150, 200, 400, 400);
fill(100, 50, 12);
triangle(-100, 400, 150, 200, 0, 400);
fill(150, 100, 0);
triangle(200, 400, 450, 250, 800, 400);
fill(120, 80, 50);
triangle(200, 400, 450, 250, 300, 400);
//递减sunHeight,每次减2,直到130
if (sunHeight > 130) {
sunHeight -= 2;
}
    //在日出期间,将颜色变量分别增加4和1
if (sunHeight < 480) {
  redVal += 4;
  greenVal += 1;
}
}
这样当草图运行时,太阳就会自动移动了!这是因为每次 draw() 运行时,变量 sunHeight 的值都会减少2。一旦if 语句中的布尔表达式 sunHeight > 130 变为 false,变量 sunHeight 就不再减少了。
当一个变量的值减少时,这被称为递减,使用减法赋值符号 -= 表示。当变量的值增加时,这被称为递增,使用加法赋值符号 += 表示。每当一个变量递增或递减时,存储在该变量中的值都会发生改变,存入新值。
访问以下运算符的 MDN 参考资料以了解更多信息: 使用 = | += | -=console.log(sunHeight) 在控制台中打印 sunHeight 的值,查看它随时间的变化。
天空颜色的改变是因为 redVal 和 greenVal 的值在逐渐改变。根据第二个条件语句中的布尔表达式,当 sunHeight 小于 480 时,颜色变量开始改变:redVal 每次增加4,greenVal 每次增加1。 每次 draw() 运行时,redVal 和 greenVal 的值都会增加,并且在下一次运行时被用来改变背景颜色。这就创造了一个动画日出效果。
语句 greenVal += 4 也可以写成 greenVal++。++ 被称为递增运算符,而 -- 被称为递减运算符。
以下语句具有相同的效果:
    //递增1
grow++;
grow += 1;

//递减1
shrink--;
shrink -= 1;
在 draw() 第一次运行时,背景是黑色的,sunHeight 开始递减。当太阳的y坐标达到480时,天空的颜色开始随着 redVal 和 greenVal 的值增加而改变。由于第一个条件语句的限制,太阳在 sunHeight 达到130时停止移动:
    if (sunHeight > 130) {
  sunHeight -= 2;
}
这里,sunHeight 会在每次 draw() 运行时减少2,直到 sunHeight 小于或等于130。当 sunHeight 小于或等于130时,布尔表达式 sunHeight > 130 的值变为 false,因此代码块 sunHeight -= 2 不再运行了。这让太阳在其 y 坐标达到130或更小时停止移动。
嵌套条件语句
当需要同时测试多个条件时,你可以将一个条件“嵌套”在另一个条件内,如下所示:
    //只有当 sunHeight 大于 130 时,变量才会发生改变
if (sunHeight > 130) {
  sunHeight -=2;

  //嵌套条件
  if (sunHeight < 480) {
    redVal +=4;
    greenVal +=1;
  }
}
当你将一个 if 语句放在另一个 if 语句内部时,被称为嵌套条件语句。这要求两个布尔表达式都必须为 true 才能运行代码块。与之前没有嵌套条件的代码相比,这个例子中的区别在于,一旦太阳的y坐标达到130,天空的颜色会立即停止改变。
在以上代码中,如果 sunHeight 大于 130,花括号内的代码块就会运行:
sunHeight减少2- 只要
sunHeight > 130和sunHeight < 480都为true,redVal和greenVal的值就会改变。
请注意,如果第一个 if 语句的布尔表达式为 false,那么第二个条件就不会被检查。这意味着只要 sunHeight 在130和480之间,redVal 和 greenVal 就会改变。而当 sunHeight 达到130或更小时,所有变量都将停止改变。在这种情况下,sunHeight > 130 必须为 true,并且 sunHeight < 480 必须为 true,才能运行嵌套条件语句中的代码块。查看完整项目示例,它在 setup() 中使用了 noStroke() 来移除形状的轮廓线。
逻辑运算符: && 和 ||
编写具有多个条件的条件语句的另一种方法是使用逻辑运算符。当两个条件都必须为 true 时,使用与运算符(AND, &&)。当任一条件必须为 true 时,使用或运算符(OR,||)。
我们可以使用与运算符(&&)来重写日出动画中的嵌套条件。在下面的代码示例中,运算符两边的布尔表达式都必须为 true,代码块中的代码才会运行:
    if (sunHeight < 130 && sunHeight > 480) {
  //当两个条件都为 true 时运行的代码块
}
访问MDN的参考资料来了解更多有关逻辑与 ( 通过在 &&) 和 逻辑或 (||) 的内容。draw() 函数中添加以下代码来练习逻辑运算符:
    if (mouseIsPressed == true && sunHeight === 130) {
  background(0);
}
布尔变量: mouseIsPressed 和 keyIsPressed
mouseIsPressed 和 keyIsPressed 是p5.js内置的包含布尔值的特殊变量。当鼠标按键被按下时,mouseIsPressed 是 true,否则为 false。当键盘上的任意键被按下时,keyIsPressed 是 true ;否则是false。
查看这个示例观察当鼠标按键按下时,mouseIsPressed 的值在控制台中是如何变化的。
在“试试这个!”挑战中,当 sunHeight 等于 130 且 鼠标按键被按下时,天空变暗了。这或许模拟了日食!
我们甚至可以在 if 语句中单独使用 mouseIsPressed:
    if (mouseIsPressed && sunHeight === 130) {
  background(0);
}
由于 mouseIsPressed 已经存储了 true 或 false 的值,我们就不需要使用比较运算符来创建一个布尔表达式。布尔表达式的结果是布尔值,而布尔变量储存布尔值。条件语句只需要布尔值为 true 时才会运行代码。如果 mouseIsPressed 是 true,条件语句的代码块就会运行。
探索这些使用了 mouseIsPressed 和 keyIsPressed 的示例:
- 鼠标与按键:探索如何在不使用逻辑运算符的情况下,在条件语句中使用
mouseIsPressed和keyIsPressed。 - 可点击按钮:探索这个结合了 mouseIsPressed、mouseX 和 mouseY 制作的可点击按钮的示例!
- 多重按键:探索这个使用了多个按键来改变画布效果的示例。
访问p5.js参考手册中 mouseIsPressed, keyIsPressed key 和 keyCode 的内容来了解更多信息。
结语
现在你已经完成了一个定时运行的日出动画,尝试通过改变形状和颜色来修改草图吧。你也可以尝试着添加新功能和交互,甚至加入一些新的条件语句。也许你可以尝试让动画在按下按键或点击鼠标后才开始运行。