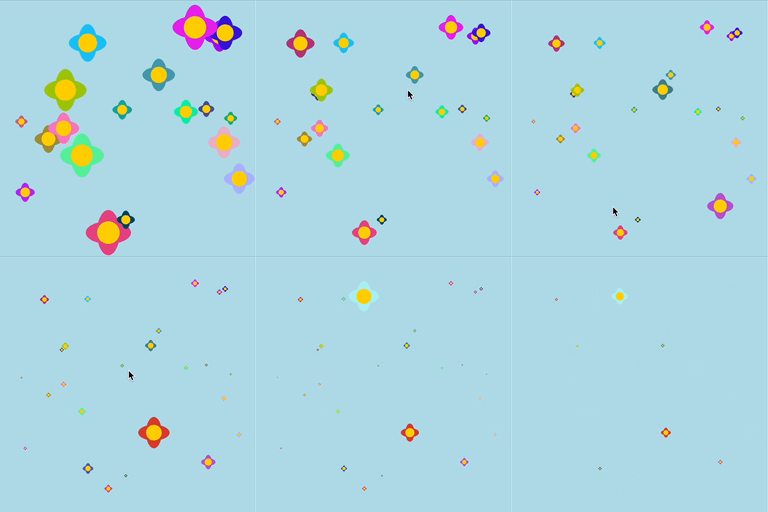
A preview of the interactive flower garden with flowers appearing on a light blue canvas as a user clicks with their mouse pointer.
In this tutorial, you will use p5.js to simulate an interactive flower garden. In this project, your digital canvas will come to life with 20 randomly generated flowers, each a different color and size. Users can also add diversity to the garden by clicking on the canvas to add new, unique flowers. Each flower is programmed with a wilting animation. This animation causes the flowers to slowly shrink and vanish, much like the natural cycle of a flower’s life.
In this tutorial, you will:
- Explore data structures like JavaScript objects by defining, creating, and using your own objects.
- Explore and use object methods to perform actions on built-in objects like JavaScript arrays.
- Use iteration with for loops to manage multiple objects at once.
Prerequisites
Before you begin, you should be able to:
- Add and customize shapes and color on the canvas using p5.js
- Declare, initialize, use, and update custom variables, and functions with parameters and return values
- Add animation on the canvas
- Comment code and address error messages
- Create and use custom functions
- Understand how to use for loops to manage repetitive tasks
For more information on arrays, loops, and custom functions, visit the Organizing Code with Functions and Repeating with Loops tutorials.
- In the Variables and Change tutorial, you learned how to store data using variables. Variables are useful for storing single values like numbers or text.
- In the Animating with Media Objects tutorial, you learned to use p5.js’ built-in
p5.Imageandp5.Graphicsobjects. These objects bundle data, like images, together with special functions called methods that enable users to perform operations on that data.
In this tutorial, you will learn how to:
- define objects
- create and use custom functions to update and draw objects
- manage multiple objects using arrays
Let’s begin!
JavaScript Objects
We have learned that variables can store one value at a time (a number, string, or Boolean). Arrays can store multiple values in indices. Sometimes, however, we want to store several pieces of related data about one thing together. We can do this using JavaScript objects, which bundle data together by pairing properties and values. Properties are special types of variables or names that are associated with an object. Each property stores a value. For example, if we wanted to create a JavaScript object based on a flower, it could have properties that describe its location (x and y) and emoji symbol.
Step 1: Make your first object
Let’s start our flower garden by creating one flower. We can start by drawing it using an emoji, so we need data on the x-coordinate, the y-coordinate, and the emoji for our flower.
Open a new p5.js project and name it “Data Structure Garden”. Save the project.
Create a flower object by bundling the flower’s canvas coordinates with the emoji used to draw it. Let’s store the object in a variable named
flower. Add this code abovesetup():// Flower object. let flower = { x: 200, y: 100, emoji: '🌸' };Print your object to the console by adding the following line of code in
setup():// Print object to the console. console.log(flower);Set the background to
"lightblue".
Your code should look like this:
Try opening the code so far in the p5.js Web Editor. You should see your flower object printed to the console. Notice how you can click on the arrow in the console to show the properties and values for the object.
Here’s the general syntax for defining an object:
    // Define an object
let objectName = {
  property1: value1,
  property2: value2,
  property3: value3
};
The syntax for objects uses:
curly braces (
{}) to enclose a bundle of properties;Properties can be names, such as the names of variables or functions, or they can be strings. When using spaces in property names, it is often helpful to use a string. For example, I might create an object with a property for a “first name” and a “last name,” like this:
    let ironMan = {
  "first name" : "Tony",
  "last name" : "Stark"
}
a colon (:) to separate each property with specific values;
- Values can be of any datatype, and can even be a function!
commas (,) to separate each
property : valuepair.
| Object name | ||
| | |
| | | | |
| Property | Value |
| | | | |
| Property | Value |
| | | | |
| Property | Value |
|
You can store objects by initializing new variables when you define them. In the code above, you declared a variable named flower. You then initialized the flower variable with an object whose properties represent a flower that can be drawn on the canvas.
To check the properties and values of an object, you used console.log(), which displays the following in the console:
    ▼ {x: 200, y: 100, emoji: "🌸"}
   x: 200`
   y: 100`
   emoji: "🌸"
Step 2: Use your object
You can access any value stored in object properties by using its variable name, property name, and dot notation like so:
    // Access the object’s property1 value with dot notation.
objectName.property1
Use the
text()function with flower object properties to place the flower on the canvas.In
draw(), add the following code:// Display flower object. text(flower.emoji, flower.x, flower.y);
You can use
textSize()before the text function to set the size of the flower.// Increase the text/emoji size. textSize(100);
Your code should look like this:
To access values in the flower object, we use dot notation, which uses the dot operator to access properties and values within objects.
In the code above, you accessed:
- the emoji for the flower with
flower.emoji - the x-coordinate with
flower.x - the y-coordinate with
flower.y
Since these values represent strings and numbers, they can be used in the text() function, similar to the way variable names are used to access the value they store.
Visit the p5.js reference to learn more about objects.size property to the flower object.textSize() value with the flower object’s size.
Step 3: Define a createFlower() function
Now, let’s define a function that can display different flowers on the canvas. We will define a createFlower() function that will allow us to customize the flower objects we create. We want to make sure that we can change the x- and y-coordinates for different flowers. We also want to change their size and color. One way to do that is to add new properties to the flower object for size and color. In this project, we also want the flower to appear, then disappear after some time. To do this, we will also include a lifespan property for our flower object.
We want our createFlower() to return information when it’s called, just like the built-in text() function returns text on the canvas. Therefore, we must specify a return value. Using return values is a great way to save information computed by the function in a variable or array.
In this example, we will be using random() to create variety in our flowers when they’re drawn on the canvas.
Define the
createFlower()function, which creates a random flower object. All values will be set randomly each timecreateFlower()is called.Outside of
draw()andsetup(), add the following function declaration:// Function that creates a random flower object. function createFlower() { // Define a flower object. let flower = { x: random(20, 380), y: random(20, 380), size: random(20, 75), lifespan: random(255, 300), color: color(random(255), random(255), random(255)), }; // Return the flower object. return flower; }
Test the
createFlower()function by using it to create a flower object, and store it in a variable calledmyFlower.Add the following in the
draw()function:// Create flower object. let myFlower = createFlower();
Draw an ellipse on the canvas using
myFlowerproperties.Add the following in the
draw()function:// Use flower object properties to draw an ellipse. fill(myFlower.color); ellipse(myFlower.x, myFlower.y, myFlower.size);
Slow down the rate at which each flower appears by changing the frame rate to one frame per second. In
setup(), add:frameRate(1);.
Your code should look like this:
In the code above, you use createFlower() to create and return a new flower object with random values, then store the object in the variable myFlower. myFlower is used to access its property’s random values, which are used to draw an ellipse on the canvas. Each time draw() runs, a new random flower object is created, and its properties are used to draw a new random ellipse on the canvas.
Visit the p5.js reference to learn more about return values and random().x and y location and size.
Step 4: Define the drawFlower() function with a parameter
Now that we know that createFlower() creates and returns a new flower object, let’s define the drawFlower() function. Our drawFlower() function will receive a flower object as an argument and place it on the canvas. This will help make our code organized and manageable.
Outside of all other functions, define the
drawFlower()function with one parameter representing a flower object.function drawFlower(flower) { }Inside the
drawFlower()function, draw the attributes of a flower, including the petals and center of the flower. Remember to use the flower object properties for thexandylocations,size, andcolor. You can add the following code to the function body:noStroke(); fill(flower.color); // Draw petals. ellipse(flower.x, flower.y, flower.size / 2, flower.size); ellipse(flower.x, flower.y, flower.size, flower.size / 2); // Draw a yellow center. fill(255, 204, 0); circle(flower.x, flower.y, flower.size / 2);Next, we will test the
drawFlower()function. Add the following to thedraw()function:// Testing drawFlower(). let flower1 = createFlower(); drawFlower(flower1);
Your code should look similar to this:
In the code above, Change and modify the flower drawing using other 2D shapes:createFlower() is used to create and return a random flower that is stored in flower1. The random flower (flower1) is then passed into drawFlower(), which accesses the flower object properties to draw a flower on the canvas. This process occurs each time the draw() function runs, so random flowers appear and disappear on the canvas.
Step 5: Learn to use arrays
Before we move on to making our garden of flowers by using an array, let’s better understand how arrays work with a few simple examples. JavaScript arrays are objects that can store multiple values in one variable name. Each value is stored in an element with a specific location known as its index. The index of the first element in any JavaScript array is 0.
Example 1: Creating and drawing an array of names
| | | | | | |
| 0 | 1 | 2 |
In this example, we’ve created an array using square brackets ([ ]) and commas that separate each element in the array. The array is a collection of strings, each representing a type of flower, and is stored in a variable called flowers. Each element of the array holds a string with a flower name. Each element can be accessed using its index number. For example, "Rose" is located at index 0, "Daisy" at index 1, and "Tulip" at index 2.
| Variable name to save the element | Array to point to | Index in array | ||||
| | | | | | |
In the code snippet above, we access the first element of the flowers array at index 0 using the index notation: flowers[0]. In the example above, this syntax is used to place text on the canvas with the names accessed from various elements in the flowers array.
We then assign that value to a new variable named rose. rose now holds the string "Rose", which is the first flower name in the flowers array. Values stored in other elements can be accessed in the same way.
Example 2: Using a for loop to iterate through the array of names
Our second example uses a for loop to iterate through each element in the array and print the text on the canvas. Iteration is a process where a block of code is executed repeatedly for each element in an array.
| Start looking at index 0 | …up to the end of the array | |||
| | | | |
| | |
Grab flowers at element i |
|
To iterate, the code snippet above uses a for loop that “looks through” each element of the flower array. According to the for loop, the index i starts at 0 and increases with each iteration until it reaches a number that is one less than the number of elements in the array. Since arrays start their index at 0, the index of the last element in the array is one less than the number of elements in the array. The number of elements in any array can be accessed by using the array.length property. In the for loop above, the length of the flowers array is accessed using flowers.length. To access the values in the array, we use flowers[i] in the for loop in the text() function to display the value in each element as text on the canvas.
Example 3: Adding new elements to the array
| | |
| Pushed elements will add here |
| | |
Add a new element to the end of the flowers array |
Using the array method array.push(), you can add a new element to the end of the array. In this example, we are adding "Sunflower" to the end of the flowers array.
Example 4: Removing an array element
| | | | | | |
| 0 | 1 | 2 |
| | | | |
| At this index | …remove one element |
In order to remove elements from an array, we use the function array.splice(). The function array.splice() modifies the flowers array with two parameters: one for the starting index and the other for how many elements to remove. flowers.splice(0,1) results in the removal of "Rose" from the array, leaving only "Daisy" and "Tulip".
Example 5: Using for..of loop for arrays
| Declare a variable to store the current element | Keyword to loop over an array | Array to loop over | ||||
| | | | | | |
| | |
| Do something with the current element |
|
We can also iterate over an array using a for..of loop. The flower variable temporarily stores each element during the loop’s iteration. The print(flower) statement inside the loop prints the name of each flower to the console, cycling through "Rose", "Daisy", and "Tulip" in order.
Using a for..of loop can make code easier to read when things become more complex, like in these examples: for loop using indices vs for..of loop.
Step 6: Generate multiple flowers with an array
Now, it’s time to generate multiple flowers on the screen using arrays.
First, declare the
flowersarray at the top of your program. The square brackets with nothing in them represent an empty array of flowers.// Array of flowers. let flowers = [];Outside of all other functions, define the
flowerPower()function.// Function to create 20 flowers. function flowerPower() {}Inside
flowerPower(), create 20 flower objects using aforloop and add them to yourflowersarray.for(let i = 0; i < 20; i += 1) { // Create a flower in a random location. let flower = createFlower(); // Add the flower to the flowers array. flowers.push(flower); }Call the
flowerPower()function in thesetup()function to create the 20 flower objects.// Generate 20 flowers. flowerPower();Use the
for..ofloop for arrays in thedraw()function to draw each flower in theflowersarray. Thefor..ofloop reads, for each flower element in the array of flowers, calldrawFlower().// For each flower in the array of flowers. for (let flower of flowers) { drawFlower(flower); }
Your code should look similar to this:
Add a parameter to your flowerPower() function so you can easily start with as many flowers as you like.
Step 7: Update the flowers in the array
Now that we have tested the array of flowers, let’s draw the wilting effect. One of the benefits of using an array to control the flowers is the ability to update values in each flower.
Outside of all other functions, define a function called
updateAndDrawFlowers():function updateAndDrawFlowers() {}This function will look at each flower in the array and will draw the flower.
    for (let flower of flowers) {
   drawFlower(flower);
}
Inside the
forloop, decrease the flower object’ssizeandlifespanto simulate wilting.Add a wilting animation effect, which will decrease the flower size by 1% after the
drawFlower()function draws the flower. We create the wilting effect by multiplying the current size by 0.99 and storing it back into the flower’ssizeproperty. Then decrement the lifespan and store it in the flower’slifespanvariable. Use the multiply assignment operator and decrement operator in the following syntax:// Wilting effect for the flower. flower.size *= 0.99; // Reduce lifespan. flower.lifespan -= 1;When the flower object’s lifespan is zero or negative, we’ll remove it from the array by using the
array.splice()method.for (let flower of flowers) { // Draw the flower. drawFlower(flower); // Wilting effect for the flower. flower.size *= 0.99; // Reduce lifespan. flower.lifespan -= 1; if (flower.lifespan <= 0) { // Save index of the flower let i = flowers.indexOf(flower); // Remove wilted flower flowers.splice(i, 1); } }Add
updateAndDrawFlowers()to thedraw()function.Remove the call to
frameRate(1)fromsetup().
Your code should look similar to this:
Experiment with the wilting effect using subtraction, random numbers, or any other ideas you come up with.
Step 8: Add more flowers to the array with mousePressed()
Finally, let’s add more flowers to the canvas by using mousePressed(), mouseX, and mouseY to add another flower object to the flowers array each time the canvas is clicked.
Outside of all other functions, write your
mousePressed()function:function mousePressed() { let flower = createFlower(); // reassign x to be mouseX flower.x = mouseX; // reassign y to be mouseY flower.y = mouseY; // add the flower to the flowers array flowers.push(flower); }
Your code should look something like this:
Conclusion
Congratulations on completing the Data Structure Garden tutorial!
Throughout this journey, you learned about the fundamental concepts of JavaScript objects and arrays to create a dynamic and interactive garden simulation. Using arrays, you’ve managed multiple objects elegantly and efficiently, each with their own properties and behaviors. This is a powerful skill in the world of programming, opening doors to more complex and interactive applications.
Next Steps
- Use HTML & CSS with p5.js in the Creating and Styling HTML tutorial.
- Use ml5.js with p5.js in the Abracadabra: Speak With Your Hands tutorial.
- Use node.js with p5.js in the Getting Started with Node.js and Simple Melody App tutorials.
Once again, well done on completing this tutorial. Keep experimenting, keep coding, and most importantly, enjoy learning and creating!


