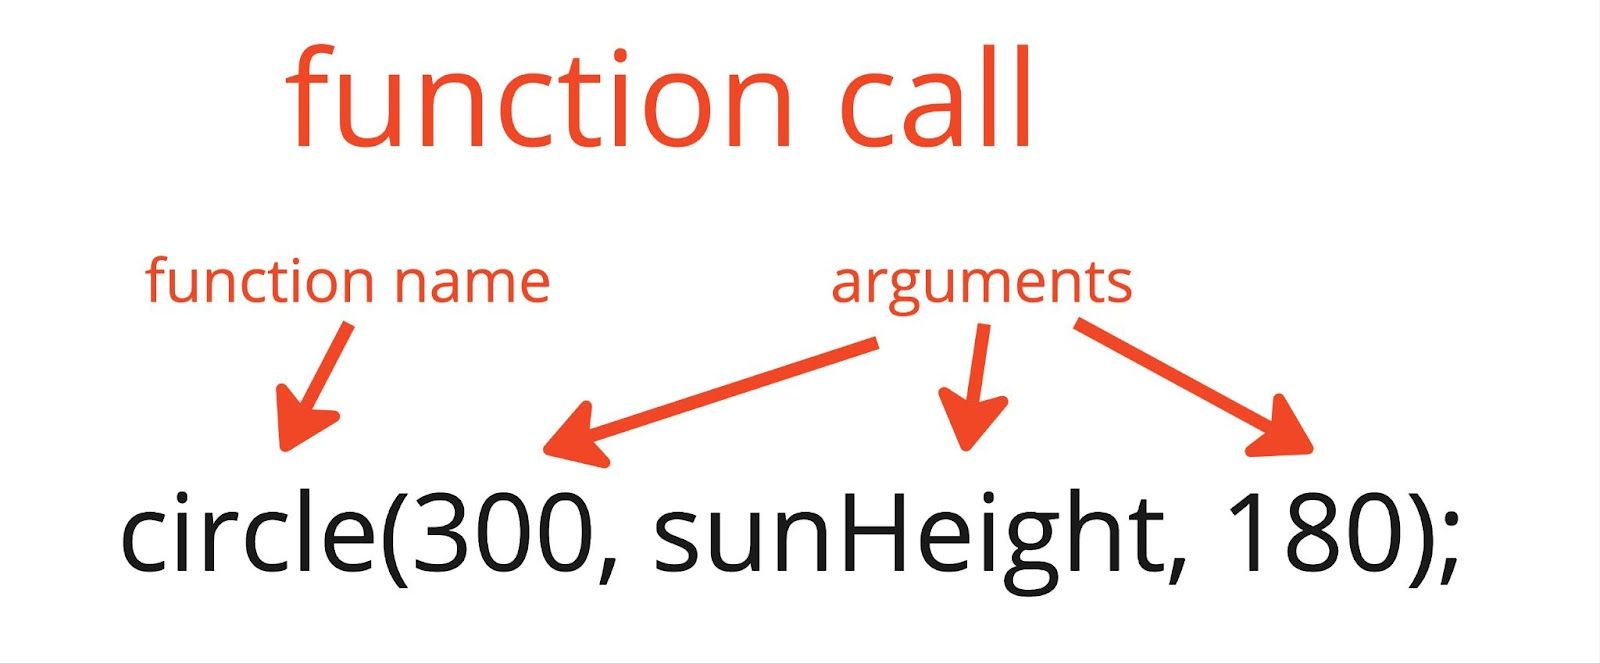
In this tutorial you will build upon the sunrise animation from the last tutorial – Conditionals and Interactivity – to create a version using custom functions to help organize your code. Here is an example of the sketch you will create at the end of this tutorial.
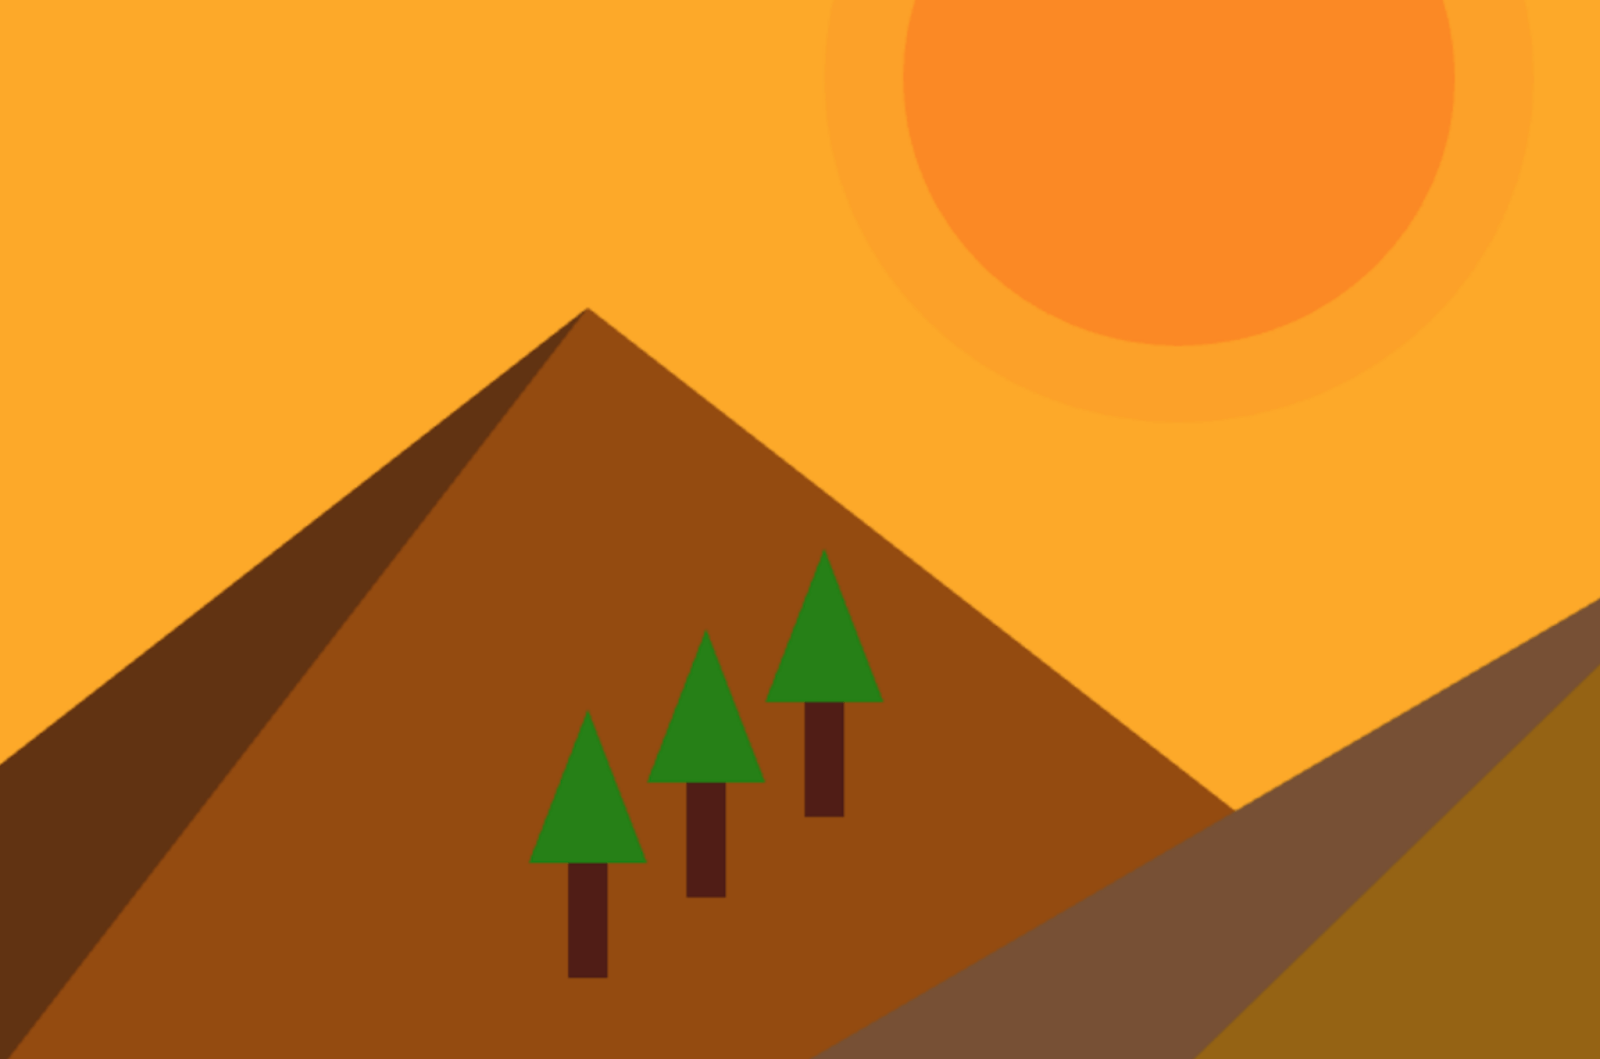
A canvas displaying a snapshot of the sunrise animation from the Conditionals and Interactivity tutorial. The snapshot includes a sun, and trees and mountains in the landscape.
You will learn about functions and how to use them to organize and improve your code. You will learn about these basic programming concepts:
- Functions built into the p5.js library
- How to create custom functions and use them to easily organize and reuse code
- Arguments, parameters, and return values
Prerequisites
- How-to: Setting Up Your Environment
- Get Started tutorial
- Variables and Change tutorial
- Conditionals and Interactivity tutorial
- Field Guide to Debugging
Before you begin, you should be able to:
- Add and customize shapes and text on the canvas
- Add simple interactivity using
mouseX,mouseY, andmouseIsPressed - Declare, initialize, use, and update custom variables
- Incorporate linear and random motion into a p5.js project
- Use conditional statements to control program flow
- Comment code and address error messages
Organizing code is a key skill in creating more complex and exciting programs. It can help to make your code readable to others, allowing them to understand your code and making collaboration easier. It also allows you to understand your own code and expand on ideas, and it even helps with debugging. Functions are a powerful way to make your code more organized, reusable, and accessible.
What is a function?
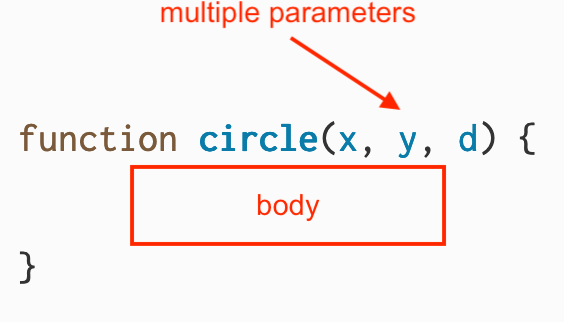
A function is a block of code assigned to a specific function name that completes a defined task. Most p5.js sketches already contain at least two function declarations, setup() and draw(). Function declarations are used to define functions before we use them. Here is the syntax for a function declaration in p5.js:
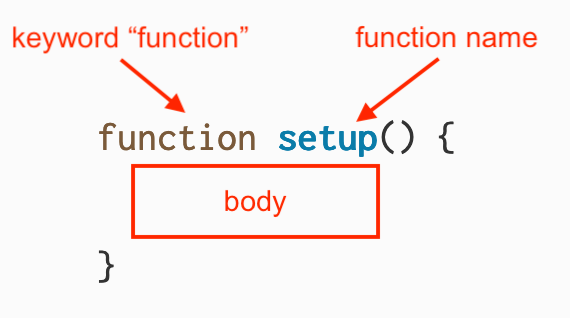
The syntax for a function with an arrow labeled “keyword ‘function’” pointing to the word “function”, an arrow labeled “function name” pointing to the word “setup”, and a box with the text “body” inside of it.
The keyword function lets p5.js know that a function is being declared. The name of the function defines how it will be called. In this example, the function’s name is setup. The name of the function is followed by a pair of parentheses (). The body of the function, which is a block of code in curly braces {}, runs when the function is called. In p5.js, setup() is a special built-in function that automatically runs when the play button is pressed.
    // You define the setup() function at the beginning
// of your sketch. It creates a canvas for you to draw on!

function setup() {
  createCanvas(400, 400);
}
When a function is used, we say that the function is called in the program. The setup() function is called once when the sketch starts, which means the block of code in the body of setup() runs once at the beginning of the program. Similarly, draw() is another function built into the p5.js library that is declared in every sketch. When draw() is called, it runs the code block in its body repeatedly. It runs over and over again until your program stops.
Visit the p5.js reference pages for draw() and setup() to learn more.
Defining custom functions
We can also create our own functions that group code together. In the last tutorial, Conditionals and Interactivity, you created a sunset animation where the code in draw() contained sections marked by comments for the sky, the sun, and the mountains. You can declare custom functions that group related code together with a specific name.
Step 1: Plan your functions with comments
Duplicate your sunset animation, or this example, and name it “Organized Sunset Animation”.
Before defining custom functions, let’s start with an outline of how we might reorganize some of the code in the sunset animation:
    function setup() {
  createCanvas(600, 400);
}
function draw() {
  // a function for the sky;
  // a function for the sun;
  // a function for the mountains;

  // a function to update the variables
}
We can see that there are 4 different groups of related code that we can turn into custom functions: code that draws the sky, draws the sun, draws the mountains, and updates the variables.
Now you can create 4 different custom functions for the sections of code described in the comments above containing the same code from the original sketch. Custom functions are defined outside of setup() and draw(), usually at the bottom of your code.
Visit the p5.js reference page for function to learn more.
Step 2: Create and call a custom function for the sky
Define a function named
sky(). This function will render the color of the sky in the sketch.// A function to draw the sky function sky() { background(redVal, greenVal, 0); }Using
sky()in the sketch, we can make a function call indraw()with the following syntax:function draw() { // call sky function sky(); // a function for the sun; // a function for the mountains; // a function to update the variables }
Your code should look like this:
//variables for color change
let redVal = 0;
let greenVal = 0;
//variable for sun position
let sunHeight = 600; //point below horizon
function setup() {
createCanvas(600, 400);
noStroke(); //removes shape outlines
}
function draw() {
// call sky function
sky();
// a function for the sun;
// a function for the mountains;
// a function to update the variables
}
    // A function to draw the sky
function sky() {
  background(redVal, greenVal, 0);
}
Calling sky() causes the code in the body of sky() to run when draw() runs, and the changing color of the sky is added to the canvas. A function call includes the function name followed by a pair of parentheses ().
Step 3: Create and call a custom function for the sun
Move the code for drawing the sun into a function and call the function in draw.
Declare a function called
sun()after the function you defined forsky(), and include the code that draws the sun in the curly braces.Add the following lines of code after the end of
function sky()://a function to draw the sun function sun() { // Draw the sun. fill(255, 135, 5, 60); circle(300, sunHeight, 180); fill(255, 100, 0, 100); circle(300, sunHeight, 140); }
Replace the lines of code that draw the sun with this function call in
draw():// call the sun function sun();
Your code should look like this:
//variables for color change
let redVal = 0;
let greenVal = 0;
//variable for sun position
let sunHeight = 600; //point below horizon
function setup() {
createCanvas(600, 400);
noStroke(); //removes shape outlines
}
function draw() {
// call sky function
sky();
// call sun function
sun();
// a function for the mountains;
// a function to update the variables
}
// A function to draw the sky
function sky() {
background(redVal, greenVal, 0);
}
// A function to draw the sun
function sun() {
fill(255, 135, 5, 60);
circle(300, sunHeight, 180);
fill(255, 100, 0, 100);
circle(300, sunHeight, 140);
}
In this step, you declare a new function named sun() that draws the sun using circles. The draw() function calls sun(), which calls fill() and circle(). fill() and circle() are also functions that are built into the p5.js library, and do not need to be declared by the programmer.
The custom functions you declare create shapes, color, and animations from simple building blocks. That is the power of computing: you build upon a simple foundation to create complex sketches. You have used many of the built-in functions in p5.js to make animations and interactive art. Now you have the ability to create your own functions and expand the power of the p5.js library. By defining your own functions, you can create so many things!
You can learn more about all the built-in functions available by visiting the reference page. All of the items followed by parentheses () are functions!
Step 4: Create and call a custom function for the mountains
Move the code for drawing the mountains into a function:
Declare a function called
mountains()and include the code that draws the mountains in the curly braces.Add the following lines to your sketch after
function sun()://A function to draw mountains function mountains() { fill(110, 50, 18); triangle(200,400,520,253,800,400); fill(150, 75, 0); triangle(-100, 400, 150, 200, 400, 400); fill(150, 100, 0); triangle(200, 400, 450, 250, 800, 400); fill(100,50,12); triangle(-100,400,150,200,0,400); fill(120,80,50); triangle(200,400,450,250,300,400); }
Remove the lines of code that draw the mountains from
draw()and replace them with the mountains() function call:// call the mountains function mountains();
Your code should look like this:
//variables for color change
let redVal = 0;
let greenVal = 0;
//variable for sun position
let sunHeight = 600; //point below horizon
function setup() {
createCanvas(600, 400);
noStroke(); //removes shape outlines
}
function draw() {
// call the sky function
sky();
    // call the sun function
sun();
// call the mountains function
mountains();
}
// A function to draw the sky
function sky() {
background(redVal, greenVal, 0);
}
// A function to draw the sun
function sun() {
fill(255, 135, 5, 60);
circle(300, sunHeight, 180);
fill(255, 100, 0, 100);
circle(300, sunHeight, 140);
}
// A function to draw mountains
function mountains() {
fill(110, 50, 18);
triangle(200,400,520,253,800,400);
fill(150, 75, 0);
triangle(-100, 400, 150, 200, 400, 400);
fill(150, 100, 0);
triangle(200, 400, 450, 250, 800, 400);
fill(100,50,12);
triangle(-100,400,150,200,0,400);
fill(120,80,50);
triangle(200,400,450,250,300,400);
}
The mountains() function calls the fill() and triangle() functions to create the mountains, and passes the arguments for x, y and size to customize them. Notice how the functions help organize the code and make it easy to read!
Customizing Functions with Parameters
Your functions sky(), sun(), and mountains() all have empty parentheses in their function declaration, and in the function call. Other functions, like print() and circle(), require values placed inside of the parentheses when you call them. The values in the parentheses when a function is called are known as arguments. Arguments customize the function in some way.
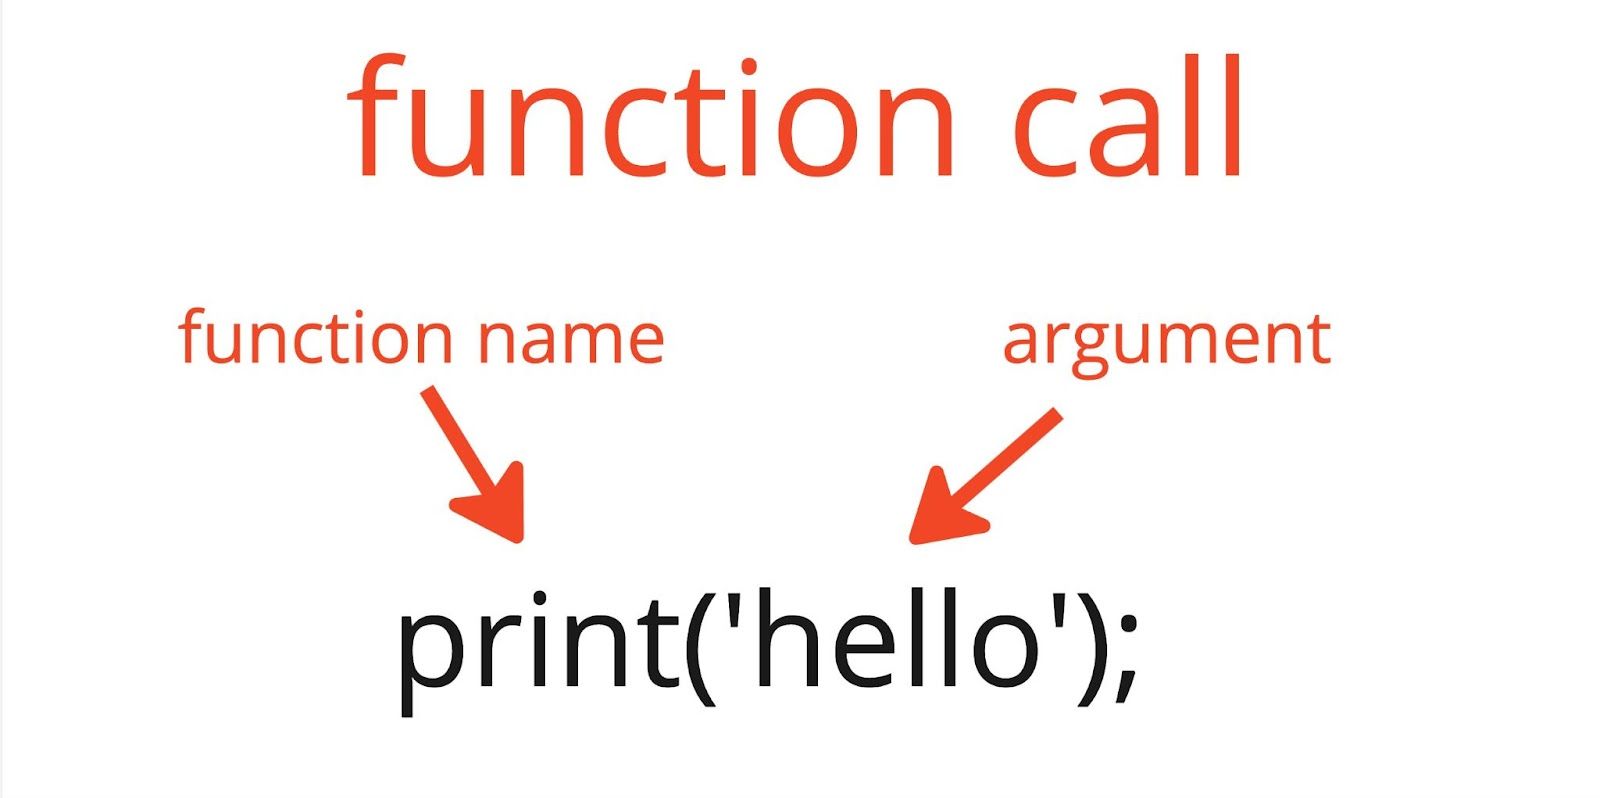
The syntax for the function call print(‘hello’) includes the function name “print” followed by parentheses enclosing the function argument ‘hello’.
In the code snippet above, the print() function was passed an argument when it was called. The argument is the string 'hello'. The print() function displays values placed in the parenthesis in the console. We could imagine that the function declaration for print looks something like this:
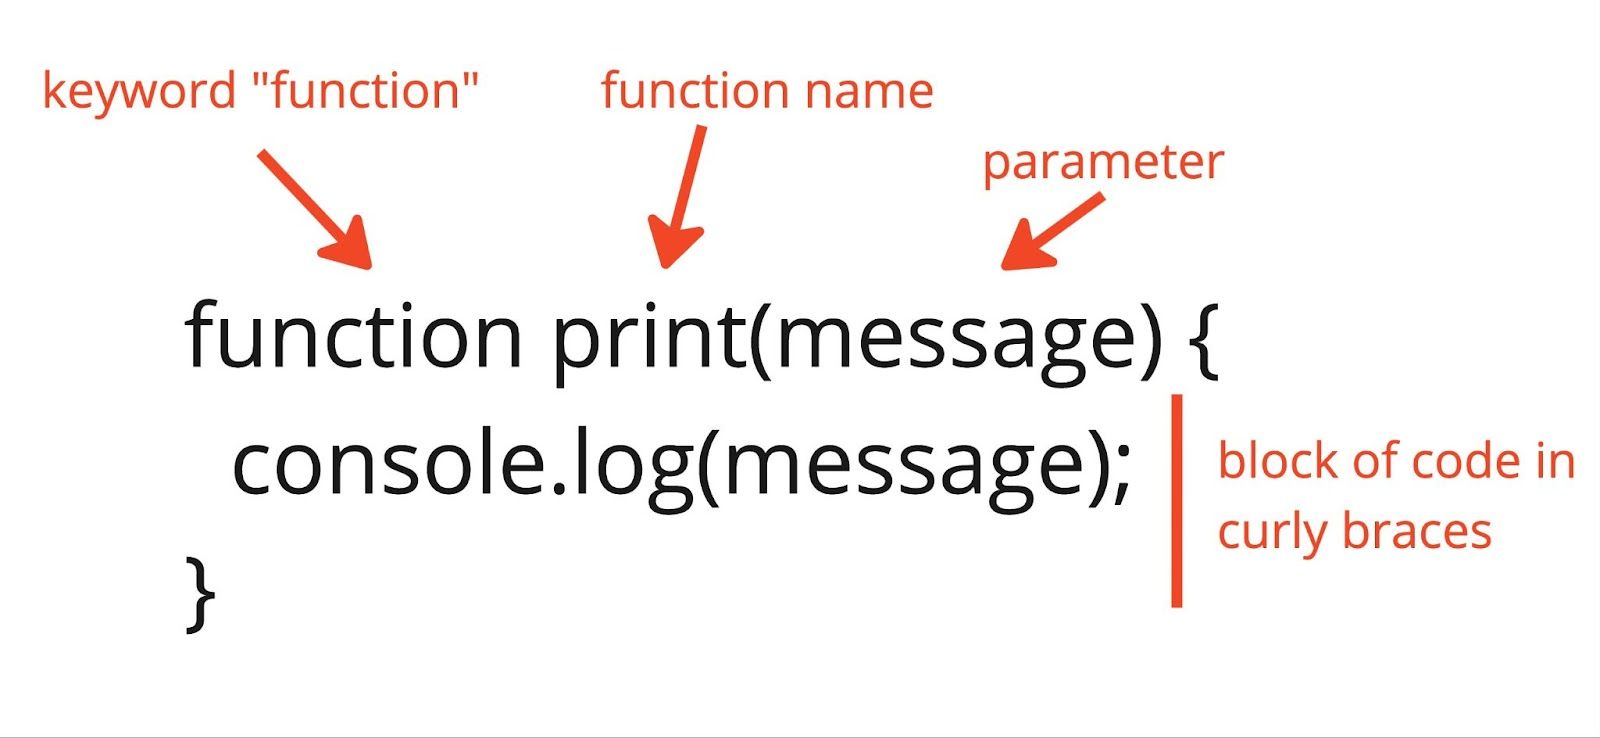
The syntax for the function declaration for print() with console.log() in curly braces. Arrows labeled keyword “function”, “function name”, and “parameter” point to the corresponding parts of the syntax. The text “console.log(message);” appears in between the curly braces and is labeled “block of code in curly braces.”
In a function declaration, the variables listed inside the parentheses are called parameters. Parameters act as placeholders that are replaced by the values for arguments in the function call.
In the examples above, print('hello') is a function call that runs the code in the body of its function declaration. The value 'hello' is passed into the function call as an argument. The argument replaces the message parameter in the function declaration. The block of code runs, replacing every instance of message with 'hello', and 'hello' is printed in the console.
The syntax for a function call for the circle function at an x-coordinate of 30 pixels, a y-coordinate of sunHeight, and a size of 180 pixels. Arrows pointing to the values for 30, sunHeight, and 180 are labeled “arguments.”
The function call for circle() requires 3 arguments – one for the x-coordinate, one for the y-coordinate, and one for the diameter (d) of the circle.
We can imagine that the function declaration in the p5.js library looks something like this:
A possible function declaration for the circle function from the p5.js library with an arrow labeled “parameters” pointing to “x, y, d”, which appears in parentheses.
The function declaration for circle() has 3 parameters in the parentheses separated by commas: x, y, and d. The arguments get assigned to their specific parameters. In this case, x is assigned 300, y is assigned the current value of sunHeight, and d is assigned 180. The body of the function contains the code to create the circle on the canvas which uses x and y to determine the circle’s location, and d for its diameter.
When you define your own function, you can place parameters in the parentheses of the function declaration. This way, you can use arguments to customize it in the function call. Make sure that the number of arguments you pass to the function call matches the number of parameters in its declaration! Explore this example of butterflies drawn on the canvas using multiple calls of the butterfly() function.
A function that requires one or more parameters requires the correct number of arguments to match the number of parameters in its declaration in order to run successfully. When a function does not receive enough arguments, the missing arguments are assigned a value of undefined, which can cause errors and produce strange results. See example 2 and example 7 in the Field Guide to Debugging for examples of an error you may receive when using the incorrect number of arguments in a function call.
Let’s see how this works by adding a tree to our sunrise animation.
Step 5: Add custom functions with parameters
First define a tree() function that has empty parentheses. You can draw a simple tree with a rectangle and triangle.
Add a
tree()function declaration to your sketch outside ofdraw()://A function to draw trees function tree() { // Draw a tree. fill(80,30,20); rect(200,320,20,60); fill(20,130,5); triangle(180,320,210,240,240,320) }Include a function call for
tree()indraw()after the landscape or mountains:// call tree function tree();
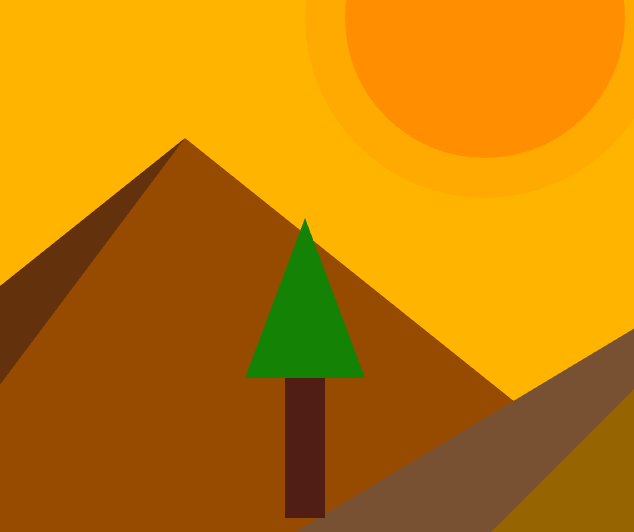
A portion of the sunrise animation showing the sun, mountains, and a tree. The tree has a rectangular brown base and a triangular green top.
Drawing a single tree with a function improves the organization of your code. The real power of this function comes from making it easy to draw multiple trees with different locations and sizes. We can add parameters to the tree() function declaration so that we can customize it and call it more than once using different arguments.
It is helpful to think of this function like a cookie cutter. For example, you can make a new tree that is similar to the one you created above, but with a different location and size each time you call the function. To accomplish this, you need to include parameters in the function declaration so that each tree can be customized.
Rewrite your function declaration for
tree()to include 3 arguments:x,y, andsize. These arguments are then used as placeholders in therect()andtriangle()functions.//A function to draw trees with different x and y and size function tree(x,y,size) { // Draw a tree. fill(80,30,20); rect(x-size,y,size*2,size*6); fill(20,130,5); triangle(x-size*3,y,x,y-size*8,x+size*3,y) }Draw two trees in your
draw()function using arguments.// draw two trees tree(150, 320, 10) tree(210, 320, 10)
Your code should look like this:
//variables for color change
let redVal = 0;
let greenVal = 15;
//variable for sun position
let sunHeight = 600;
function setup() {
createCanvas(600, 400);
noStroke(); //removes shape outlines
}
function draw() {
// call the sky function
sky();
// call the sun function
sun();
// call the mountains function
mountains();
// draw two trees
tree(150, 320, 10)
tree(210, 320, 10)
}
// A function to draw the sky
function sky() {
background(redVal, greenVal, 0);
}
// A function to draw the sun
function sun() {
fill(255, 135, 5, 60);
circle(300, sunHeight, 180);
fill(255, 100, 0, 100);
circle(300, sunHeight, 140);
}
    //A function to draw mountains
function mountains() {
  fill(110, 50, 18);
  triangle(200,400,520,253,800,400);
  fill(150, 75, 0);
  triangle(-100, 400, 150, 200, 400, 400);
  fill(150, 100, 0);
  triangle(200, 400, 450, 250, 800, 400);
  fill(100,50,12);
  triangle(-100,400,150,200,0,400);
  fill(120,80,50);
  triangle(200,400,450,250,300,400);
}
//A function to draw trees with different x and y and size
function tree(x,y,size) {
fill(80,30,20);
rect(x-size,y,size*2,size*6);
fill(20,130,5);
triangle(x-size*3,y,x,y-size*8,x+size*3,y)
}
The parameters that customize each tree are x, y, and size. These parameters specify the x-coordinate, y-coordinate, and size of the tree, respectively. In order to maintain the same relative shape of a tree, the rect() and triangle() functions use numerical expressions with parameters and arithmetic operators. Numerical expressions, such as x - size, are mathematical calculations that result in a numerical value. When numbers and arithmetic operators are used as arguments in function calls, they pass the result as an argument.
For example, let’s follow, or trace, the function call tree(210, 320, 10) to see how the arguments find their way into the rect() function:
tree(210, 320, 10) is called in draw(), where x = 210, y = 320, and size = 10
Here are the formulas used in the
rect()function call:rect(x-size,y,size*2,size*6);When
x = 210,y = 320, andsize = 10, the following values are plugged in:rect(210-10,320,10*2,10*6);The resulting arguments are used to draw the shape on the canvas:
rect(200,320,20,60);
Similarly:
Here are the formulas used in the
triangle()function call:triangle(x-size*3, y, x, y-size*8, x+size*3,y)When
x = 210,y = 320, andsize = 10, the following values are plugged in:triangle(210-10*3, 320, 210, 210 + 10*3, 320);The resulting arguments are used to draw the shape on the canvas:
triangle(180, 320, 240, 320);
When the arguments change, the tree is modified and can be at different locations, and with a different size.
- Explore this example to see how changes in specific arguments customize the tree drawn on the canvas.
You can figure out the exact formula for the rect() and triangle() functions through trial and error. Starting with a static tree and creating expressions for changes you want to make in the tree is a great place to start! You can even try to add parameters that changes the fill and stroke colors.
- Explore this example for step-by-step instructions on how to add x and y parameters using numerical expressions, and test your function using
mouseXandmouseY.
For more examples of custom functions that include parameters, visit the p5.js reference page for function.
By creating two trees with the same Here is an example.tree() function, you reduce the amount of code in your sketch. This makes your code shorter so that it is easier to read. With less code, it is also easier to debug. tree() with the wrong number of arguments. What happens?seagull(x, y, size) or cloud(x, y, size).
Return Values
Functions such as random() produce, or return, values that can be used elsewhere in your code. Here’s an example of a function that adds 5 to its parameter and returns the result:
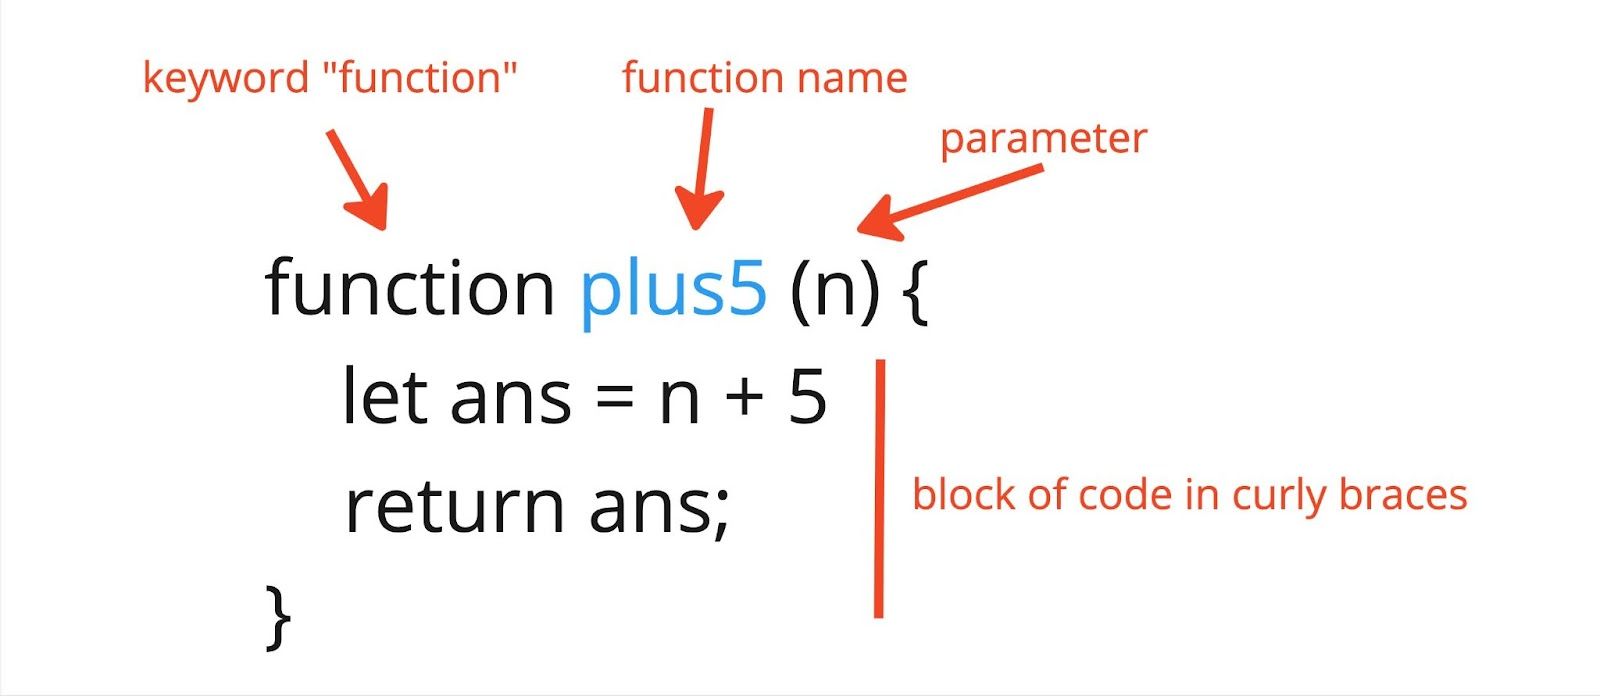
The syntax for function declaration that returns the value “ans” with labeled arrows pointing to its various parts. An arrow labeled “keyword ‘function’” points to the word “function”; an arrow labeled “function name” points to “plus5”; an arrow labeled “parameter” points to the letter “n” within parentheses; the body of the function is labeled “block of code in curly braces” with the code “let ans = n + 5” and “return ans;” on separate lines.
Similar to other function declarations, the keyword function is followed by the function name and a pair of parentheses. This function has one parameter, n within the parenthesis. The body of the function includes a numerical expression and return statement. The keyword return tells functions to finish executing the code block and provide a result as an output value.
Let’s try this out with a quick example that displays the value returned by plus5() as text. Open a new p5.js project and add the following code to the script.js file:
function setup() {
createCanvas(400, 400);
}
function draw() {
background(220);
// Make a calculation by calling plus5().
let number = plus5(10);
// Style the text.
textAlign(CENTER);
textSize(30);
// Display the text.
text(`10 + 5 = ${number}`, width / 2, height / 2);
}
function plus5(n) {
let ans = n + 5;
return ans;
}
In this sketch, you defined a variable number and assigned it to the value returned by the plus5(10) function call. The argument 10 replaces the parameter n in the function declaration. In the first line of plus5(), the result of 10+5 or 15 is stored in the variable ans. The function then returns a value of 15. Finally, you displayed the answer by passing number to the text() function using string interpolation.
Here’s another example that uses plus5() to draw the path of a shooting star:
function setup() {
createCanvas(400, 400);
}
function draw() {
// Draw the sky black with transparency.
background(0, 50);
// Set the stroke.
stroke(255);
strokeWeight(5);
// Increase the x-coordinate with each frame.
let x = frameCount;
// Call plus5() to calculate the y-coordinate.
let y = plus5(x);
// Draw the shooting star.
point(x, y);
}
function plus5(n) {
let ans = n + 5;
return ans;
}
In draw(), you stored the value in frameCount in the variable x, then passed it to plus5(). You also stored the value returned by plus5(x) in the variable y. Finally, you used x and y as the arguments in the point() function call to display a shooting star as it moves from left to right. The values stored in both x and y (in the draw function) increase as the sketch runs. Notice that the shooting star follows a diagonal line.
Visit the p5.js reference page for return to learn more.
Step 6: Use custom functions inside other custom functions
To practice this idea, let’s return to our sunrise animation sketch and define a function that’s very similar to plus5() called treeLine(). It does a bit more math using its parameter and returns the result:
// A function to calculate the y-coordinate of a tree along a straight line.
function treeLine(x) {
let y = -0.7 * x + 450;
return y;
}
The statement let y = -0.7 * x + 450; multiplies the parameter x by -0.7, then adds 450 to that value, stores the value in the variable y, and returns y.
Declare the
treeline()function and atrees()function to draw a few trees. Add atreeLine()function declaration to your sketch:Add the following lines to your code below
draw():function treeLine(x) { let y = -0.7 * x + 450; return y; }
Add a
trees()function declaration to your sketch.Add the following lines to your code below
draw():function trees() { // First tree let x = 150; let y = treeLine(x); tree(x, y, 5); // Second tree x = 180; y = treeLine(x); tree(x, y, 5); // Third tree x = 210; y = treeLine(x); tree(x, y, 5); }
Add a
trees()function call todraw().Add the following lines inside
draw():// call trees() function trees();
Your code should look like this:
//variables for color change
let redVal = 0;
let greenVal = 15;
//variable for sun position
let sunHeight = 600;
function setup() {
createCanvas(600, 400);
noStroke(); //removes shape outlines
}
function draw() {
// call the sky function
sky();
// call the sun function
sun();
    // call the mountains function
mountains();
// draw two trees
trees()
}
// A function to draw the sky
function sky() {
background(redVal, greenVal, 0);
}
// A function to draw the sun
function sun() {
fill(255, 135, 5, 60);
circle(300, sunHeight, 180);
fill(255, 100, 0, 100);
circle(300, sunHeight, 140);
}
//A function to draw mountains
function mountains() {
fill(110, 50, 18);
triangle(200,400,520,253,800,400);
fill(150, 75, 0);
triangle(-100, 400, 150, 200, 400, 400);
fill(150, 100, 0);
triangle(200, 400, 450, 250, 800, 400);
fill(100,50,12);
triangle(-100,400,150,200,0,400);
fill(120,80,50);
triangle(200,400,450,250,300,400);
}
//A function to draw trees with different x and y and size
function tree(x,y,size) {
fill(80,30,20);
rect(x-size,y,size*2,size*6);
fill(20,130,5);
triangle(x-size*3,y,x,y-size*8,x+size*3,y)
}
//A function that creates a line for trees to be drawn
    function treeLine(x) {
  let y = -0.7 * x + 450;
  return y;
}
//A function that draws many trees
//using treeLine() and tree() functions
    function trees() {
  // First tree
  let x = 150;
  let y = treeLine(x);
  tree(x, y, 5);

  // Second tree
  x = 180;
  y = treeLine(x);
  tree(x, y, 5);

  // Third tree
  x = 210;
  y = treeLine(x);
  tree(x, y, 5);
}
In the step above, you defined a function called treeLine() that calculates a line along which multiple trees can be drawn. You also defined a function that uses the tree() function you created earlier and the treeLine() function to draw multiple trees along a line in your landscape.
Here is an example of what your project could look like!let y = -0.7 * x + 450; in the treeLine() to use values other than -0.7 and 450.
The keyPressed() function
In addition to functions like setup() and draw(), you can use other built-in p5.js functions that add interactivity to your program. The function keyPressed() is a useful function to define in your program, as it gets triggered when the user presses a key.
Step 7: Add interactivity to your animation
Define the function keyPressed() at the bottom of your sketch.
    function keyPressed() {
  redVal=0;
  greenVal = 0;
  sunHeight = 600;
}
keyPressed() runs one time when any key on the keyboard is pressed. Here, we use it to reset variables back to their initial position when a key is pressed, essentially starting the animation from the beginning.
keyPressed() can also access the key variable that a user presses, allowing for more user interactivity. Similarly, you can define a function mousePressed() in your sketch that runs once every time the user clicks the mouse.
Here are some examples you can explore:
For more information on functions like keyPressed() and mousePressed(), visit the Events section of the p5.js reference.
Conclusion
Functions like Declare a Here is an example. Create an entirely new sketch and animate a different landscape. Use functions to plan and organize this exciting project. tree() let you express a complex idea (drawing a tree) using a combination of simpler ideas (drawing 2D shapes). The function trees() further expands this idea by creating a line of trees. Whether you’re sketching a landscape or designing an interactive light show, functions can help you construct complex ideas out of simpler ones. This is called abstraction. Abstraction allows you to focus at a higher level so that you are not distracted by all the details. Imagine what your code would look like if you animated a magic forest by calling triangle() and rect() hundreds of times. It would be hard to keep track of everything. Functions allow you to create abstractions that handle details such as the specific coordinates of the shapes in an elegant and organized way. As your sketches become more elaborate, you’ll find that creating the right abstractions makes it easier to focus on the big picture.butterfly() function to display a butterfly 🦋emoji that appears at random locations or flutters around. Call the butterfly() function in draw() to display.Or Try This Spicy Challenge!