Introduction
Music is used by cultures around the world as a way to communicate their histories, emotions and experiences by combining vocal or instrumental sounds. One of music’s basic elements is a melody: a group of musical notes that form compositions of sounds that are pleasing to hear. In this tutorial you will explore how to use p5.Oscillator objects to generate musical notes, and develop an web application where users create melodies, and play them back!
This tutorial is part 1 in a series of 3 tutorials that walk you through creating different versions of a melody app.
- Part 1: In this tutorial you will develop a simple melody app where users can compose melodies from a musical scale, and play them back.
- Part 2: In Getting Started with Node.js, you will learn how to use Node.js and Express.js to route HTTP requests that retrieve and play melodies saved on your computer.
- Part 3: In Melody App with Node.js (coming soon!), you will learn how to integrate your simple melody app with Node.js and Express.js. You will develop a more complex Melody App where users can heir melodies onto their computers, and retrieve them for playback later.
Prerequisites
This tutorial requires:
- A computer with internet connection and speakers or headphones
- The p5 Web Editor (or an IDE and the most recent p5.js library downloaded)
- Understanding of basic programming concepts from Introduction to p5.js tutorials such as:
- variables
- loading files
- conditionals
- arrays
- for loops
- JSON objects
- Understanding of basic web design principles introduced in the Web Design tutorials
Note: Sections 1.1 - 1.5 introduce concepts in other disciplines such as physics and music theory. These sections are resources for background knowledge recommended to understand how p5.Oscillator objects can be used to create melodies. Although it is highly recommended for you to review these section, it is not required to finish the simple melody app.
If you are already familiar with:
p5.Oscillatorobjects- sound waves
- pressure waves
- periodic waves and their characteristics
- musical notes (frequency, pitch, and amplitude)
Skip to Play musical notes with oscillators to bypass background knowledge.
Oscillators, science & music background information
p5.Oscillator objects
p5.Oscillator objects hold information to generate electrical signals called oscillators that can play musical notes. These signals change between a minimum and maximum value in a pattern that repeats at a specific rate. When the signal is played through your speakers, we can hear that it generates a sound!
To understand how oscillators generate musical notes, we can dive into some science behind sound.
Note
In the next section, Science of sound and music, the following concepts are introduced:
- Sound as a pressure waves
- Periodic wave characteristics
- Sound waves in relation to musical notes
- Music Theory concepts such a melodies, musical notes & frequency
Skip ahead
If you are already familiar with the background concepts above, jump over to the Building a melody app section to begin your project!
Science of sound & music
Melodies are a collection of musical notes that form sounds that are pleasing to hear. Sounds are described as pressure waves, and can be generated by oscillators.
1.1 - Sound and pressure waves
Have you ever wondered if you can hear a sound in outer space? Or why sounds are lower when you are under water?
In physical science, sound is energy created by vibrating molecules and particles of air, or any other form of matter. The matter that carries sound from one place to another is called a medium, and can be a liquid (like water), a gas (like air) or a solid (like a wall or a door). These vibrating particles of matter create a pressure wave that carries the sound from one place to another, through the medium.
A pressure wave is any disturbance that carries energy when the particles in the medium get closer together, and create areas of higher pressure. Consider the following gif of a tuning fork creating a sound:
A tuning fork vibrates the particles of matter around it, creating a pressure wave of sound energy illustrated by a repeating pattern of particles that are compressed together, and particles that are spread out. The particles of matter carry the sound wave from left to right as they bump into one another
Source: The Physics Classroom: Sound Waves and Music - Lesson 1 - The Nature of a Sound Wave
We can see in the gif above that the tuning fork vibrates the particles of matter around it, creating a pressure wave that carries sound energy. When that pressure wave reaches your ear, you hear the particle vibrations as sound! The reason why you wouldn’t hear any sounds in outer space is because there is no medium to carry the sound energy!
To get a better idea of how sound travels through matter, check out this video that demonstrates pressure waves formed by the sound of a clap!
Learn more about the science behind pressure waves and sound by visiting these resources: Particle Theory of Matter, Sound as a Pressure Wave and Waves and the eardrum.
1.2 - Periodic waves and sound
Pressure waves can be described by repeating patterns of compressed particles in a medium. Compressions are characterized by areas with high pressure where particles are close together. Rarefactions are characterized by low pressure areas where particles are more spread out. The image below illustrates the areas of high and low air pressure caused by a sound wave generated by a tuning fork. Notice how high air pressure corresponds to areas where air particles are close together, and low air pressure corresponds to areas where air particles are farther apart.

A sound generated by a tuning fork causes a periodic pattern of high and low pressure areas in a medium. Areas where particles are close together are labeled as “high pressure,” and areas where particles are farther apart are labeled “low pressure.”
Source: Sound for Music Technology - The Open University
Pressure waves that create sound are simply a sequence of repeating cycles of compressions and rarefactions in a medium. One cycle of the wave, one oscillation, includes an area with high pressure (compression) and an area with low pressure (rarefaction). Repeating oscillations at a fixed interval of time form periodic waves that we hear as musical notes and other sounds!
For example, speakers produce sound waves by moving its surface up and down in a periodic pattern generated by electric circuits. The gif below illustrates how sound waves produced by a speaker travel through particles of air:
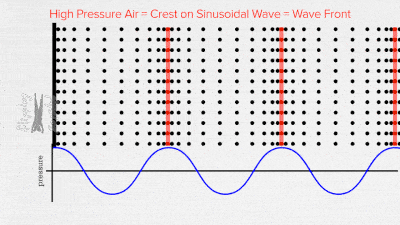
A black line on the left-hand side moves in a periodic pattern to imitate the surface of a speaker as it produces sound. Columns of black dots to the right of the surface represent the air particles around the speaker. As the surface moves to the right, it pushes surrounding air particles causing them to bump into others. As the surface moves to the left, it creates space for particles to spread out as they move back. Red lines that mark areas where particles bump into others, appear to travel to the right through the air. A periodic sine curve that represents air pressure is drawn under the sound wave, with each peak aligned to a red line. The sine curve appears to travel to the right as red lines move through air particles.
The black line on the left represents the surface of the speaker, and columns of black dots represent particles of air.
The speaker produces sound by moving its surface from right to left in a periodic pattern. As the surface of the speaker moves to the right, it pushes air particles to the right, and causes them to get closer together (compress). When particles compress they create areas of high air pressure and transfer sound energy down the medium.
In the gif above, red lines label areas in the air where particles compress and transfer sound energy. A blue line, in the form of a periodic sine curve, shows changes in pressure as sound travels through air. Areas where air particles compress align with the highest points on the blue line (high pressure). Areas where particles are more spread apart align with the lowest points on the blue line (low pressure).
Did you notice how particles in a medium oscillate back and forth to carry sound energy, but never actually travel anywhere? The red lines illustrate how the sound energy is carried by the medium through the transfer of energy from its particles. Notice how the sound travels in the same direction that particles vibrate. This means that sound is a longitudinal wave! Visit this resource to learn more about longitudinal waves.
Sound waves are commonly illustrated using a periodic sine curve that represents changes in pressure as sound travels through a medium (like the blue line in the gif above).
Periodic wave characteristics
Periodic waves are described using characteristics illustrated in the diagram below:
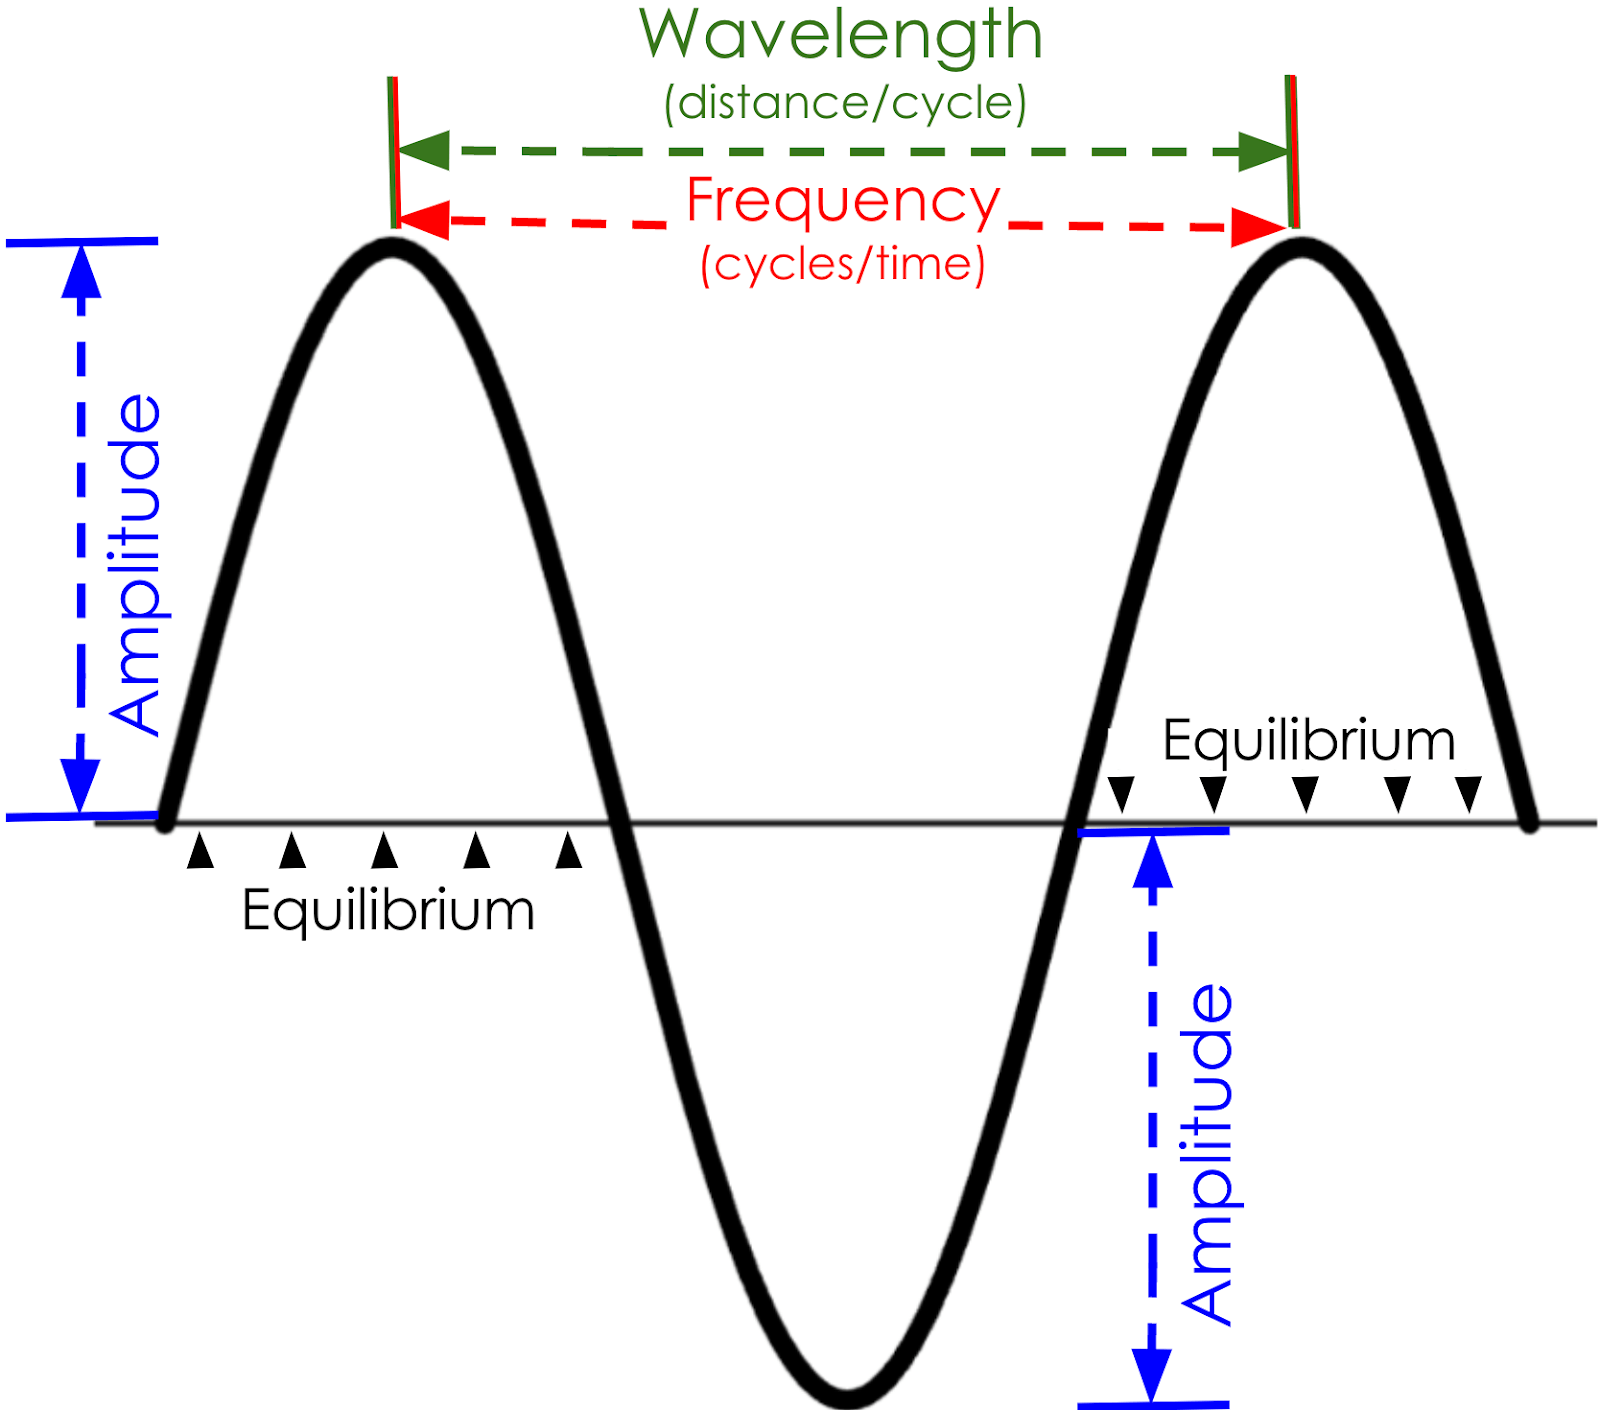
A diagram of a periodic sine curve drawn over a horizontal line in the middle. Arrows label the wave characteristics: “wavelength (distance per cycle)”, “frequency (cycles per time)”, “amplitude” and “equilibrium.” Horizontal arrows pointing from one peak to the next show that wavelength measures the length of one wave cycle, and frequency measures the number of wave cycles that occur over a specific period of time. The line in the middle of the wave is labeled the “equilibrium.” Vertical arrows that point from the highest point in the line to the equilibrium, or from the lowest point to the equilibrium, show that amplitude is a measure of the distance from the equilibrium.
Label descriptions:
- Equilibrium: represents the resting position of an oscillation, and is often represented by a flat horizontal line in the middle of a wave.
- For a pressure wave, equilibrium describes the pressure in a medium when there is no sound.
- Wavelength: the distance between two identical points on the wave, or the length of one oscillation.
- The wavelength for a sound wave is the distance between two consecutive compressions, or two consecutive rarefactions.
- Amplitude: the distance between the equilibrium line, and the highest or lowest point on the wave
- For a sound wave, the amplitude describes the intensity, or volume, of the sound.
- Frequency: the number of oscillations that occur in a specific period of time.
- Frequency is often measured in Hertz (Hz), which measures the number of cycles per second. 1 Hz = cycle/second
- The frequency of a pressure wave, measured in Hz, is the number of times a compression or rarefaction passes a point in one second.
1.3 - Musical notes and wave characteristics
Since musical notes are sounds that are carried by periodic pressure waves, we can also describe them using wave characteristics.
The amplitude of a sound wave is a measure of the sound’s intensity, which we can hear through its volume. Musical notes played at high volumes have high amplitudes, while notes played at low volumes have low amplitude. To learn more about amplitude and music, visit this resource.
The equilibrium for a sound wave describes the energy that is transferred by the particles in the medium when no sound is traveling through it. We can imagine that at equilibrium, the volume of a sound is 0, and the pressure in the medium is at some resting value.
The frequency of sound waves can be heard through its tones, or pitch, which range from high to low. Musical notes are sound waves played at specific frequencies for a short period of time. Notes played at low frequencies correspond to low tones, much like the musical notes played on a bass guitar. Notes played at high frequencies correspond to high tones, much like the musical notes played on a flute. To learn more about how musical notes correspond to wave specific frequencies, visit this resource.
Visit the Sound Synthesis Tutorial from The Coding Train for a brief introduction to p5.Oscillator objects and waves.
Play musical notes with oscillators
Let’s dive into the wonderful world of sound, music and oscillators to create a simple melody app!
Step 1 – Create a p5.oscillator object that can play a musical note
Open a new p5.js project, name it “Play a note,” and save the project.
- Be sure that you have the p5.js sound library linked in your
index.htmlfile.
Identify a frequency that matches a musical note, and store it in a global variable called myFreq.
For the middle C note, initialize
myFreqwith262by adding this code abovesetup():// Variable for frequency (middle C). let myFreq = 262;
Visit this resource for a list of musical notes and corresponding frequencies. Middle C has a frequency of 262 Hz.
Declare a global variable that will store the p5.Oscillator object.
Add this code above
setup():// Variable for Oscillator. let osc;
Initialize osc with a p5.Oscillator object using myFreq as an argument.
Add this code in
setup():/* Create an Oscillator object with a Frequency defined by the variable myFreq */ osc = new p5.Oscillator(myFreq);
Ensure that the oscillator object was successfully initialized by adding console.log(osc) in the next line. You should see and object that looks like this:
r {started: false, phaseAmount: undefined, oscillator: OscillatorNode, f: 262, output: GainNode…}
You can confirm that you created an oscillator object with the correct frequency by examining the “f” property in the console, or printing it using console.log(osc.f). The frequency in the osc.f should match the frequency you identified for your note.
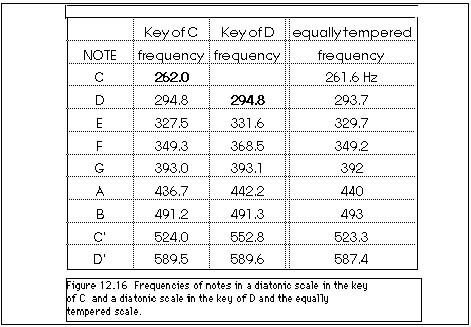
Visit the p5.Oscillator reference to learn more about the properties in p5.Oscillator objects. See this resource for a chart that lists the frequencies for specific musical notes.
Your sketch.js file should look like this:
    // Variable for frequency (middle C).
let myFreq = 262;
    // Variable for Oscillator.
let osc;
function setup() {
createCanvas(400, 400);
    /* Create an Oscillator object with a
Frequency defined by the variable myFreq */
osc = new p5.Oscillator(myFreq);
console.log(osc.f);
}
function draw() {
background(220);
}
Step 2 – Play a note
Most browsers require a user’s permission to play or retrieve sounds, images and video. To bypass this feature, we can add a feature that gives the user control over when a sound is played.
Next, we’ll enable a user to start the oscillator when they click the canvas by defining a mousePressed() function that calls osc.start().
Add the following lines of code under
draw():// Starts the oscillator when the mouse is pressed. function mousePressed() { osc.start(); }Run your code. You should hear middle C play after clicking on the canvas.
If you do not hear any sounds after clicking the canvas , check that your code looks like this. If a sound does not play, check that your browser settings allow for playing multimedia. You can use the following resources to help you:
We have created a musical note that plays forever, or until you stop running the code!
Next, we’ll enable a user to start and stop the sound when they click the canvas.
Replace the code in the
mousePressed()function with this conditional statement:// Toggle the note that is playing. if (osc.started) { osc.stop(); } else { osc.start(); }Run your project. You should be able to hear the middle C note play when you click the canvas, and stop when you click the canvas again!
Your sketch.js file should look similar to this:
// Variable for Oscillator.
let osc;
// Middle C frequency.
let myFreq = 262;
function setup() {
createCanvas(400, 400);
// Create the Oscillator object.
osc = new p5.Oscillator(myFreq);
// console.log(osc.f);
}
function draw() {
background(220);
}
function mousePressed() {
    // Toggle the note that is playing.
if (osc.started) {
  osc.stop();
} else {
  osc.start();
}
}
In the code above, a new p5.Oscillator object is initialized with a frequency of 262 Hz and stored in the osc variable. The user can start and stop the oscillator by clicking the canvas. To add this interactivity, you added a conditional statement in mousePress() that used the oscillators .started property to check if the oscillator has started playing already. osc.started is true if the oscillator has started, and false otherwise. If the oscillator has started, the conditional instructs the program to stop the oscillator using the .stop() function, otherwise the oscillator starts using the .start() function.
Visit the p5.js reference for p5.Oscillator to learn more about its functions and properties.
Example Project In the next section, Musical scales and oscillators, we introduce the theory behind musical scales and melody composition by introducing musical scales, melody composition, octaves & musical scales and frequencies. If you are already familiar with the background concepts above, skip ahead to the Build a simple melody app section!
Musical scales and oscillators
Music composers and producers often create simple melodies by choosing notes from a specific musical scale to ensure melodies will sound pleasing to listeners. In western culture, musical scales are a collection of notes arranged according to ascending or descending frequencies. Ascending scales increase in frequency (from a low pitch to a higher pitch), and descending scales decrease in frequency (from a high pitch to a lower pitch). An octave is an ascending scale consisting of eight evenly spaced musical notes, where the frequency of the last note is two times the frequency of the first note.
We chose one of the most fundamental scales in western music known as C Major in the example for this tutorial. The first note in the C Major scale is middle C, with a frequency of 264 Hz. The last note in the scale will have a frequency that is double the frequency for middle C. This means the last note in the scale is C sharp with a frequency of 524 Hz. See table below for a list of frequencies and corresponding musical notes:
Musical Notes and Frequencies in C Major
Note (4th Octave) | Frequency (Hz) | Expression ( |
|---|---|---|
C | 264 |
|
D | 294.75 |
|
E | 327.5 |
|
F | 349.33 |
|
G | 393 |
|
A | 436 |
|
B | 491.25 |
|
C# (5th Octave) | 524 |
|
Visit these resources to explore more about other musical scales, octaves, melody composition and scales, and C Major.
This project uses p5.Oscillator objects to generate the musical notes that will play during a melody. We learned to initialize a new p5.Oscillator object in a variable with a specific frequency in Step 1. To generate oscillators for a musical scale, we can initialize multiple p5.Oscillator objects with different frequencies in an array.
To learn more about arrays, visit the MDN resource for JavaScript Arrays.
Build a simple melody app
In the simple melody app project, we will enable users to choose any note in C Major to compose melodies. Frequencies and oscillator objects are stored in arrays so that they are ready to be played when the user selects them. Each note in C Major has a specific frequency, so each note will have a specific oscillator object that will play it.
Step 1 – Create p5.Oscillator objects for a musical scale
Open a new project in the p5.js Web Editor, name it “Simple Melody App” and save.
- Be sure that you have the p5.js sound library linked in your
index.htmlfile.
Choose a musical scale to use in your app.
- This tutorial uses the C Major scale (4th octave) where the first note is middle C - the same note that has a frequency stored in the variable
myFreq. - Calculate the 8 frequencies that represent musical notes in a scale, starting with the frequency in a variable
myFreq.
Refer to this table from the section above for more information on how to calculate the frequencies for notes in C Major.
Declare a global variable myFreq and initialize it the frequency of the first note in the scale. Declare another global variable called frequencies and initialize it with an array of frequencies you calculated that match the 8 notes in the scale.
Add this code before
setup():// Variable for frequency (middle C). let myFreq = 262; // Array of frequencies in C Major. let frequencies = [ myFreq, myFreq * 9/8, myFreq * 5/4, myFreq * 4/3, myFreq * 3/2, myFreq * 5/3, myFreq * 15/8, myFreq * 2 ];
Access the elements in the frequencies array to initialize p5.Oscillator objects for each note in C Major.
Create a global variable called
oscillatorsand initialize it with an empty array. This array will hold thep5.Oscillatorobjects for each note.Add this code above
setup():// Empty array for oscillator objects. let oscillators = [];
Initialize oscillators for notes that match the
frequenciesarray, and add them to theoscillatorsarray by calling.push()on the array with each new oscillator.Add this code in
setup():// Initialize oscillators and place in oscillators array. for (let freq of frequencies) { osc = new p5.Oscillator(freq); oscillators.push(osc); }
Here you use a The index of for specific frequencies in the for loop to access each frequency in the frequencies array to initialize new p5.Oscillator objects for each note. Each oscillator object is stored in the oscillators array.frequencies array match the index of oscillator objects in the oscillators array.
Double check oscillators are created correctly by printing the frequencies for each oscillator in the console.
Add this line of code in
setup()://double check each oscillator has correct frequency for (let freq of frequencies) { console.log(osc.f); }
Your sketch.js file should look similar to this:
// Middle C frequency.
let myFreq = 262;
// Array of frequencies in C Major.
let frequencies = [
myFreq,
myFreq * 9/8,
myFreq * 5/4,
myFreq * 4/3,
myFreq * 3/2,
myFreq * 5/3,
myFreq * 15/8,
myFreq * 2
];
// Empty array for oscillator objects.
let oscillators = [];
function setup() {
createCanvas(400, 400);
// Initialize oscillators and place in oscillators array.
for (let freq of frequencies) {
osc = new p5.Oscillator(freq);
oscillators.push(osc);
}
// double check each oscillator has correct frequency
for (let freq of frequencies){
console.log(osc.f);
}
}
function draw() {
background(220);
}
In the next section, Melodies and tempo, we will introduce how tempo and note duration play a role in creating melodies. If you are already familiar with the background concepts above, skip ahead to Step 2!p5.Oscillator objects have methods such as .start(), .stop(), and .amp() that help control the intensity of the sound they produce. They also have properties such a .f and .started that store, respectively, its frequency in Hz, and a boolean value that is true when the oscillator starts, and false otherwise. We will use these to add more interactive elements to the sketch later on.
Melodies and tempo
Melodies are created when multiple musical notes are played one after the other. A simple melody can consist of musical notes, rhythm, and tempo. Rhythm describes how long each individual note is played, and is commonly measured in beats. Tempo describes the number of beats per minute (bpm) for a melody. For example, the average pop melody is played at 120 beats per minute, which means that each beat is half a second long. Beats describe the pulse of a melody, whereas the tempo describes how fast each beat moves in time.
The amount of time each note is played, known as note duration, is measured in beats and directly affects a melody’s rhythm. Notes are often played for durations like 4 beats, 2 beats, 1 beat and half a beat. For a simple melody, each note is played for the same amount of time. A simple melody played at 120 bpm will have notes that are played every half a second, and last for half a second. To learn more about note duration, rhythm and tempo, visit this resource.
Visit the MDN reference to review JavaScript JSON objects - we will be storing our melodies as JSON objects that we can play back!
We will use JSON objects to store melodies and their characteristics such as a name, musical notes, and tempo. We will call these melody objects.
Step 2 – Create a melody object
We can create a melody object that represents the notes in C Major by adding this code before setup():
// Melody Object for C Major
let melody = {
name: 'C Major Scale',
notesIndex: [0, 1, 2, 3, 4, 5, 6, 7],
tempo: 120
};
Melody objects have the following properties:
name: the name of the melodynotesIndex: an array of numbers that specify the index in theoscillatorsarray that corresponds to each note.notesIndexdefines the order in which each note will be playedtempo: the number of beats per minute used to calculate the duration of each note in the melody.
Visit the MDN reference for JSON objects to learn more about how to access property values.
Step 3: Play a note in a melody object
Before playing an entire melody, we first have to give the program instructions on how to play an individual note.
Define a playNote() function with a parameter n, where n matches the index in the melody.noteIndex. n also matches the indices for notes in the oscillators array, and their frequencies in the frequencies array.
Add the following function declaration below
draw():// Starts playing the note. function playNote(n) { }
Use a conditional statement that plays a note if the note is not already playing.
Add the following code in
playNote(n):// Starts oscillator if needed. if (oscillators[n].started === false) { oscillators[n].start(); }
Add a short fade-in as the note plays using .amp() for a more natural listening experience. This method changes the amplitude of the oscillator, gradually raising the volume in the beginning.
Add the following function declaration below
draw():// Starts playing the note by increasing the volume with a 0.01 sec fade-in.
oscillators[n].amp(1, 0.01);
The `playNote()` function should look like this:
```js
function playNote(n) {
// Starts oscillator if needed.
if (oscillators[n].started === false) {
oscillators[n].start();
// Starts playing the note by increasing the volume with a 0.01 sec fade-in.
oscillators[n].amp(1, 0.01);
}
}
The playNote() function:
- Receives a number
nthat indicates the index value for a note based on thenotesIndexproperty in themelodyobject. - Start the oscillator at
oscillators[n], as long as it hasn’t already started.- To check if the oscillator is playing, use its
.startedproperty in a conditional statement. - Use the
.start()method to start the oscillator if its not already started
- To check if the oscillator is playing, use its
- Using the oscillators
.amp()method, set the volume to 1, with a fade-in of 0.01 seconds
To stop the note, we can add a fade out using the .amp() to decrease the volume to 0, and stop the oscillator using .stop().
Define a function called
stopNote()with a parameternby adding this code underplayNote():// Stops playing the note. function stopNote(n) { // Lower oscillator volume to 0. oscillators[n].amp(0, 0.01); // Stop the oscillator. oscillators[n].stop(); }
The stopNote() function:
- Receives a number
nthat indicates the index of the oscillator object that is playing - Sets the volume to 0 with a fade out of 0.01 seconds using the oscillators
amp()method - Uses the
stop()method to stop the oscillator
We can call stopNote() in the playNote() function, and control the amount of time each note plays. First define a global variable noteDuration that uses the melody.tempo property to calculate the amount of time each note should play..
Add the following code before
setup():// Calculate duration of each note in seconds. let noteDuration = 60 / melody.tempo;
In the Melodies and tempo section, we learned that note duration can be calculated using tempo because each note in our simple melody is played for the same amount of time. Since the tempo is measured in beats per minute, we can divide 60 seconds per minute by the tempo (60 / melody.tempo) to determine the number of seconds a note should play.
Modify playNote() by using setTimeout() to schedule the time when a specific note from melody.notesIndex plays. setTimeout() requires 3 arguments: the function to call after the set time, the set time to wait until the function is called (in milliseconds), and the argument to use in the function when it is called.
Trigger
stopNote()afternoteDuration * 1000milliseconds usingnas the third parameter usingsetTimeout():Add this line of code at the end of
playNote():// Stops playing the note after number of seconds stored in noteDuration setTimeout(stopNote, noteDuration * 1000, n);
setTimeout() calls stopNote after a period of time measured in milliseconds:
noteDurationcan be converted from seconds to milliseconds using the expressionnoteDuration * 1000.- The third argument,
n,indicates the value to pass into thestopNote()function when it is called. This is the value for the index in themelody.notesIndexarray that matches the index of theoscillatorin theoscillatorsarray that is playing. - Delaying
stopNote()based onnoteDurationplays the note for a 1/2 beat.
For more information about the setTimeout() function visit the MDN reference.
Your playNote() and stopNote() functions should look like this:
// Starts playing the note.
function playNote(n) {
// Starts oscillator if needed.
if (oscillators[n].started === false) {
oscillators[n].start();
}
// Starts playing the note by increasing the volume with a 0.01 sec fade-in.
oscillators[n].amp(1, 0.01);
// Stops playing the note after number of seconds stored in noteDuration
setTimeout(stopNote, noteDuration * 1000, n);
}
// Stops playing the note.
function stopNote(n) {
// Lower oscillator volume to 0.
oscillators[n].amp(0, 0.01);
// Stop the oscillator.
oscillators[n].stop();
}
Test
playNote()by calling it at the end of setup using a specific note from the melody object. For example, you can add this line of code at the end ofsetup()and change the argument to test each://test playNote playNote(0);
Step 4: Play a melody object
Define the play() function to schedule when to play each note from the oscillators array based on the order in which their index appears in the melody.notesIndex array, and the melody’s noteDuration. The elements in melody.notesIndex include all indices for notes in the melody, in the order they should be played.
The value of melody.notesIndex[0] is the value of the index in the oscillators array that plays the first note in the melody. The last element in melody.notesIndex is the index in the oscillators array for the last note. Each note can be played at a specific time after the melody starts using setTimeout() to trigger playNote() in a for loop.
Add the function declaration for
play()at the bottom of sketch.js:// Plays the notes in a melody. function play() { // Read each [index, note] in melody.notesIndex for (let [index, note] of melody.notesIndex.entries()) { // Play each note at scheduled time setTimeout(playNote, noteDuration * 1000 * index, note); } }Test the
play()function by calling it to themousePressed()function.
Your code should look like this:
    // Variable for frequency (middle C).
let myFreq = 262;

// Array of frequencies in C Major.
let frequencies = [
  myFreq,
  myFreq * 9/8,
  myFreq * 5/4,
  myFreq * 4/3,
  myFreq * 3/2,
  myFreq * 5/3,
  myFreq * 15/8,
  myFreq * 2
];
// Melody Object for C Major
let melody = {
name: 'C Major Scale',
notesIndex: [0, 1, 2, 3, 4, 5, 6, 7],
tempo: 120
};
    // Empty array for oscillator objects.
let oscillators = [];
// Calculate duration of each note in seconds.
let noteDuration = 60 / melody.tempo;
function setup() {
createCanvas(400, 400);
    // Initialize oscillators and place in oscillators array.
for (let freq of frequencies) {
  osc = new p5.Oscillator(freq);
  oscillators.push(osc);
}
//set color mode to HSB (better for using notes to color keys)
colorMode(HSB);
}
function draw() {
background(220);
drawMelody();
}
// Starts playing the note.
function playNote(n) {
// Starts oscillator if needed.
if (oscillators[n].started === false) {
oscillators[n].start();
// Starts playing the note by increasing the volume with a 0.01 sec fade-in.
oscillators[n].amp(1, 0.01);
}
// Stops playing the note after number of seconds stored in noteDuration * 1000
setTimeout(stopNote, noteDuration * 1000, n);
}
    // Stops playing the note.
function stopNote(n) {
  // Lower oscillator volume to 0.
  oscillators[n].amp(0, 0.01);

  // Stop the oscillator.
  oscillators[n].stop();
}
    // Plays the notes in a melody.
function play() {
  // Read each [index, note] in melody.notesIndex
  for (let [index, note] of melody.notesIndex.entries()) {
    // Play each note at scheduled time
    setTimeout(playNote, noteDuration * 1000 * index, note);
  }
}
//play melody with mouse click
function mousePressed() {
play();
}
The play() function:
- Uses a for loop to iterate through all the elements in the
melody.notesIndexarray, and captures the index of the element in theindexvariable, and its value in thenotevariable.indexindicates the order in which the note should be played.noteindicates the index for in theoscillatorsarray that will play the note.
- Schedules the playback for each note in
melody.notesIndexusingsetTimeout()- Calls
playNote(note)after a time, in milliseconds, calculated bynoteDuration * 1000 * index
- Calls
setTimeout() schedules when each note should be played, and takes two or more arguments: the function to run (playNote), the delay before it runs (in milliseconds), and any arguments to pass to the function it runs. In this case, we want to pass a note to the playNote function. The delay is calculated using noteDuration * 1000 * index, where index is the index of the current note in the melody.noteIndex array that corresponds to the index of the oscillator in the oscillators array.
This timing allows for the following schedule for playing notes in a melody:
- The first note in
melody.noteIndexplays immediately when the melody starts (at 0 milliseconds). - The second note plays after the after
noteDuration * 1000 * 1milliseconds. This occurs 1/2 beat after the first note starts playing. - Third note plays after the second note, delayed by
noteDuration * 1000 * 2milliseconds. - This process repeats until each element in the
melody.notesIndexarray is used.
Each note’s playtime is staggered by the duration and position of a single note in the melody. This allows for a smooth progression of notes played throughout the melody, and creates a rhythm where each note is played at a consistent interval, aligning with the melody’s tempo.
Example Code In the next section, User interface and Experience, we will introduce how to think about user interface (UI), user experience (UX), and the importance of visual feedback while using an app. If you are already familiar with the background concepts above, skip ahead to Step 7!melody.notesIndex and observe how the melody changesmelody.tempo and observe how the melody changes
User interface and experience
We have programmed our projects to play the notes from a melody object! Now we can add a user interface (UI)that allows users to select notes from the C Major scale, and compose their own melodies. A user interface (UI) can provide anything you think a user may need to use your app successfully, and have a great time while doing so. It can provide a fun and pleasant user experience (UX).
Visual feedback during their experience is an important part of keeping users interested in your app. for users as each note plays can make composing and playing back melodies a more satisfying experience that keeps people making more!
Visit these resources to learn more about user interfaces (UI), user experiences (UX) and visual feedback.
In this step you can design any user interface you like. As an example, we will be drawing a row of buttons that resemble the keys on a piano. To allow for an intuitive user experience, each note in the C Major scale will correspond to a button on the canvas, organized in order of decreasing frequency. When the note associated with a specific key is played, the key will light up with a bright color to add some visually pleasing feedback to the melody playback experience!
Step 5 – Create a user interface
In this step you will define a drawMelody() function that draws buttons that resemble piano keys across the canvas. Each button corresponds to a specific musical note represented by a p5.Oscillator object in the oscillators array. Since each there are 8 oscillator objects in the oscillators array and 8 musical note frequencies in the frequencies array, there will be 8 buttons drawn across the canvas.
Define global variables that hold the number of notes available for users in
numNotes, and the width of the canvas incWidth. Add the following code abovesetup():// number of notes that can be played (equal to the number of frequencies/oscillators) let numNotes = frequencies.length; // canvas width let cWidth = 400;Replace the width dimension in
createCanvas()withcWidthand set the color mode to HSB.
Your global variables and setup():
//...other variables
    // number of notes that can be played (equal to the number of frequencies/oscillators)
let numNotes = frequencies.length;

// canvas width
let cWidth = 400;
function setup() {
createCanvas(cWidth, 400);
// Initialize oscillators and place in oscillators array.
for (let freq of frequencies) {
osc = new p5.Oscillator(freq);
oscillators.push(osc);
}
//set color mode to HSB (better for using notes to color keys)
colorMode(HSB);
}
cWdith and numNotes will be used to calculate the x-coordinate for each button on the canvas. Each button will change color, using HSB color mode, as a note plays, and will return back to a default color when a note is not playing.
In this example, you will draw a row of rectangular buttons on the canvas that behave like keys on a piano. Each key corresponds to a note in the C Major Scale. The keys change color when the note that matches a specific key is played. Each button (keys) represents a note in C Major, and appears on the canvas arranged in the order of increasing pitch.
- Define a function called
drawMelody()that draws buttons for each note on the canvas in a row. - Define a local variable named
keyWidthand initialize it withcWidth/numNotesminus the width of each key. - Define a local variable
keyWidthfor x and y coordinates for each button using a for loop:yis a fixed value-
xis dependent on the index variableiand thekeyWidth - Use
x,y, andkeyWidthto draw rounded rectangle keys across the canvas.
Your drawMelody() function should look like this:
    // User Interface
function drawMelody() {
  // width of each key
  let keyWidth = cWidth/numNotes;

  // Loop for the number of notes available
  for (let i = 0; i < numNotes; i ++) {
    //set x for each element
    let x = i * keyWidth;
    let y = keyWidth*3; // y 3x width

    // Draw a rounded key.
    rect(x, y, keyWidth, keyWidth*2, 10);
  }
}
- Add
drawMelody()to thedraw()function, and click the canvas with your mouse! Observe how the colors don’t change yet!
Step 6: Add visual feedback
drawMelody() generates a color for each but that represents a note. Each time a note is played, its corresponding key will change in a color. This creates a visually pleasing element to the experience. The map() function can be used to to set the color for each button in HSB color mode as it is playing using the index of each note in the oscillators array.
Add the following code to
drawMelody()beforerect()://Check if the oscillator[i] has started playing if (oscillators[i].started) { // true: define a local variable h, using map(), numNotes and i // Set the color of the key using map() let h = map(i, 0, numNotes, 0, 360); // use h in fill fill(h, 100, 100); } else { fill("white"); }
Your drawMelody() function should look like this:
    // User Interface
function drawMelody() {
  // draw rectangular buttons
  let keyWidth = cWidth/numNotes;

  // Loop for the number of notes available
  for (let i = 0; i < numNotes; i ++) {
    // set x for each element
    let x = i * keyWidth;
    let y = keyWidth*3; // height 3x width

    // Check if the oscillator[i] has started playing
    if (oscillators[i].started) {
      // true: define a local variable h, using map() and numNotes
      // Set the color of the key  using map()
      let h = map(i, 0, numNotes, 0, 360);

      // use h in fill
      fill(h, 100, 100);
    } else {
      fill("white");
    }

    // Draw a rounded key height double the width.
    rect(x, y, keyWidth, keyWidth*2, 10);
  }
}
- Test your code by clicking the canvas! You should see a row of keys that become colorful as notes play!
Your code should look like this Change the range in the For example, mapping to map() function. You can alter the range from 0, 360 to a different range in the map(n, 0, numNotes, 0, 360) line within drawMelody(). This will change the spectrum of hues that the notes are mapped to.50, 250 instead of 0, 360 will use a different segment of the color spectrum.
To prepare for the next step, consider reviewing p5.Elements such as createP(), createSelect(), createInput(), and createButton(). Also consider reviewing the MDN reference for DOM elements and html elements.
You can also review how to use and modify DOM objects by visiting the Creating and Styling HTML tutorial.
Step 7 – Add user input to customize melodies
Now that we have a sketch that will play a melody and display visuals as sounds play, we can add DOM elements and canvas interactivity to help users customize their melody objects. DOM elements are HTML elements that we can include in p5.js web apps.
Melody objects have 3 properties that can be customized: name, notesIndex, and tempo. Users also can interact with a button to playback the melody. Let’s start by adding a play button!
Step 7.1 - Add a play button
Erase the mousePressed() function from your code and call createButton() to create a button to play the melody. We can add DOM objects, such as buttons, to our project in setup():
Call
.position(x, y)to position the button on your app.Call
.mouseClicked(play)to call theplay()function when the user clicks on the button.Add this code to
setup():
// Play button. let playButton = createButton(’🎵 Play your song when you are done! 🎶’); playButton.position(cWidth * 0.2, 540); playButton.mouseClicked(play);
Your setup function might look like this:

```js
function setup() {
  createCanvas(cWidth, 400);

  // Initialize oscillators and place in oscillators array.
  for (let freq of frequencies) {
    osc = new p5.Oscillator(freq);
    oscillators.push(osc);
  }

  // set color mode to HSB (better for using notes to color keys)
  colorMode(HSB);

 // Play button.
 let playButton = createButton('🎵 Play your song when you are done! 🎶');
 playButton.position(cWidth * 0.2, 540);
 playButton.mouseClicked(play);
}
- Test your button to see if it works!
Step 7.2 - Customize tempo
Let’s add a dropdown menu with a list of tempos that the user can choose from. The value that they select will update the melody objects they are playing. Let’s start by placing some instructions on the app on what to do with the dropdown menu.
- Use
createP()to create a paragraph that prompts users to set their tempo. Use.style()and.position()to style and position the paragraph element.Add this code in
setup():// Text to prompt users to set tempo let p = createP('Step 1: Select tempo!'); p.style("color", "magenta"); p.position(10, 415);
To add a dropdown menu with tempo options, we’ll need an array, tempoList, with values they can choose from (measured in bpm). We will also need a variable that stores the dropdown menu DOM element.
Add this code before
setup():// Tempo selection list (in beats per min). let tempoList = [ "100","110","120", "130", "140", "150", "160","170","180", "190", "200", "210", "220","230", "240", "250", "260","270", "280", "290", "300" ]; // Variable for tempo dropdown. let tempoSelect;
We can add DOM objects, such as dropdown menus, to our project in setup():
Use
createSelect()to create a dropdown box and store it in a variable calledtempoSelect. Set the location of the dropdown box with.position(). Set the first option to the index0using.option()Add this code in
setup():// Tempo dropdown. tempoSelect = createSelect(); tempoSelect.position(10, 455); tempoSelect.option(0);
Use a
forloop to populate the dropdown options by adding this code insetup():// Add tempos to dropdown options. for (let tempo of tempoList){ tempoSelect.option(tempo); }Test the dropdown to make sure the tempo list is correctly populated.
Declare a custom function
setTempo()that will set themelody.tempoandnoteDurationof a melody object based on the user’s choice from the dropdown menu.First, check that the tempo selected is not 0 (the default value).
If not 0 then update
melody.tempoandnoteDurationDo this by adding this code outside of
setup():// Sets tempo of melody object function setTempo() { // Check that the tempo choice isn’t 0 if (tempoSelect.selected() !== 0) { melody.tempo = tempoSelect.selected(); noteDuration = 60 / melody.tempo; } }
Use
.changed()to callsetTempo()when users select a tempo by adding this code insetup():// Call setTempo() when selected. tempoSelect.changed(setTempo);Display the Melody’s tempo on the canvas.
Add this code in
draw():// Display melody tempo fill("magenta") textSize(20) text(`Tempo: ${melody.tempo}`, 300, 50);
Confirm that
setTempo()works by changing the tempo using the dropdown, then pressing the play button.
Your code could look like this example.
Step 7.3 - Customize names
We will add some instructions for users on how to name their melodies, along with a text input box to type their melody names, and a button to update the melody object’s name.
Use
createP()to create a paragraph that prompts users to set the name of their melody, then use.style()and.position()to style and position the paragraph.Add the following code in
setup():// Directions to input text. let p2 = createP('Step 2: Type a name for your melody and click "Set name"'); p2.style("color", "magenta"); p2.position(10, 455);Use
createInput()to create a textbox for users to enter a melody name, then use.position()and.size()to position and resize it.Add the following code in
setup():// Name of song input nameInput = createInput("Type a name and set");
nameInput.position(10, 490); nameInput.size(200);
- Use `createButton()` to create a button for users to set the melody name. Use `.position()` to place it on the app. Use `.mouseClicked()` to call `setName()` when the button is clicked.
- Add the following code  in `setup()`:

```js
// Name button.
let nameButton = createButton('Set name');
nameButton.position(250, 490);
nameButton.mouseClicked(setName);
Define a function called
setName()to update themelody.nameproperty with the value of the text input field.Add this code outside of
setup():// Set name of melody function setName(){ melody.name = nameInput.value(); }
Display the Melody’s name on the canvas.
Add this code in
draw():// Display melody name fill("magenta") textSize(20) text(`Melody Name: ${melody.name}`, 50, 50);
Your project should look similar to this example.
Step 7.4 - Add a refresh button
Create a button that resets the melody object so that the user can populate a new melody object. Resetting the melody object allows users to begin composing a new melody by clearing all of its properties. As a result users can start their melody with an empty melody object. An empty melody object looks like the following:
    // Empty melody object
let melody = {
  name: "",
  notesIndex: [],
  tempo:0,
  duration: 0
};
- Declare a function that resets the melody object called
resetMelody()by adding the following code outside of all other functions:
    // Reset melody object
function resetMelody() {
 // Reset melody object properties
  melody.name =  "";
  melody.notesIndex = [];
  melody.tempo = 0;

  // Reset tempo dropdown
  tempoSelect.selected(0);
}
- Use
createButton()to create a button for users to reset the melody object. Use.position()to place it on the app. Use.mouseClicked()to callsetName()when the button is clicked.Add the following code in
setup():// Reset button let resetButton = createButton('Reset Melody'); resetButton.position(150, 580); resetButton.mouseClicked(resetMelody);
Your project should look similar to this example.
Step 8: Add interactive keys
Add interactive mouse presses to each key on the canvas by declaring a function called updateMelody(). This function plays notes that match the key that is pressed on the canvas, and adds the notes to melody.notesIndex. In updateMelody():
Define a local variable
keyWidthfor x and y coordinates for each button using a for loop. We will use the same code we used to generate each key in the user interface during Step 5.updateMelody()should look like this:// save notes based on rectangles on the screen function updateMelody() { // width of keys let keyWidth = width / numNotes; // Loop over each key for (let i = 0; i < numNotes; i++) { //set x and y for each element let x = i * keyWidth; let y = keyWidth * 3; } }
Add a conditional statement that checks if the mouse is hovering over the boundaries of each key, saves the specific note in the local
notesvariable, uses the.push()array method to add the note tomelody.notesIndex, and plays the note.Add the following code in
updateMelody():// Check if the mouse is over the key if (mouseX > x && mouseX < x + keyWidth && mouseY > y && mouseY < y + keyWidth * 2) { //save notes index array let notes = melody.notesIndex; //add new note index to the array notes.push(i); //reassign to melody object melody.notesIndex = notes; //play note at that index playNote(i); }
Replace the function call in
mousePressed()with a call to theupdateMelody()function.
updateMelody() and mousePressed() should look like this:
//update melody object when canvas clicked
function mousePressed() {
updateMelody();
}
//save notes based on rectangles on the screen
function updateMelody() {
//width of keys
let keyWidth = width / numNotes;
//Loop for the number of notes available
for (let i = 0; i < numNotes; i++) {
//set x and y for each element
let x = i * keyWidth;
let y = keyWidth * 3;
    // Check if the mouse is over the key
if (mouseX > x &&
    mouseX < x + keyWidth &&
    mouseY > y &&
    mouseY < y + keyWidth * 2) {

  //save notes index array
  let notes = melody.notesIndex;

  //add new note index to the array
  notes.push(i);

  //reassign to melody object
  melody.notesIndex = notes;

  //play note at that index
  playNote(i);
}
}
}
For a more seamless user experience, replace the melody object for the C Major Scale with an empty melody object. This will start your Simple Melody App with an empty melody object so users can begin composing their own melodies!
Final Simple Melody App Example
Next Steps:
- Follow Getting Started with Node.js to enable users to save and replay melodies from their computers.
Resources
Coding Train: Sound Synthesis p5.js Tutorial
Science resources
- Sound - definition
- Particle Theory of matter
- What does sound look like? - video
- Sound is a pressure wave
- Pressure waves and cycles
- Sound waves and the eardrum
- Sine waves
- Categories of waves
- Pitch and frequency
Music Resources
- Music - definition
- What is Melody?
- Musical note
- What is an oscillator?
- Amplitude and Frequency
- Understanding note frequencies
- What’s synthesis and sound design? - video
- What are musical frequencies?
- Music note frequency chart
- Middle C
- C Major
- Note duration
- What is tempo?
- List of musical scales
- Musical scales and frequencies
- What is an octave?
- Understanding rhythm
Programming Resources