Follow this tutorial to create an animated landscape as you learn the basics of variables and creating motion in p5.js.
In this tutorial you will:
- Declare, initialize, and update variables in a p5.js sketch
- Use variables, operators, and random() in p5.js shape functions to create motion on the canvas
- Add both linear and random motion in a p5.js project
Prerequisites:
Before you begin, you should be able to:
- Log in to the p5.js Web Editor and save a new project
- Change the canvas size and background color
- Add and customize shapes and text
- Add simple interactivity using
mouseXandmouseY - Comment code
- Read and address error messages
Step 1: Choose where to start
Log in to the p5.js Web Editor and choose one of the following options:
- If you followed our previous Get Started Tutorial:
- Duplicate your interactive landscape and give it a new name.
- Open your interactive landscape, click File, then Duplicate.
- Change its name to something like “Animated Landscape.”
- Skip to Step 3.
- Duplicate your interactive landscape and give it a new name.
- If you are starting from scratch:
- Use this template that contains code that helps you position shapes and text on the canvas:
- Duplicate the template and give it a new name.
- Open this template link, click File, then Duplicate.
- Change its name to something like “Animated Landscape.”
- You can also open a new p5.js project without the template, name it “Animated Landscape,” and save it.
Copy the following lines into the
draw()function if you want to use the helper code://displays the x and y position of the mouse on the canvas fill(255) //white text text(`${mouseX}, ${mouseY}`, 20, 20);
Click Play and check the box next to “Auto-refresh” on the p5.js Web Editor to continuously update the canvas as you add more code to your project. With this box checked, you won’t need to press the Play button every time you make changes to your sketch.
If you duplicated the template, your code should look like this:
The line of code To keep this text shown, make sure this code appears on the last lines in Don’t forget: The last line of code in your program should be text(`${mouseX}, ${mouseY}`, 20, 20); displays the x- and y-coordinates for your mouse pointer as a coordinate pair x, y. The first number, the value in the variable mouseX, represents the x-coordinate of your mouse pointer as it moves across the canvas. The second number, the value in the variable mouseY, represents the y-coordinate of the mouse pointer.draw(). You may need to change the color of the text by changing the value in fill() if it blends in with the background. When you do not need the coordinates anymore, type // before the fill() and text() functions. This tells the program to skip those lines of code by hiding them as comments! } (a closing curly bracket), which closes the block for the draw() function.
Visit this reference or watch this video to learn more about comments.
Variables
Variables store values in them that we can use in our sketch. Variables are very helpful when adding elements to your sketch that will change over time. They can be used in calculations, messages, as function arguments, and so much more!
mouseX and mouseY are variables that are built into the p5.js library. They store the x- and y-coordinates of the mouse pointer as it is dragged over the canvas. In the Get Started tutorial, you created an interactive landscape where mouseX and mouseY were used as x- and y-coordinates of a ladybug or other emoji. This allowed the emoji to follow the mouse pointer as it was dragged across the canvas, making your artwork interactive!
In the template above, you use mouseX and mouseY to print the x- and y-coordinates of the mouse on the canvas using the text() function. Variables can be displayed on the canvas alongside text using the text() function and string interpolation (example 2).
String Interpolation
In Get Started, you learned that strings are data types that are always surrounded by quotation marks (""). To use variables and strings together, we can use template literals to help us! Template literals begin and end with backticks (`) instead of quotation marks (""). You can type any character in between the backticks to generate a string like in this example. You can include a variable in the string using the ${} placeholder, and by placing the name of the variable inside the curly brackets like in this example.
Visit string interpolation (example 2), template literals, or the p5.js reference page for string to learn more! Variables with numbers in them can be used as arguments where numbers are required. If a variable that stores a string is used where a number should be, the console will show an error message like “...was expecting Number for the first parameter, received string instead.” Visit the Error Messages section in the Field Guide to Debugging for some common errors and how to fix them!
Step 2: Create a background landscape
- Color the background.
- Add and color landscape shapes (a sun or moon, mountains, buildings, houses, trees, etc.)
- Add comments that describe each section of code.
See Steps 4 - 6 in Get Started for more information on how to use color and shapes on the canvas.
Your code could look like this:
The code above uses circle() and triangle() shapes to create objects in the landscape, and fill() and stroke() to color shapes and outlines.
background()is used to change the color of the canvas background.draw()executes code over and over again. This allows for shapes that appear last indraw()to overlap with shapes that come first if they are placed close together.- The crescent moon was created by overlapping two
circle()shapes.- This example uses two circles that overlap to create a crescent moon.
- The mountains were created using two overlapping
triangle()shapes (see diagram below).- This example shows how you can use triangles that overlap to create a mountain with some more detail.
- The crescent moon was created by overlapping two
triangle()needs the location of 3 points on the canvas in order to appear. Each point has an x-coordinate and a y-coordinate value. The first two numbers are the x- and y-coordinates of the first point (x1, y1), the second two numbers are the coordinates of the next point (x2, y2), and the last two are the coordinates of the last point (x3, y3).
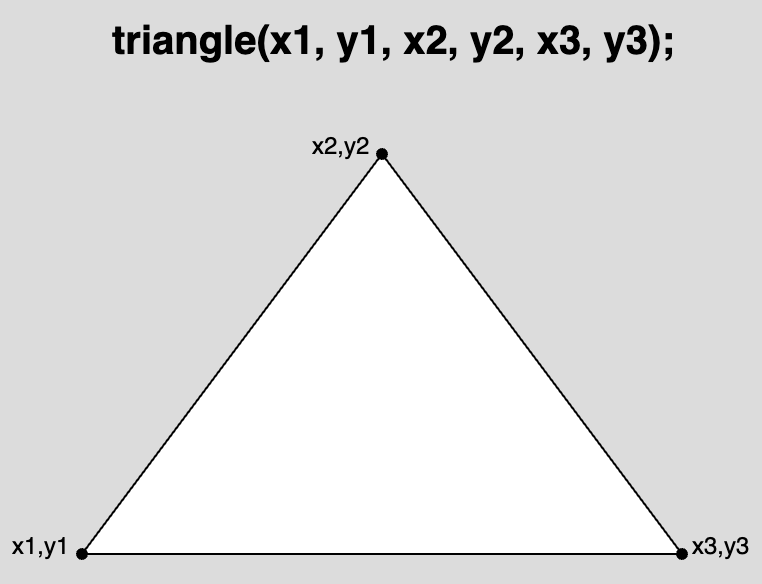
A labeled diagram depicting a triangle with coordinates labeled for its three corners: (x1, y1), (x2, y2), and (x3, y3). The syntax for the triangle function is displayed above the diagram as: "triangle(x1, y1, x2, y2, x3, y3);"
Your landscape may look very different from the code sample above. Feel free to use any of the following shapes in your sketch (click on the links to learn more): rect() | triangle() | ellipse() | circle() | line() | square() | quad() | point() | arc()
Visit the following resources to learn more about using shapes and colors in your projects: fill() | stroke() | background() | draw()
Be sure to avoid common errors highlighted in the Field Guide to Debugging and this video from The Coding Train.
Step 3: Draw shapes using custom variables
Place a white cloud in the sky on your canvas using the
ellipse()Add these lines of text directly under the code for the grass:
    //cloud
fill(255);
ellipse(50, 50, 80, 40);
Create a custom variable named
cloudOneXand store the number 50 in it – this variable will store the value for the x-coordinate of the white cloud throughout the program.Add these lines of text before
setup()://custom variable for x coordinate of cloud let cloudOneX = 50;
Replace the x-coordinate in
ellipse(50, 50, 80, 40);with thecloudOneXvariable.This line of code should now look like this:
ellipse(cloudOneX, 50, 80, 40);
Your code can look like this:
ellipse() needs 4 numbers in order to appear on the canvas. The first two numbers (x, y) are the x- and y-coordinates of the center point. The last two numbers describe the pixel width and height of the ellipse.
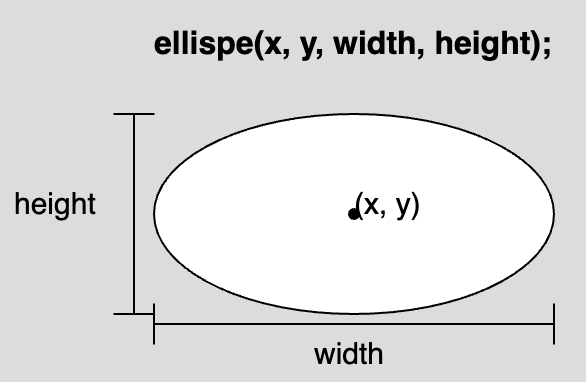
A diagram of an ellipse with labels for width, height, and a center point at (x,y). The syntax for the ellipse function is displayed above the diagram as: “ellipse(x, y, width, height);”.
In the code above, the cloud is drawn using ellipse() with cloudOneX (which stores the number 50) as its x-coordinate, 50 as a y-coordinate, a width of 80 pixels, and a height of 40 pixels.
Custom Variables
Custom variables store values, like numbers or strings, that can change later. Since custom variables store values that can change, we can use them to change the x- or y-coordinates and size of shapes on the canvas. When the x- or y-coordinate of a shape changes, it appears to be moving. In this step:
- you placed a white cloud on the canvas using
ellipse()with the number 50 as an x-coordinate; - you declared a custom variable named
cloudOneXbeforesetup();- When you want to create custom variables to use in your program, you must give them a name and declare them by using the keyword
let. - You can declare a variable using any name; however, it is best to use a name that will help you remember what the variable is used for!
- When you want to create custom variables to use in your program, you must give them a name and declare them by using the keyword
- you initialized
cloudOneXby assigning it the number 50.- A value can be stored in a variable using the assignment operator (
=) – it assigns a value to a specific variable. - When a value is stored in a custom variable for the first time, it is called initializing the variable.
- A value can be stored in a variable using the assignment operator (
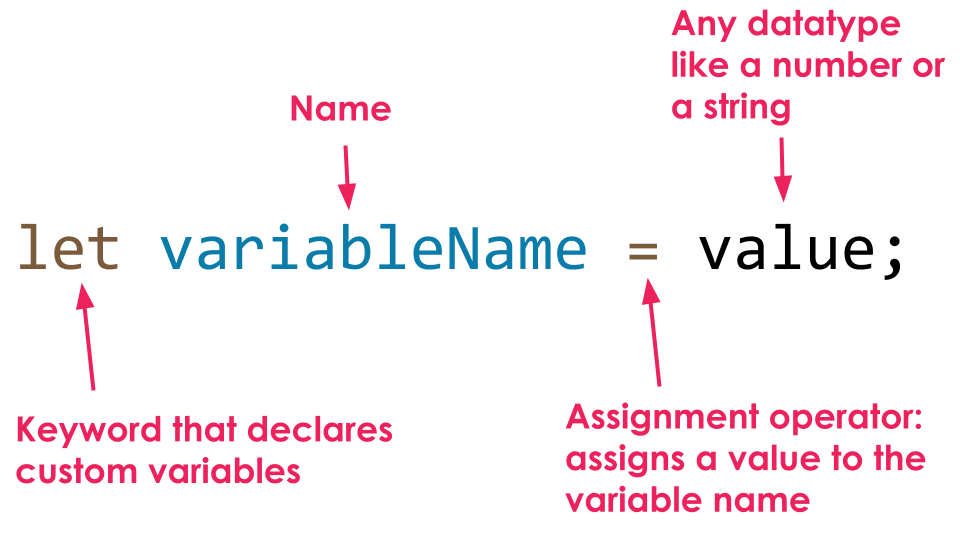
A diagram labeling parts of the JavaScript syntax for initializing and declaring a variable: “let” is labeled as the “keyword that declares custom variables”, “variable name” is labeled as “name”, “=” is labeled as an “assignment operator” that “assigns a value to the variable name”, and “value” is labeled as “Any data type like a number or a string”.
Finally, you can use the variable name cloudOneX as the argument for the x-coordinate in ellipse(). Since the variable cloudOneX has the number 50 stored in it, we can use cloudOneX as an argument in any function that requires a number. Here, you used it as the x-coordinate of the white cloud by replacing the number 50 with the variable name cloudOneX: ellipse(cloudOneX, 50, 80, 40);.
Variable Scope
A variable’s scope describes where the variable can be used in a program. It is often useful to declare custom variables outside of setup() and draw() because it allows the variables to have a global scope. A variable with a global scope can be used anywhere in the program. Global variables are often declared on the very first lines of code. This helps programmers get an understanding of what is changing, makes the code easier to maintain, and avoids confusion further down in code. Built-in variables such as mouseX, mouseY, width, and height do not have to be declared because they are built into the p5.js library, and you can use them anywhere in your code because they have global scope!
Variables declared inside of other functions (like draw() and setup()) have local scope – which means they can only be used within the block or function where they are declared. Variables declared in setup() cannot be used in draw() or any other function, and variables defined in draw() cannot be used in setup(). View this example of global and local variable scope.
Visit these p5.js reference pages to learn more about declaring, initializing, and using custom variables: let, numbers, & strings.
Using Variables for Animation
A shape on the canvas appears to be moving when its x- or y-coordinates change. We can use variables in place for the x- or y-coordinates of anything that appears on the canvas. In the example:
- Change the value stored in
cloudOneXby replacing the value it is initialized with and observe changes in the white cloud on the canvas.- If the value in
cloudOneXincreases, the white cloud appears to be moving to the right. - If the value in
cloudOneXdecreases, the white cloud appears to be moving to the left.
- If the value in
In the next step, we will change the value in cloudOneX so that the cloud appears to be moving horizontally on the canvas.
Step 4: Add horizontal motion,
In the line under the white cloud, add these lines of code:
    //sets the x coordinate to the frame count
//resets at left edge
cloudOneX = frameCount % width
Your code can look like this:
In the step above, you set cloudOneX to the value of frameCount % width. Recall that draw() runs over and over again, in a loop:
frameCountis a built-in variable that saves the number of timesdraw()runs. This value continues to increase as long as your program is running.- See this example to view the values stored in
frameCount.
- See this example to view the values stored in
widthis a built-in variable that stores the width of the canvas defined increateCanvas(). We can see that in this example, thewidthis 400 and theheightis 400.%is the remainder operator (also referred to as modulo) – it divides a number on the left (frameCount) by a number on the right (400), and returns the remainder. Refer to the table below, which displays howframeCountandframeCount % widthchange while the program is running (whenwidthis 400):
|
|
|---|---|
0 | 0 |
100 | 100 |
300 | 300 |
400 | 0 |
500 | 100 |
700 | 300 |
800 | 0 |
- For
cloudOneX = frameCount % width:- If
frameCountis less than 400,frameCount % widthwill return the value inframeCount.- For example: when
frameCountis 40, thenframeCount % widthwill return 40 and store it incloudOneX.
- For example: when
- As
frameCountincreases, new values will be stored incloudOneX, and the white cloud will appear to move to the right (a higher x-coordinate). - When
frameCountis equal towidth,frameCount % widthwill return 0. This will reset the position of the cloud back to the x-coordinate 0 – the left edge of the canvas. - When
frameCountis greater thanwidth,frameCount % widthwill return the values inframeCountagain.- For example: when
frameCountis 440, thenframeCount % widthwill return 40 and store it incloudOneX.
- For example: when
- When
frameCountreaches any multiple ofwidth,frameCount % widthwill be 0 and it will appear as if the cloud has reset its position back to the left edge of the canvas (where the x-coordinate is 0).
- If
When the program runs:
cloudOneXis declared and initialized with a value of 50.setup()runs and creates a canvas with awidthof 400 pixels.- The first time
draw()runs:- the background and all shapes on the landscape are drawn on the canvas;
- the cloud is drawn with an x-coordinate
cloudOneX(which stores the number 50); cloudOneXstores the remainder in the operationframeCount % width.
- The second time
draw()runs:- all shapes are covered when the background and landscape are drawn on the canvas again;
- a new cloud is drawn on top with the new value for
cloudOneX, creating the illusion that it has moved from an x-coordinate of 0 to 400, then resets; - this pattern continues until
draw()is stopped.
See this example, which displays values for frameCount and frameCount % width as shapes move across the canvas. Visit the Remainder reference on MDN to learn more!
Animation and draw()
The draw() function runs code repeatedly and behaves much like a flipbook when animating a series of still drawings.
- Example of a flipbook animation
Each time draw() reads the lines of code for the background and landscape shapes, it covers anything drawn on the canvas the previous time draw() ran. This makes it appear as if we flipped to the next page in our flipbook when things on the canvas change each time draw() runs.
- This example shows the changes in the x-coordinate of a circle as it moves horizontally on the canvas.
- This example shows the changes in the y-coordinate of a circle as it moves vertically on the canvas.
- This example shows changes to the size of a circle as the program runs.
- These examples show how new shapes are drawn at a new location every time the
draw()function runs: horizontal motion | vertical motion | random motion- In these examples,
background()is removed to eliminate the “flipbook” illusion thatdraw()provides. Now we can see every new shape drawn because the background is not there to cover it.
- In these examples,
Visit the p5.js reference for draw() for more information.
frameRate(), frameCount and console.log()
The number of times draw() runs is stored in the variable frameCount, and the number of times draw() runs in 1 second is known as the frame rate. By default, the frame rate is set by your computer, which is about 60 for most computers. This indicates that the code appearing in draw() will run about 60 times in a second.
We can set and display the value for draw()’s frame rate using the frameRate() function. We can view the value for the frame rate and frameCount using console.log() to display the values and messages in the console.
- This example shows a random circle animation and prints the frame rate in the console.
- This example shows a random circle animation, sets the frame rate to a new value, and displays it in the console.
For more information, visit the following p5.js reference pages: frameRate() | frameCount | console.log()
Step 5: Add more moving clouds & change frame rate
- Slow down the animation by setting the frame rate to 15:
- Add this in the line under
background():frameRate(15); //set frame rate to 15
- Add this in the line under
- Repeat Step 4 to add more clouds to your landscape with different x and y values.
You can add this text under the first cloud:
    ellipse(cloudOneX - 40, 100, 60, 20);
ellipse(cloudOneX + 20, 150, 40, 10);
Your code can look like this:
In the step above, you added:
- A second cloud at an x-coordinate
cloudOneX - 40and y-coordinate100- This draws a second cloud 40 pixels to the left and 20 pixels below the first cloud.
- A third cloud at an x-coordinate
cloudOneX + 20and y-coordinate150- This draws a third cloud 20 pixels to the right and 70 pixels below the first cloud.
Here, we used cloudOneX as a reference point – the point used as a guide when placing shapes on the canvas that move together.
- This example illustrates how a reference point (x, y) can be used to change the location of multiple shapes at once.
Step 6: Add vertical motion
Add a tree (or another object) to the landscape that moves vertically (up or down).
Draw a tree on the canvas.
Add this text in between the code where the clouds are drawn and the code where variables increase:
    //growing tree
//trunk
fill("rgb(118,80,72)");
rect(40, 270, 15, 50);
//leaves
fill("green");
triangle(25, 270, 45, 240, 70, 270);
Subtract the top angle of a triangle that draws leaves (240) by
frameCount % 290:Modify the value for y2 in the triangle above by subtracting it by
frameCount % 290://leaves fill("green"); triangle(25, 270, 45, 240 - frameCount % 290, 70, 270);
Add more trees that grow the same way.
Add this line of text under the first tree:
    //trunk
fill("rgb(118,80,72)");
rect(340, 330, 15, 50);
//leaves
fill("green");
triangle(325, 330, 345, 240 - frameCount % 290, 370, 330);
Your code can look like this:
In this step, you:
- added a tree made of a rectangle (tree trunk) and a triangle (leaves);
- modified the value for the y-coordinate of the top corner of the triangle (
y2) by subtracting it byframeCount % 290(see triangle() Diagram for a reminder ofy2):- Since you want the tree leaves to grow, the top corner of the triangle needs to move up on the canvas each time
draw()runs. As seen in this example, the y-coordinate (y2) of the point that moves up on the canvas decreases. - To achieve this motion, you modified the value for
y2by subtracting240 - frameCount % 290. This decreasesy2by the remainder whenframeCountis divided by 290. - As you saw in Step 5, each time the
draw()function runs, the value returned byframeCount % 290increases by1so thaty2also changes.- Before
draw()runs,y2is240. - The first time
draw()runs, the value fromframeCount % 290is1, andy2becomes239. - The second time
draw()runs, the value fromframeCount % 290is2, andy2becomes238. - The third time
draw()runs, the value inframeCount % 290is3, andy2becomes237. - Once
frameCountbecomes a number that is a multiple of290, the value inframeCount % 290is0, andy2is set back to its original value of240. - This pattern continues until
draw()is stopped.
- Before
- Since you want the tree leaves to grow, the top corner of the triangle needs to move up on the canvas each time
Visit the following p5.js reference pages for more information: frameRate() | frameCount | triangle()
Step 7: Add random motion
Add shooting stars that appear at random locations in the sky.
Declare two variables,
lineXoneandlineYone, and initialize them with0by adding these lines of text beforesetup()://custom variable for shooting stars let lineXone = 0; let lineYone = 0;
Draw a line that will represent a shooting star by adding this text under
frameRate(15)://shooting star stroke("yellow"); line(lineXone, lineYone, lineXone + 30, lineYone - 30);Set
lineXoneandlineYoneto random values by adding this text after the line of code wherecloudOneXis assigned toframeCount % width://set shooting star to random location lineXone = random(0, width); lineYone = random(0, height/2);Delete the lines of code at the bottom of
draw()that show the x- and y-coordinates of the mouse pointer to view your final project.Share with your friends!
Your code should look like this:
In the step above, you created two new variables, lineXone and lineYone, which are used to draw a line representing a shooting star in the sky. The line is drawn using the line() function (see diagram below).

A diagram of a line with endpoints (x1,y1) and (x2, y2). The syntax for the line function is displayed above the diagram as: “line(x1, y1, x2, y2);”.
line() needs 4 numbers to appear on the canvas. The first two numbers are the coordinates of the first point (x1,y1) – x1 is the x-coordinate and y1 the y-coordinate. The last two numbers are the coordinates of the second point (x2,y2), where x2 is the x-coordinate and y2 is the y-coordinate.
Visit the p5.js reference page for line() to learn more.
In this project, you drew a line that begins at a point (lineXone, lineYone), where x1 is the value stored in lineXone and y1 is the value stored in lineYone. The line ends at a point (30, lineXone + 30), where x2 is 30 pixels to the right of x1 and y2 is 30 pixels above y1.
By using x1,y1 to modify values for x2,y2, both ends of the line can move in the same way. This allows for the line to move around the canvas without changing its shape as lineXone and lineYone change.
- View this example to see how the line moves around the canvas as x1,y1 changes.
- View this example to see how the line changes as the distance between points changes.
random() is used to generate random numbers between a minimum and maximum value. You used it to reassign lineXone and lineYone to random numbers, placing them in random positions within the sky of your landscape.
Examples using random():
Visit the p5.js reference page for random() to learn more about how random numbers are generated.
When draw() runs:
- The background is set.
- The shooting star is placed on the canvas along with the rest of the landscape, and
cloudOneXis changed. lineXoneis changed to a random number between0andwidth(so that it always appears on the canvas).lineYoneis changed to a random number between0andheight/2.height/2indicates that the shooting star can only appear on the top half of the canvas.
When draw() runs again, the same process occurs, and the shooting star is placed at a new random location within the top half of the canvas. This continues until draw() is stopped.
Error Messages
p5.js uses the console to communicate with programmers about lines of code that it does not understand. These are called error messages. Programmers use this to locate and fix “bugs” in their code. Read the Field Guide to Debugging or watch this video to learn more!
Next Step
Previous Steps
Resources
- Guidelines for writing JavaScript code
- Template Literals
- Remainder (
%) - String Interpolation in JavaScript